Authentication and Directory Servers
AAA Server Overview
Understanding the Role of AAA Servers in the access management framework
AAA stands for authentication, authorization, and accounting. A AAA server is a database that stores user credentials - username and password - and, in some cases, group information or other user attributes. The authentication results and the group or user attribute information is used by the access management framework for policy decisions.
In the access management framework, the sign-in page, realm, and AAA server configurations are associated. They determine user access and user role. A user submits credentials through a sign-in page, which specifies a realm, which is associated with a AAA server. If the access request meets the realm's authentication policy, the system forwards the user's credentials to the associated authentication server. The authentication server's job is to verify the user's identity. After verifying the user, the authentication server sends approval. If the realm also uses the server as a directory/attribute server, the AAA server sends the user's group information or other user attribute information. The access management framework then evaluates the realm's role-mapping rules to determine the user roles that apply to the session.
The access management framework supports the following types of AAA servers:
•Local - You can create special purpose local databases to manually create user accounts, permit anonymous access, or manage access based on digital certificates.
•External (standards-based) - You can integrate standards-based LDAP and RADIUS servers with the access management framework. In addition to using the backend server for authentication, you can use LDAP group and RADIUS attribute information in role-mapping rules.
•External (other) - You can integrate compatible versions of popular third-party AAA servers with the access management framework. In addition to using the backend server for authentication, you can use Active Directory group information in role-mapping rules. In addition, you can use MDM device attributes in role mapping rules.
The following table is a reference of the AAA servers supported in Ivanti Connect Secure deployments.
The following table lists the Supported AAA Servers:
|
Ivanti Connect Secure |
|
|
Local |
"Local Authentication Server"**, "Anonymous Server", "Certificate Server", "SAML Server"*** **No special features to manage guest users. ***Supports an authentication server configuration when deployed as a SAML service provider. Different Ivanti Connect Secure features support a local SAML server when deployed as a SAML identity provider. |
|
External (standards-based) |
"LDAP Server", "RADIUS Server" |
|
External (other) |
"Active Directory", "MDM Server", "RSA ACE Server" |
AAA Server Configuration Task Summary
To integrate an authentication server:
1.Configure the authentication server. Select Authentication > Authentication > Auth. Servers page and complete the authentication server configuration.
2.Create an authentication realm. Select Users > User Realms or Administrators > Admin Realms and select the authentication server when you complete the authentication realm configuration.
AAA Traffic Management
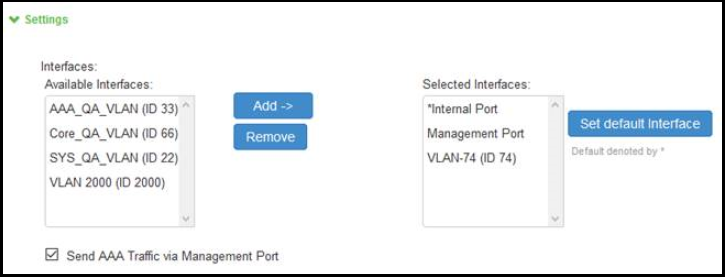
Ivanti Connect Secure Virtual appliances and Appliances allow the administrator to choose the communicating interface or the network for each authentication server.
This feature allows the AAA traffic across the following interfaces:
•Physical Internal
•Physical External
•Physical Management
•Virtual ports for Physical Interfaces
•VLAN ports
•Virtual Ports on VLAN Interfaces
This feature allows to connect to remote supported authentication servers through any interfaces based on the network Topology.
The following Authentication server types are supported:
•LDAP
•Active Directory
•RADIUS
•CRL and OCSP traffic flow
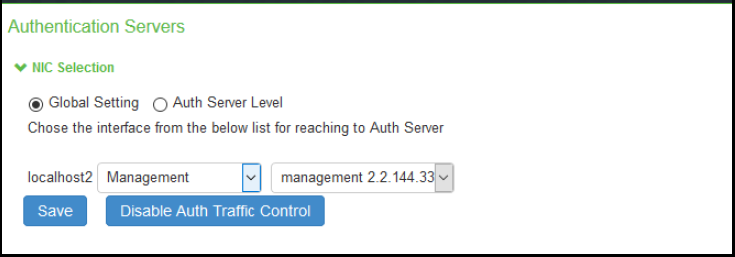
Configuring AAA Traffic Management Across Interfaces
1.Select Authentication > Auth Servers and configure service provider AAA configurations as needed.
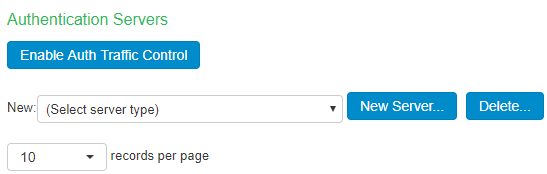
2.Click Enable Auth Traffic Control A new window appears.
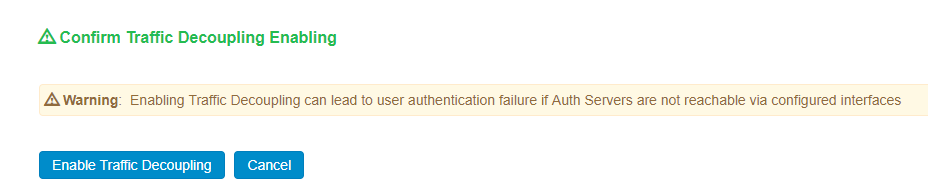
3.Click Enable Traffic Decoupling to confirm. The page navigates to the Auth server page that displays the options to configure the AAA traffic interfaces.
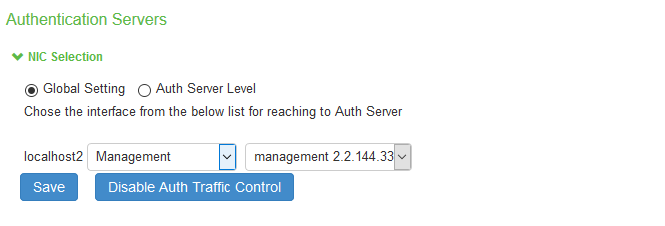
4.Select Global setting to use same interface across all supported authentication servers or select Auth Server Level to select the interface for a specific authentication server for the AAA traffic.
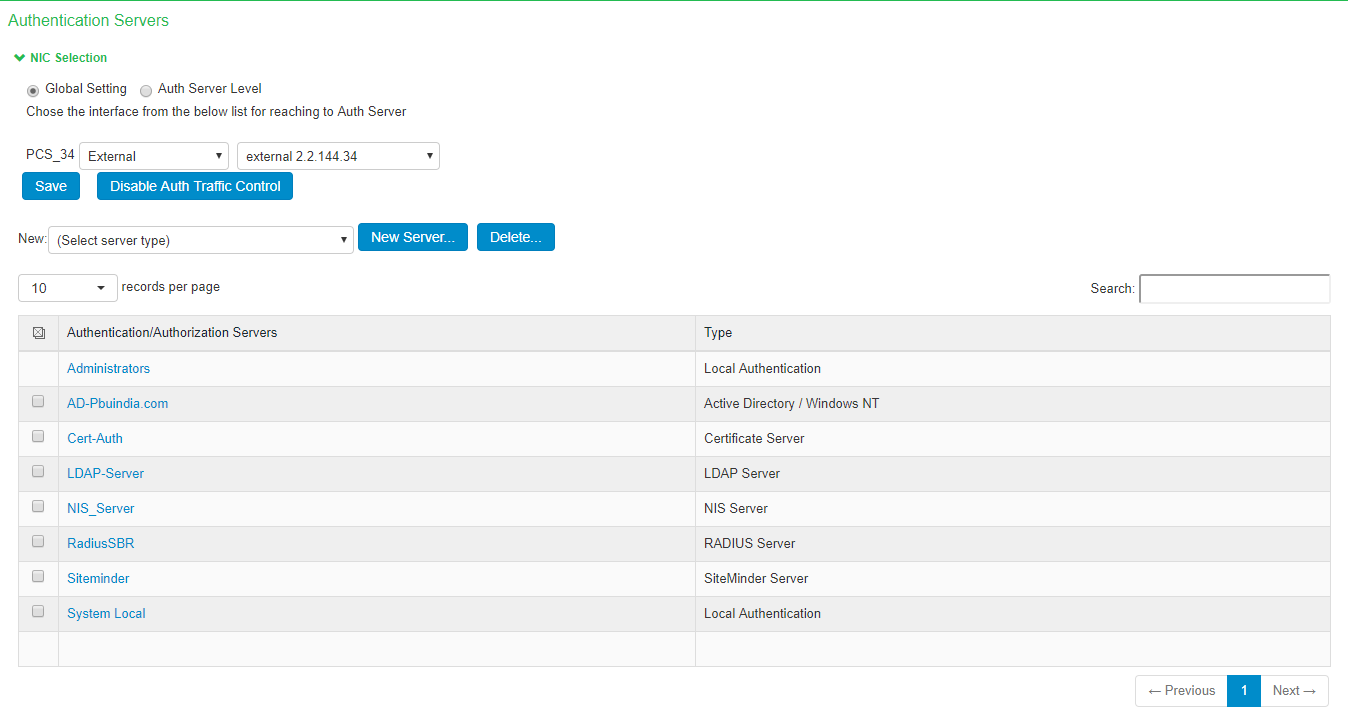
5.Select the required interface and port from the list.
For Clusters, select applicable interfaces and associated ports.
6.Click Save.
Upgrading from Previous Releases
The AAA traffic was routed through the management port. This option was available on both the Default Network and the Administrative Network.
The AAA traffic can be routed through Internal, External, Management, Virtual ports and VLAN ports. If Send AAA traffic via Management Port was enabled, then by default, immediately after upgrade, the AAA traffic is routed through the management port for all authentication servers as a global setting. The selected interfaces may be modified as required using the Global Settings or the Auth Server Level settings.
Configuring AAA Traffic Management on Upgrade
The Ivanti Connect Secure Interface had the option "Send AAA traffic via Management Port" as shown in figure under System > Traffic Segregation. This option routes the AAA traffic through the Management port by default.
If Send AAA traffic via Management Port was enabled, then the following changes are observed:
•The AAA traffic management options are available under Authentication > Auth. Severs.
•The AAA traffic management is enabled by default.
•The physical port is automatically set to Management port or default VLAN.
Using the Local Authentication Server
This topic describes the local authentication server.
Local Authentication Server Overview
This section provides an overview of the feature and its limitations.
Understanding the Local Authentication Server
The local authentication server is an authentication database that is built in to the system. Therefore, it is considered a "local" server in contrast to a third-party enterprise AAA server that is connected over the network.
Typically, you create local user accounts for temporary users who do not have accounts on your enterprise AAA servers. Temporary users include lab users or guests, but you might find the local authentication server useful to create temporary accounts for users who are normally verified by an enterprise AAA server that you plan to disable.
You also use the local authentication server to create accounts for administrator users, such as system administrators.
Although it is common practice to use the local authentication server for administrator accounts, it does not preclude you from using any of the supported third-party enterprise AAA servers in your administrator access management framework.
Configuring the Local Authentication Server
You can create multiple local authentication server instances. When you define a new local authentication server, you must give the server a unique name and configure options for passwords.
To create a local authentication server:
1.Select Authentication > Auth. Servers.
2.Select Local Authentication and click New Server to display the configuration page.
3.Complete the configuration as described in the following table.
4.Save the configuration.
The following table lists the Local Authentication Server Configuration Guidelines:
|
Settings |
Guidelines |
|
Name |
Specify a name that is useful to you. |
|
Password Options |
|
|
Minimum length |
Specify a number of characters. The valid range is 0-99. 6 is the default. |
|
Maximum length |
Specify a number of characters. The valid range is 0-99. 8 is the default. The maximum length cannot be less than the minimum length. |
|
Minimum digits |
Specify the number of digits required in a password. Do not require more digits than the value of the maximum length option. |
|
Minimum letters |
Specify the number of letters required in a password. Do not require more letters than the value of the maximum length option. If you enable the previous option, the combined total of the two options cannot exceed that of the value specified in the maximum length option. |
|
Uppercase and lowercase required |
Select this option if you want all passwords to contain a mixture of uppercase and lowercase letters. Require passwords to contain at least two letters if you also require a mix of uppercase and lowercase letters. |
|
Special Characters |
Select this option if you want password should contain any special characters |
|
Password Position |
Select this option to validate the new password with old password based on password position. Default is 8 positions, example: If previous password is test12345678, then change password cannot be aeph2345. The matched characters based on position are highlighted. |
|
Different from username |
Select this option if the password cannot equal the username. |
|
Different from previous password |
Select this option if a new password cannot equal the previous password. |
|
Stored as cleartext |
Select this option if you are using open authentication protocol sets. CHAP and EAP-MD5-Challenge work with local authentication servers only if you select this option. Be aware of the security implications of storing passwords as cleartext. |
|
Password Management |
|
|
Allow users to change passwords |
Select this option if you want users to be able to change their passwords. In addition to selecting local authentication password management options, you must select the Enable Password Management option for the associated realm authentication policy. |
|
Force password change |
Select this option to specify the number of days after which a password expires. The default is 64 days. |
|
Prompt users to change password |
Select this option to specify when to prompt the user to change passwords. |
|
Account Lockout |
|
|
Enable account lockout for users |
Select this option to manage user authentication failures for admin users of local authentication server. |
|
Maximum wrong password attempts |
Specify the number of consecutive wrong password attempts after which the admin user account will be locked. The default value is 3 retries. |
|
Account Lockout period |
Specify the time in minutes for which admin user account will remain locked. The default value is 10 minutes. |
Creating User Accounts
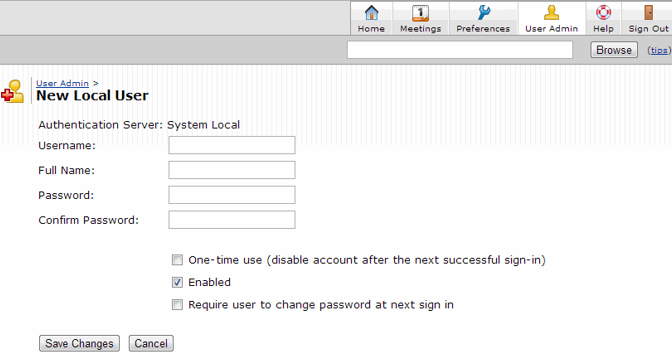
You use the Users page to create local authentication server user accounts. A user account includes a username and password to be used for authentication, as well as other information used for records and account management.
To create a local user account:
1.Select Authentication > Auth. Servers.
2.Select the local authentication server to which you want to add a user account.
3.Click the Users tab.
4.Click New to display the configuration page.
5.Complete the configuration as described in the following table.
6.Save the configuration.
The following table lists User Account Configuration Guidelines:
|
Settings |
Guidelines |
|
Username |
Do not include "~~" in a username. You cannot change a username after you create the account. |
|
Full Name |
Specify the user's full name. |
|
Password |
Specify a password. Make sure that the password you enter conforms to the password options specified on the local authentication server configuration page. |
|
Confirm password |
Confirm the password. |
|
One-time use |
Select this option to limit the user to one login. After one successful login, the user's login state is set to disabled, and the user receives an error message when attempting subsequent sign-ins. However, you can manually reset this option to allow the same user to log in again. |
|
Enabled |
Select this check box if it is not already selected. If the one-time use option has been implemented, this option is listed as Disabled after the user has logged in successfully. If a permanent or one-time user is logged in and you disable this option, the user is immediately logged out of the system and receives an error message. |
|
Require user to change password |
Select this option to force users to change their passwords at the next login. If you force the user to change passwords, you must also enable the local authentication password management options. |
Managing User Accounts
You use the Users page to list, modify, and delete local authentication server user accounts.
To manage a user account:
1.Select Authentication > Auth. Servers.
2.Click the link for the authentication server you want to manage.
3.Click the Users tab to display the user accounts table.
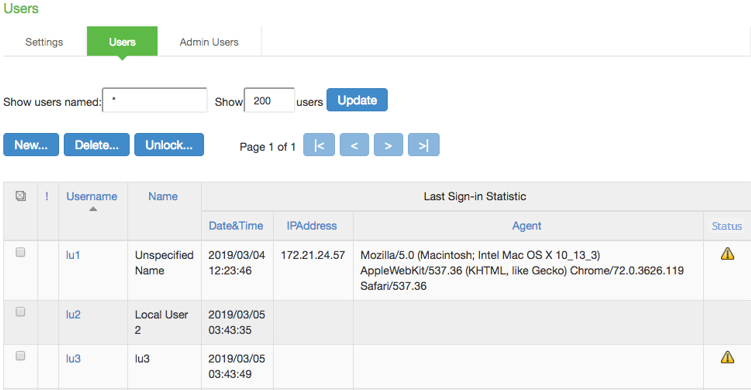
The user accounts table includes entries for the accounts that have been created. The Last Sign-in Statistic column shows the last successful sign-in date and time for each user, the user's IP address, and the agent or browser type and version. The Status column for the user shows the account-locked warning icon if the user account is locked.
4.Use the controls to search for users and manage user accounts:
•To search for a specific user, enter a username in the Show users named box and click Update.
You can use an asterisk (*) as a wildcard, where * represents any number of zero or more characters. For example, to search for all usernames that contain the letters jo, enter *jo*. The search is case-sensitive. To display the entire list of accounts again, type * or delete the field's contents and click Update.
•To limit the number of users displayed on the page, enter a number in the Show N users box and click Update.
•To edit the user account configuration, click the link in the Username column to display the Update Local User Account page.
•To terminate the user session and delete the account, select the box next to the user account record and click Delete.
•To unlock a user account, select the locked-out account and click Unlock. The account-locked warning icon will disappear after successful unlock.
•To view the admin user access logs, select System > Log/Monitoring > Admin Access > Log.
Select a user to display the user account configuration page. You can use this page to modify the account settings, or to disable or quarantine the account.
Creating Administrator User Accounts
You use the Admin Users page to create a special admin user account that enables the account holder to manage the local authentication server users table. These special admin users can sign in to a special page that enables them to create, modify, and delete user accounts.
To create a special admin user account:
1.Select Authentication > Auth. Servers > System Local.
2.Click the Admin Users tab to display the configuration page.
3.Specify a username, select an authentication realm, and click Add to create the administrator user.
4.Save the configuration.
Using the Admin User Sign-In Page to Manage the Local Authentication Users Table
The special admin users created using the feature shown in the previous section can manage the local authentication server accounts table. For example, if an admin user named adminuser is provisioned to manage user accounts for the Users realm, when adminuser signs into the Users realm sign-in page, a User Admin button appears on the toolbar at the top of the page. The following figure depicts shows the toolbar.
The following figure depicts the Sign-In Page Toolbar:

The special admin user can click the User Admin button to display the User Admin page, which shows the local authentication server users table.
The following figure depicts the User Admin Page:
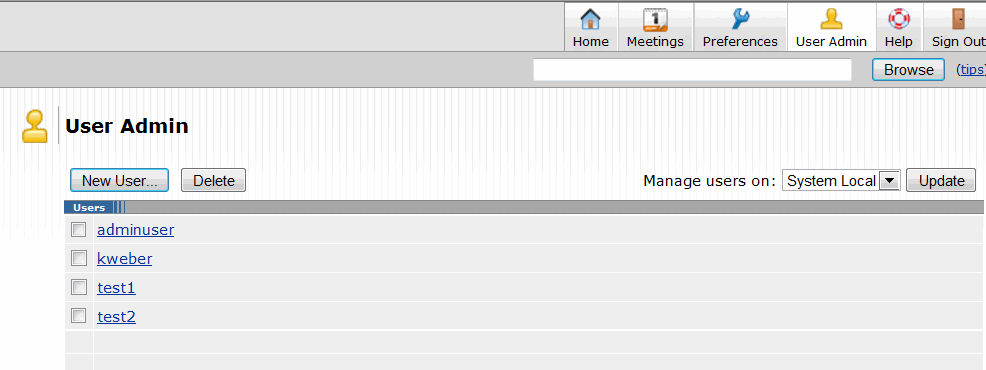
The special admin user can select accounts and delete them and can create user accounts. The same account management guidelines apply as when using the admin console for creating and modifying user records.
The following figure depicts the New Local User Configuration Page:
Using Active Directory
This topic describes integration with the Microsoft® Windows® platform Active Directory™ service.
Microsoft Windows Platform Active Directory Service Overview
This section describes support for using Ivanti Connect Secure with the Active Directory AAA service.
Understanding Active Directory
Active Directory is a directory service used in Windows domain networks. It is included in most Windows server operating systems. Enterprise servers that run Active Directory are called domain controllers. An Active Directory domain controller authenticates and authorizes users and computers in a Windows domain network.
When you use Active Directory as the authentication and authorization service for your access management framework, users can sign in to Ivanti Connect Secure using the same username and password they use to access their Windows desktops. You can also use Active Directory group information in role mapping rules.
Active Directory Legacy Mode configuration will not be supported. If you have an existing Active Directory authentication server using Legacy Mode, first migrate to Standard Mode and then upgrade ICS. For the detailed migration procedure, refer KB40430.
If you upgrade to 22.5R2.1, with SMBv1 disabled, AD Domain join fails after upgrade. Do a reset join on troubleshooting page post upgrade. For more information, see forum link.
Active Directory Feature Support
access management framework supports the following Active Directory features:
•Honors trust relationships in Active Directory and Windows NT environments.
•Supports Domain Local Groups, Domain Global Groups, and Universal Groups defined in the Active Directory forest.
•Supports use of Kerberos, NTLMv2, and NTMLv1 authentication protocols.
•Supports user principal name (UPN) format for usernames. This support is available for Web login.Supports User Principal Name (UPN) format for usernames. The UPN should be able to pass validation against the domain joined by the ICS system either directly or by trust relationship. If a UPN is rejected it will not be retried against other domains.
Interoperability Requirements and Limitations
The following limitations apply to interoperability with Active Directory:
•The access management framework uses Active Directory security groups, not distribution groups. Security groups allow you to use one type of group for not only assigning rights and permissions, but also as a distribution list for e-mail.
•Each Active Directory configuration you create for the access management framework should use a different and unique machine account name.
•If the current Active Directory domain controller is not reachable, the user or machine authentication requests fail for a few seconds (less than 2 minutes) before attempting to authenticate users with another domain controller in the Active Directory domain.
•We do not support Active Directory implementations that use the equal sign operator (=) in a group name, such as: "\=THIRD FLOOR GROUP". The access management framework authentication process involves search operations that use the equal sign operator (=) when parsing server catalogs to retrieve group names, usernames and domain names, as well as user_SID and domain_SID values. You might encounter unexpected behavior that can affect normal processing of authentication services if a group name configured on your Active Directory server includes an equal sign operator (=).
•Active Directory versions Windows 2008 R2 and later use a dynamic port range. The default start port is 49152 and the default end port is 65535. Therefore, if there is a firewall between the Ivanti Secure Access client service and the Active Directory Service, you must increase the remote procedure call (RPC) port range on the firewall. See Microsoft Knowledge Base article 929851.
•The password management feature, which enables users to change their Active Directory passwords through the Web server, is not supported for users of trusted domains that do not trust the domain specified in the Active Directory configuration.
Configuring Authentication and Authorization with Active Directory Service
To configure integration with Active Directory Service:
1.Select Authentication > Auth. Servers.
2.Select Active Directory / Windows NT and click New Server to display the configuration page.
3.Select Active Directory mode and complete the configuration as described in Table.
4.Save the configuration.
The following table lists Active Directory Mode Settings:
|
Settings |
Guidelines |
|
|
Select Active Directory mode. This table describes Active Directory mode. |
|
Base Configuration |
|
|
Name |
Specify a name to identify the server within the system. |
|
Domain |
Specify the NetBIOS domain name for the Active Directory domain. The system uses DNS to discover domain controllers in the Active Directory forest. It sends authentication requests to the domain controller at the closest site. Ensure that your DNS servers are configured to resolve the Active Directory domain controller fully qualified domain name (FQDN) and service (SRV) records. |
|
|
|
|
Kerberos Realm |
Specify the FQDN of the Active Directory domain. For example, if "secure" is the domain name (NetBIOS name), then secure.net is the Kerberos realm name. |
|
Domain Join Configuration |
|
|
Username |
Specify a username that has permission to join computers to the Active Directory domain. Use the "Delegate Control" workflow in Active Directory to assign the following user account permissions to the username or to a group to which the user belongs: Write Write All Properties Change Password Reset Password Validate Write to DNS hostname Read and write DNS host attributes Delete Computer Objects Create Computer Objects |
|
Password |
Specify the password for the special user. |
|
Save Credentials |
If this setting is not enabled, the credentials entered will be destroyed after successfully joining the domain. This option is useful when managing clusters. For example, you might want to save the credentials for a cluster node you have yet to add. If you do not enable this option, you must manually enter the credentials when you add the new cluster node. |
|
Container Name |
Specify the container path in Active Directory in which to create the machine account. Changing this field triggers a domain rejoin action. The default is Computers, which is a standard container created during installation of the AD server. The AD Computers container is the default location for new computer accounts created in the domain. If desired, you may specify a different container or OU. To specify nested containers, use a forward slash ( / ) as the container separator. For example: outer OU/inner OU. Do not use backslashes in the path. Using backslashes causes an Invalid DN Syntax error. |
|
Computer Name |
Specify the machine account name. The default computer name is derived from the license hardware in the following format: 0161MT2L00K2C0. We recommend the Computer Name string contain no more than 14 characters to avoid potential issues with the AD/NT server. Do not include the '$' character. |
|
Update Join Status / Reset Join |
The following colors are used to indicate status: Gray. The Domain Join action has not been attempted. This is the default status that appears when you are using the page to create a new Active Directory configuration. Yellow. Attempting to join the Active Directory domain. This is the default status that appears after saving configuration settings or when any domain join settings are changed in an existing configuration. Green. The attempt was successful. This status indicates that this server can now be used to authenticate users. Red. The attempt to join the Active Directory domain was not successful. Click Update Join to get the latest join status of nodes. If the status appears persistently red, click Reset Join to reinitiate the domain join process. The Reset Join action requires Active Directory administrator credentials.
For cluster nodes, you might need to click Update Join multiple times to obtain the latest join status of nodes. Transient network issues might also cause the join status indicator to appear red. Before restarting the join process, ensure that it is not caused by network issues. Make sure your DNS servers can resolve queries to the Active Directory domain controller and that the Active Directory credentials are valid and have the appropriate permissions. |
|
Additional Options |
|
|
Authentication Protocol |
The system attempts authentication using the protocols you have enabled in the order shown on the configuration page. For example, if you have selected the check boxes for Kerberos and NTLMv2, the system sends the credentials to Kerberos. If Kerberos succeeds, the system does not send the credentials to NTLMv2. If Kerberos is not supported or fails, the system uses NTLMv2 as the next protocol in order. Kerberos. Select this option to enable the Kerberos authentication protocol. Kerberos is the most secure method and is required for Kerberos single sign-on authentication. Kerberos must be enabled if you plan to use Ivanti Secure Access client single sign-on or browser-based agentless single sign-on (SPNEGO). Enable NTLM protocol. Select this option to enable NTLM if you plan to use any of the following features: Machine authentication using, Ivanti Secure Access client, or Windows native 802.1x supplicants. MS-CHAP-based authentication protocols for any 802.1x supplicants. User password management. Role mapping rules based on group membership. |
|
Trusted domain lookup |
Contact trusted domains. Select this option to contact domain controllers of trusted domains directly without proxying authentication requests and group membership checks through the domain controller. If this option is not selected: Network contact with trusted domains is not permitted, but pass-through authentication using the primary domain is still permitted. Trusted domain user's group lookup for Kerberos SSO. Trusted domain user's password-based authentication does not work. Only groups from the domain in which this system is a member are available for use in role mapping when a group search is performed in the server catalog window. If you want to restrict trusted domain users and computers from logging in when this option is not selected, you can define a custom expression based on the ntdomain variable and use it in role mapping rules. For example, if Ivanti Connect Secure belongs to the domain named Corporate, you can define a custom expression as ntdomain=Corporate and use the custom expression in the role mapping rule of the realm. |
|
Domain Connections |
Maximum simultaneous connections per domain. Enter the maximum number of simultaneous domain connections (1 to 10). This field specifies the maximum number of simultaneous connections that the auth daemon should open to the domain controller of one domain. A value of greater than 1 can improve the scalability with simultaneous authentication requests. However, this field value should be judiciously used, especially if trusted domain setting is enabled. This value dictates how many authentication processes are created per domain. For example: if the maximum domain connection is configured as 4 and there are 5 trusted domains, there could be as many as 5*4+1 = 21 auth processes. Hence if there are many trusted domains, the domain connection value needs to be controlled by the administrator, failing which there could be too many auth processes created only for AD authentication purpose. By default, this field value is set to 2 if trusted domain setting enabled. If trusted domain is not enabled, then the default value is set to 5. If Contact trusted domains is enabled, a value above 6 may degrade overall system performance. |
|
Machine account password change |
Enable periodic password change of machine account. Select this option to change the domain machine account password for this configuration. Change machine password frequency. Specify a frequency in days. For example, every 30 days. |
|
User Record Synchronization This feature is available only on Ivanti Connect Secure. |
|
|
Enable User Record Synchronization |
Select this option to retain the bookmarks and individual preferences regardless of which system you log in to. |
|
Logical Auth Server Name |
Specify a logical authentication server name. |
|
Save Changes |
Click the button to save the changes made. |
Active Directory IPv6 Support
Active Directory server for authentication and authorization for AD mode auth server in ICS supports both IPv6 and IPv4 based backend Active Directory servers. If Active Directory server is configured with IPv6 only, then ICS is forced to use IPv6. If IPv6 is disabled in the backend server or in ICS, then ICS is forced to use IPv4. In case of a dual network in both the ICS and backend server, ICS would use both the protocols IPv6 and IPv4 for different authentication protocols like Kerberos, NTLM, etc.
ICS DNS server preferred mode settings do not apply to AD mode auth server since, internal third-party Samba library selects the available networks based on DNS resolution and other runtime protocol checks.
All features supported in IPv4 for Active Directory auth server are supported via IPv6 interface also.
Displaying the User Accounts Table
To display user accounts:
1.Select Authentication > Auth. Servers.
2.Click the link for the authentication server you want to manage.
3.Click the Users tab to display the user accounts table.
The user accounts table includes entries for the accounts that have been created. The Last Sign-in Statistic column shows the last successful sign-in date and time for each user, the user's IP address, and the agent or browser type and version.
4.Use the controls to search for users and manage user accounts:
•To search for a specific user, enter a username in the Show users named field and click Update.
You can use an asterisk (*) as a wildcard, where * represents any number of zero or more characters. For example, to search for all usernames that contain the letters jo, enter *jo*. The search is case-sensitive. To display the entire list of accounts again, type * or delete the field's contents and click Update.
•To limit the number of users displayed on the page, enter a number in the Show N users field and click Update.
•To terminate their user session and delete the account, select the check box next to the user account record and click Delete.
Troubleshooting the Active Directory Service
To troubleshoot the Active Directory Service:
1.Select Authentication > Auth. Servers > AD Server name > Troubleshooting.
2.Select the appropriate functions described in the following table.
The following table lists the Active Directory Server Troubleshooting Functions:
|
Function |
Description |
|
Basic Verification |
Verifies whether the domain is properly joined and if the winbindd service is running. The number of winbindd processes is displayed, along with the ongoing CPU and memory usage for each process. For example, if user authentication is slow or fails randomly, use this function to check the number of winbindd processes and the CPU, memory and file descriptor usage. Select Restart AD Services to correct faulty processes. |
|
Test User Authentication |
Prompts for a username and password and attempts to log in. If successful, the groups the user belongs to are displayed. Only the regular password authentication is done. |
|
Test User Password Change |
Prompts for a username and the old and new password for a user and attempts to change the password on the AD server. |
|
List Domain Info |
Lists each domain and all trusted domains. Selecting a domain lists each Domain Controller for the domain, its IP address, and whether it is reachable. For example, if user authentication fails consistently and the domain is shown as successfully joined in the AD Server Settings page, the domain trust may be broken. Use this function to check the trusted domains. Also, if the domain join fails consistently or user authentication to a trusted domain fails consistently, the domain might not be reachable or the DNS configuration may be incorrect. Use this function to verify whether the domains and trusted domain are reachable. |
|
Change Machine Password |
Sends a request to the domain controller to change the machine password. A confirmation prompt is displayed to confirm the change. |
|
Restart AD Services |
Restarts the winbindd process, which may restore proper authentication, specifically during load and longevity scenarios. A confirmation prompt is displayed to confirm the restart (users cannot log in during a restart. |
|
Reset Join |
Reinitiates the domain join process. A confirmation prompt is displayed to confirm the reset and allows you to clear the Samba cache and keytab files before the reset. This is the same function shown on the AD server's Settings page and requires Active Directory administrator credentials. For example, if user group changes are not reflected in the user authentication, run this function with Clear Samba Cache enabled. |
|
Samba Diagnostics Logs |
Displays Diagnostic Logs page where you can download the Samba logs. |
|
Load Output |
Displays up to the last 500 lines of the troubleshooting output for the current session. |
|
Save Output File |
Saves all the troubleshooting messages for the current session. |
|
Clear Output File |
Erases all the troubleshooting messages saved in the output file (they cannot be retrieved). |
JITC AAA Certification
Enabling JITC Mode
To enable the JITC Mode:
1.Navigate to System > Configuration > Security > Inbound SSL Options.
2.Click on Turn on JITC mode checkbox.
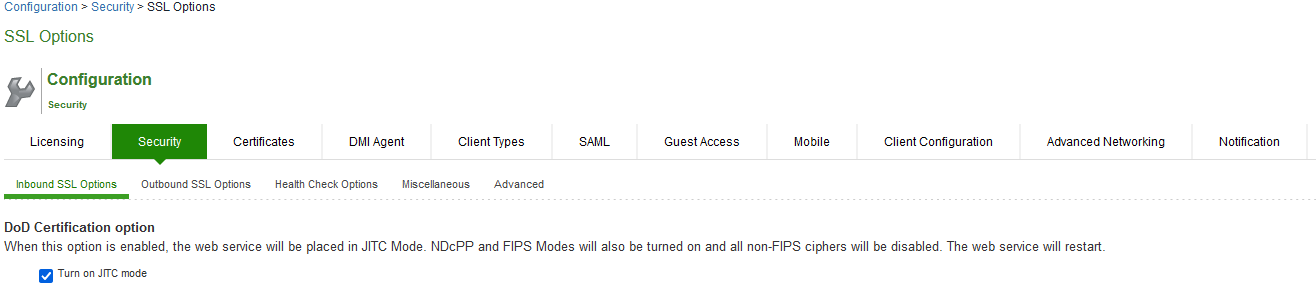
3.Once Turn on JITC mode is enabled, Turn on NDcPP mode and Turn on FIPS mode are also automatically enabled.
4.Click Save Changes.
For more details about the deployment of ICS in the JITC Mode, refer to the ICS NDcPP and JITC Certification Deployment Guide.
Important Factors to Consider
•Password Strengthening: When JITC is enabled, ICS does not allow an administrator to configure a password exactly same as previously configured 5 passwords. An error message is displayed in this case.
•Notification for Unsuccessful Admin Login Attempts: With JITC Mode on, ICS shows a banner with the count of unsuccessful login attempts. This includes any change in the admin status that would have happened since the last successful login. Upon clicking on the banner, the administrator is directed to the status page, which provides more details about status or configuration change since last log-in. These configuration changes are cleared before the next login so that admin can see different set of configuration changes, if anything happened from the last login.
•Re-authentication of Admin Users: ICS will force the administrator to re-authenticate with ICS whenever the following conditions occur:
•Add Role
•Delete Role
•Modify the Role
•Delete the Realm
•Update the Realm
•During DPE (Dynamic Policy Evaluation)
•Configuration Change Notification: For details about configuration changes and status information since last login, go to System > Status >Admin Notification.
Understanding Multidomain User Authentication
This topic provides an overview of multidomain user authentication with Active Directory and Windows NT.
Multi-Domain User Authentication Overview
The access management framework allows for multidomain Active Directory and Windows NT authentication. The system authenticates users in the domain that you configure, users in child domains, and users in all domains trusted by the configured domain.
Users in the default domain can sign into the system using just their username, or the default domain and the username in the format default-domain\username.
When you enable trusted domain authentication, users in trusted or child domains can sign in using the name of the trusted or child domain and the username in the format trusted-domain\username. Note that enabling trusted domain authentication adds to the server response time.
Windows NT User Normalization
To support multidomain authentication, the access management framework uses "normalized" Windows NT credentials when it contacts an Active Directory or Windows NT4 domain controller for authentication. Normalized Windows NT credentials include both the domain name and the username: domain\username. Regardless of how the user signs in (either using just a username or using the domain\username format), the access management framework always processes the username in domain\username format.
When a user signs in using only their username, the access management framework normalizes their Windows NT credentials as default-domain\username. Authentication succeeds only if the user is a member of the default domain.
When a user signs in using the domain\username format, the access management framework attempts to authenticate the user as a member of the domain the user specifies. Authentication succeeds only if the user-specified domain is a trusted or child domain of the default domain. If the user specifies an invalid or untrusted domain, authentication fails.
Two variables, <NTUser> and <NTDomain>, allow you to individually refer to Windows NT domain and username values. The system populates these two variables with the Windows NT domain and username information.
In role mapping rules, when you specify USER = john, the system treats this rule semantically as NTUser = john AND NTDomain = defaultdomain.
Kerberos Support
We recommend you configure the access management framework to use the Kerberos authentication protocol with Windows domain controllers. When a user logs in to the system, the system performs Kerberos authentication and attempts to fetch the Kerberos realm name for the domain controller, as well as all child and trusted realms, using LDAP calls.
You can use Kerberos differently. You can specify the Kerberos realm name when configuring an Active Directory authentication server. We do not recommend this method for two reasons:
•You cannot specify more than one realm name. The system cannot then authenticate against child or trusted realms of the realm you specify.
•If you misspell the realm name, the system cannot authenticate users against the proper realm.
Windows NT4 Support
The access management framework does not support Kerberos-based authentication in Windows NT4 domain controllers. The system uses NTLM with a backend Windows NT4 domain controller.
Understanding Active Directory and Windows NT Group Information Support
This topic describes support for polling group information from Active Directory and Windows NT servers.
Active Directory Group Information Overview
The access management framework supports user group lookup in Domain Local, Domain Global, and Universal groups in the default domain, child domains, and all trusted domains. The system obtains group membership using one of three methods that have different capabilities:
•Group information in User's Security Context - Returns information about the user's Domain Global groups.
•Group information obtained using LDAP search calls - Returns information about the user's Domain Global groups and about the user's Universal groups if the access management framework queries the Global Catalog Server.
•Group information using native RPC calls - Returns information about the user's Domain Local Group.
With respect to role-mapping rules, the system attempts group lookup in the following order:
•Checks for all Domain Global groups using the user's security context.
•Performs an LDAP query to determine the user's group membership.
•Performs an RPC lookup to determine the user's Domain Local group membership.
Windows NT4 Group Information Overview
The access management framework supports group lookup in the Domain Local and Domain Global groups created in the default domain, as well as all child and other trusted domains. The system obtains group membership using:
•Domain Global group information from the user's security context.
•Domain Local information using RPC calls.
In the Windows NT4 environment, the system does not use LDAP-based search calls.
Join Domain for Active Directory-based Authentication Server Without Using a Domain Admin Account
With Active Directory on Windows Server, the system can join domain (for an Active Directory based Authentication server) without using a domain administrator account. For more details refer to KB2624.
Using the Certificate Server
This topic describes integration with the certificate server.
Certificate Server Overview
This section describes support for using Ivanti Connect Secure with the certificate server.
Understanding the Certificate Server
The certificate server is a local server that allows user authentication based on the digital certificate presented by the user without any other user credentials.
When you use a certificate server, the user experience is similar to anonymous authentication. If the certificate is secured through a hardware or a software token or through a password, the certificate server authentication is very useful. The certificate contains the full distinguished name (DN) and the system extracts the values from the DN and uses it for role mapping rules, authentication policies, and role restrictions.
Feature Support
The access management framework supports the following certificate server features:
•Certificate directory services to retrieve user attributes in role mapping rules, authentication policies, and role restrictions.
•Load CA-created certificates on the system.
•Load multiple certificates from different CAs for use with different authentication realms.
Interoperability Requirements and Limitations
If you choose a certificate attribute with more than one value, the system uses the first matched value. For example, if you enter <certDN.OU> and the user has two values for the attribute (ou=management, ou=sales), the system uses the "management" value.
To use all values, add the SEP attribute to the variable. For example, if you enter <certDN.OUT SEP=":"> the system uses "management:sales".
Configuring Authentication with the Certificate Server
To configure authentication with the certificate server:
1.Select Authentication > Auth. Servers.
2.Select Certificate Server and click New Server to display the configuration page.
3.Complete the configuration as described in the following table.
4.Save the configuration.
The following table lists Certificate Server Settings
|
Settings |
Guidelines |
|
Name |
Specify a name to identify the server within the system. |
|
User Name Template |
Specify a username template. Specify how the system should construct a username. You may use any combination of certificate variables contained in angle brackets and plain text. This value populates the <USER> and <USERNAME> session variables for use throughout the rest of the system configuration. |
|
User Record Synchronization |
This applies only to Ivanti Connect Secure. |
|
Enable User Record Synchronization |
Select this option to retain the bookmarks and individual preferences regardless of which system you log in to. |
|
Logical Auth Server Name |
Specify a logical authentication server name. |
Displaying the User Accounts Table
To display user accounts, refer to Displaying the User Accounts Table
Using an LDAP Server
This topic describes integration with the LDAP server.
LDAP Server Overview
This section describes support for using Ivanti Connect Secure with the LDAP server.
Understanding LDAP Server
Lightweight Directory Access Protocol (LDAP) facilitates the access of online directory services. The Internet Engineering Task Force (IETF) designed and specified LDAP as a better way to make use of X.500 directories, having found the original Directory Access Protocol (DAP) too complex for average Internet clients to use. LDAP is a relatively simple protocol for updating and searching directories running over TCP/IP.
LDAP directory consists of a collection of attributes with a name, known as a distinguished name (DN). Each of the entry's attributes, known as a relative distinguished name (RDN), has a type and one or more values. The types are typically mnemonic strings, such as CN for common name. The valid values for each field depend on the types.
The full DN is constructed by stringing together RDNs from most specific to least specific, separated by commas, as shown in the following example:
cn=Bob_Employee, ou= account_mgr, o=sales, dc=Acme,dc=com.
LDAP Feature Support
access management framework supports the following LDAP features:
•LDAP directory services to retrieve user attributes and group membership in role mapping rules
•Encrypted connections to the LDAP server using LDAP over SSL (LDAPS) or Start Transport Layer Security (TLS)
•Password management feature enabling users who access an LDAP server to manage their passwords using the policies defined on the LDAP server
•Fine-grained password policy (FGPP) for Active Directory 2008
Interoperability Requirements and Limitations
The following limitations apply to interoperability with LDAP:
•Backup LDAP servers must be the same version as the primary LDAP server. Also, we recommend that you specify the IP address of a backup LDAP server instead of its hostname, which might accelerate failover processing by eliminating the need to resolve the hostname to an IP address.
Configuring Authentication with an LDAP Server
The LDAP authentication configuration is enhanced to locate the nearest Microsoft domain controllers, which are spread across the globe, by resolving DNS SRV records.
To configure authentication with an LDAP server:
1.Select Authentication > Auth. Servers.
2.Select LDAP Server and click New Serverr to display the configuration page.
3.Complete the configuration as described in the following table.
4.Save the configuration.
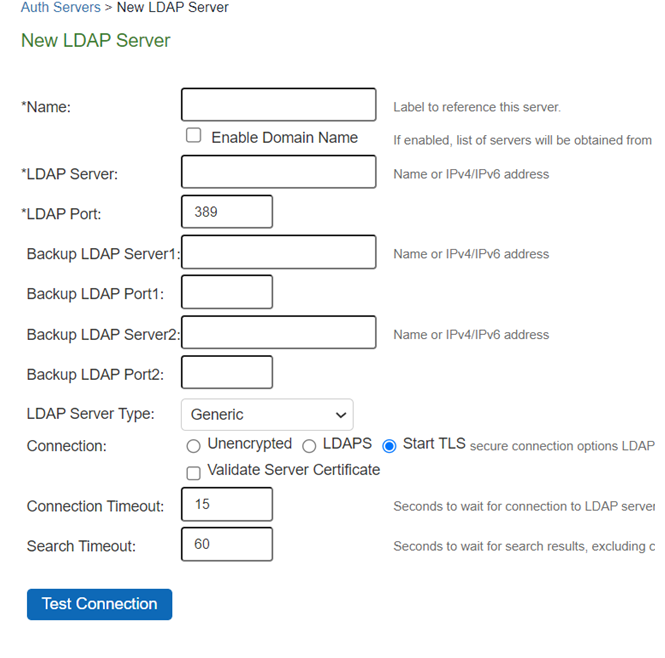
The following table lists LDAP Server Settings
|
Settings |
Guidelines |
|
Name |
Specify a name to identify the server within the system. |
|
Enable Domain Name (enabled) |
Select this option if you want to fetch a list of servers from the DNS server. |
|
Domain Name When you Enable Domain Name, specify the LDAP Domain name that can be mapped to domain controllers by DNS service. |
|
|
Enable Domain Name (disabled) |
Clear this option if you want to manually enter all the domain controllers host names. |
|
|
LDAP Server Specify the LDAP server name or the IPv4/IPv6 address. |
|
|
Backup LDAP Server1 (Optional) Specify the parameters for backup LDAP server1(server name or the IPv4/IPv6 address). Default port number: 389 (unencrypted connection). The specified backup LDAP server is used for failover processing. The authentication request is first routed to the primary LDAP server, and then to the specified backup servers if the primary server is unreachable. |
|
|
Backup LDAP Port1 Specify the parameters for backup LDAP port1. |
|
|
Backup LDAP Server2 (Optional) Specify the parameters for backup LDAP server2 (server name or the IPv4/IPv6 address). |
|
|
Backup LDAP Port2 Specify the parameters for backup LDAP port2. |
|
LDAP Port |
Specify the LDAP port for the LDAP server. Default port number: 389 (unencrypted connection) Default port number: 636 (SSL connection) |
|
LDAP Server Type |
Select the backend LDAP server type from the following choices: Generic Active Directory |
|
Connection |
Select one of the following options for the connection to the LDAP server: Unencrypted - The device sends the username and password to the LDAP Directory Service in cleartext. LDAPS - The device encrypts the data in the LDAP authentication session using the Secure Socket Layer (SSL) protocol before sending it to the LDAP Directory Service. Start TLS - The device allows both secure and plain requests against an LDAP server on a single connection.
If you select LDAPS or Start TLS, the Validate Certificate option is displayed for the configured LDAP server(s) and its referral servers. Select this option if the SSL connection uses digital certificate security. If you enable validation for the referral servers, make sure your network DNS supports reverse lookup zone. If you want to verify the server certificates, the root CA and Intermediate CAs must be imported under trusted server CAs. |
|
Connection Timeout (seconds) |
Specify the time to wait for connection to the primary LDAP server, and then to each backup LDAP server. Default: 15 seconds |
|
Search Timeout (seconds) |
Specify the time to wait for search results from a connected LDAP server. |
|
Test Connection |
(Optional) To verify the connection between Ivanti Secure Access client and LDAP servers, click the Test Connection button. We recommend using the Test Connection function only after saving changes on the LDAP Server Configuration page. |
|
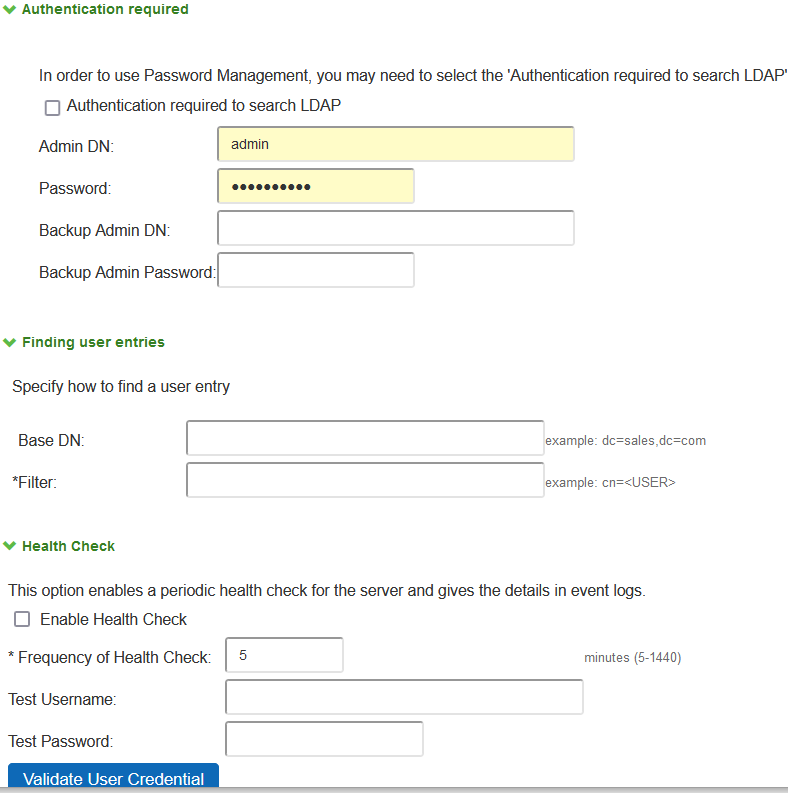
Authentication required? |
|
|
Authentication required to search LDAP |
Select this option to require authentication when performing search or password management operations.
If you use Active Directory, you must select the Authentication required to search LDAP check box and provide the full DN and password of primary and backup administrator accounts that can reach Active Directory. You can enable password management on any LDAP server. |
|
Admin DN |
Specify the administrator DN for queries to the LDAP directory. |
|
Password |
Specify the password for the LDAP server. |
|
Backup Admin DN |
Specify the backup administrator DN for queries to the LDAP directory, as a fallback when primary Admin DN fails (due to account expiration). The interaction with LDAP directory stops when both primary and backup administrator accounts fail. |
|
Backup Admin Password |
Specify the backup administrator password for the LDAP server. |
|
Finding user entries |
|
|
Base DN |
Specify the base DN under which the users are located. For example, dc=sales,dc=acme, dc=com. |
|
Filter |
Specify a unique variable that can be used to do a fine search in the tree. For example, samAccountname=<username> or cn=<username>. Include <username> in the filter to use the username entered on the sign-in page for the search. Specify a filter that returns 0 or 1 user DNs per user; the device uses the first DN returned if more than 1 DN is returned. |
|
Health Check |
|
|
Enable Health Check |
This option enables a periodic health check for the server and gives the details in event logs. |
|
Frequency of Health Check |
Specify the frequency to preform the health check in every "x" minutes, default value is 60 minutes and range is 5-1440 minutes. |
|
Test Username and Password |
Specify the test credentials and click Validate User Credential. |
|
Health check process might be performance intensive and can lead to huge logs so be conscious while enabling the option and choosing the frequency. |
|
|
Remove Domain from Windows users names? |
|
|
Strip domain from Windows username |
Select this option to pass the username without the domain name to the LDAP server. |
|
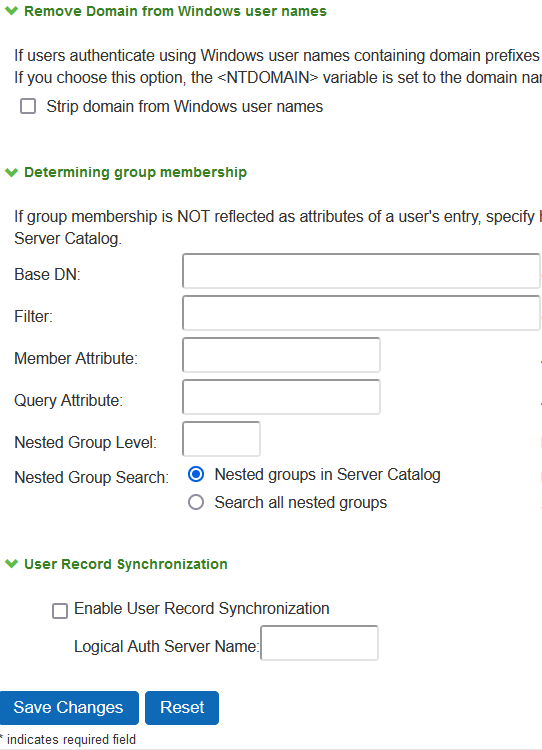
Determining group membership |
|
|
Base DN |
Specify the base DN to search for user groups. |
|
Filter |
Specify a unique variable which can be used to do a fine search in the tree. For example, samAccountname=<username> or cn=<GROUPNAME>. |
|
Member Attribute |
Specify all the members of a static group. For example, member or unique member |
|
Reverse group search |
Select this option to start the search from the member instead of the group. This option is available only for Active Directory server types. |
|
Query Attribute |
Specify an LDAP query that returns the members of a dynamic group. For example, memberURL. |
|
Nested Group Level |
Specify how many levels within a group to search for the user. The higher the number, the longer the query time, so we recommend that you specify to perform the search no more than two levels deep. |
|
Nested Group Search |
Select one of the following options: Nested groups in Server Catalog - This option is faster because it can search within the implicit boundaries of the nested group. Search all nested groups - With this option, the device searches the Server Catalog first. If the device finds no match in the catalog, then it queries LDAP to determine if a group member is a subgroup. |
Displaying the User Accounts Table
To display user accounts, refer to Displaying the User Accounts Table
Using the LDAP Password Management Feature
This topic describes support and limitations for LDAP password management.
LDAP Password Management Feature Overview
The password management feature enables users who access an LDAP server to manage their passwords through the access management framework using the policies defined on the LDAP server. For example, if a user tries to sign in to the system with an LDAP password that is about to expire, the system notifies the user through the interface, and then passes the user's response back to the LDAP server without requiring the user to sign in to the LDAP server separately.
Users, administrators, and help desk administrators who work in environments where passwords have set expiration times may find the password management feature very helpful. If users are not informed that their passwords are about to expire, they can change them themselves through the system rather than call the help desk.
Once this feature is enabled, the system performs a series of queries to determine user account information, such as when the user's password was last set, whether the account is expired, and so on. The access management framework does this by using its internal LDAP or Samba client. Many servers, such as Microsoft Active Directory, offer an Administrative Console to configure account and password options.
LDAP-based password management works with the following types of LDAP servers:
•Microsoft Active Directory. For Active Directory, password policy attributes can be configured in the user entry container level or any organization level above the user container. If these attributes are configured at multiple levels, the level closest to the user node takes precedence. The password management feature is not supported on the Active Directory Global Catalog because password policy attributes are not fully populated in the Active Directory Global Catalog.
•For Active Directory 2008, the access management framework supports the Fine-Grained Password Policy (FGPP) configured in the AD user container.
•Generic LDAP servers such as OpenLDAP
The system relies on the back-end server to pinpoint the cause of error when a password change operation fails. However, although LDAP servers may report errors accurately to human operators, they do not always do so when communicating programmatically to systems. Therefore, reported errors might be generic or cryptic.
The system does not support customized password policies.
Enabling LDAP Password Management
To enable password management, you must first create an instance of the LDAP server. Next, you associate the LDAP server with the applicable realms. Finally, you select the enable password management feature at the realm level.
LDAP Password Management Support
The access management framework supports password management with the following LDAP directories:
•Microsoft Active Directory/Windows NT
Table describes supported password management functions, their corresponding function names in the individual LDAP directories, and any additional relevant details. These functions must be set through the LDAP server itself before the system can pass the corresponding messages, functions, and restrictions to end users.
The Active Directory attribute names shown are specific to the Domain Security Policy object. Similar attributes for the corresponding functions are used for the Active Directory 2008 Fine-Grained Password Policy. Refer to Microsoft documentation for details.
When authenticating against a generic LDAP server, the system supports only authentication and allows users to change their passwords. Password management functions are not supported when the CHAP family protocols are used for authentication. All functions are available when the JUAC protocol is used for authentication (Policy Secure only).
The following table lists Supported Password Management Functions
|
Function |
Active Directory |
eDirectory |
|
unicodePwd |
userPassword |
|
|
Allow user to change password if enabled |
Server tells us in bind response (uses ntSecurityDescriptor) |
If passwordAllowChange == TRUE |
|
Log out user after password change |
Yes |
Yes |
|
Force password change at next login |
If pwdLastSet == 0 |
If pwdMustChange == TRUE |
|
Expired password notification |
userAccountControl== 0x80000 |
Check date/time value |
|
Password expiration notification (in X days/hours) |
if pwdLastSet - now() < maxPwdAge - 14 days |
If now() - passwordExpirationTime< 14 days (The system displays warning if less than 14 days) |
|
Disallow authentication if "account disabled/locked |
userAccountControl== 0x2 (Disabled) accountExpires userAccountControl == 0x10 (Locked) lockoutTime |
Bind ErrorCode: 53 "Account Expired" Bind ErrorCode: 53 "Login Lockout" |
|
Honor "password history |
"Server tells us in bind response |
Server tells us in bind response |
|
Enforce "minimum password length |
"If set, the system displays message telling user minPwdLength |
If set, the system displays message telling user passwordMinimumLength |
|
Disallow user from changing password too soon |
If pwdLastSet - now() < minPwdAge, then we disallow |
Server tells us in bind response |
|
Honor "password complexity |
"If pwdProperties == 0x1, then enabled. Complexity means the new password does not contain username, first or last name, and must contain characters from 3 of the following 4 categories: English uppercase, English lowercase, Digits, and Non-alphabetic characters (ex. !, $, %) |
Server tells us in bind response |
Note the following expected behavior:
•The system displays a warning about password expiration only if the password is scheduled to expire in 14 days or less. The system displays the message during each sign-in attempt. The warning message contains the remaining number of days, hours, and minutes that the user has to change the password before it expires on the server. The default value is 14 days, but you can change it on the password configuration page of the admin console.
LDAP Password Management for Windows AD Versions
Note the following expected behavior:
•Changes on the Active Directory domain security policy can take 5 minutes or longer to propagate among Active Directory domain controllers. Additionally, this information does not propagate to the domain controller on which it was originally configured for the same time period. This issue is a limitation of Active Directory.
•When changing passwords in Active Directory using LDAP, the system automatically switches to LDAPS, even if LDAPS is not the configured LDAP method. To support LDAPS on the Active Directory server, you must install a valid SSL certificate into the server's personal certificate store. The certificate must be signed by a trusted CA, and the CN in the certificate's Subject field must contain the exact hostname of the Active Directory server, (for example: adsrv1.company.com). To install the certificate, select the Certificates Snap-In in the Microsoft Management Console (MMC).
•The Account Expires option in the User Account Properties tab only changes when the account expires, not when the password expires. Microsoft Active Directory calculates the password expiration using the Maximum Password Age and Password Last Set values retrieved from the User object and Fine-Grained Password Policy objects or the Domain Security Policy LDAP objects.
•The system displays a warning about password expiration only if the password is scheduled to expire in 14 days or less. The system displays the message during each sign-in attempt. The warning message contains the remaining number of days, hours, and minutes that the user has to change the password before it expires on the server. The default value is 14 days, but you can change it on the password configuration page of the admin console.
Troubleshooting LDAP Password Management
When you troubleshoot, provide any pertinent system logs, server logs, configuration information, and a TCP trace from the system. If you are using LDAPS, switch to the "Unencrypted" LDAP option LDAP server configuration while taking the LDAP TCP traces.
Using an MDM Server
This topic describes integration with the mobile device management (MDM) servers.
Understanding MDM Integration
MDM vendors provide enrollment and posture assessment services that prompt employees to enter data about their mobile devices. When the user installs the MDM application on the device and completes enrollment, the MDM pushes the device certificate to the device. After enrollment, the MDM maintains a database record that includes information about the enrollee-attributes related to device identity, user identity, and posture assessment against MDM policies.
The access management framework MDM authentication server configuration determines includes details on how the system communicates with the MDM Web RESTful API service and how it derives the device identifier from the certificates presented by endpoints.
After you have configured the MDM authentication server, you can configure a realm that uses the MDM data for authorization, and you can use MDM device attributes in the role mapping rules that are the basis for your network access and resource access policies.
Feature Support
The device access management framework supports integration with the following MDM solutions:
•Ivanti (formerly MobileIron)
•Microsoft Intune
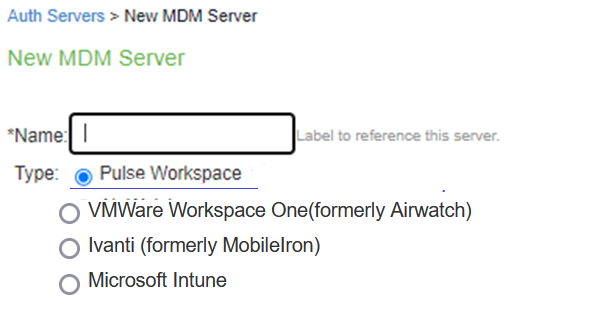
Configuring an MDM Server
The authentication server configuration is used by the system to communicate with the MDM. In the device access management framework, the MDM server is used as the device authorization server.
To configure the authentication server:
1.Select Authentication > Auth Servers to navigate to the authentication server configuration pages.
2.Select MDM Server and click New Server to display the configuration page.
3.Complete the configuration as described in the following table.
4.Save the configuration.
The following table lists Authentication Server Configuration Guidelines:
|
Settings |
Guidelines |
|
Name |
Specify a name for the configuration. |
|
Type |
Select one of the following options: Pulse Workspace VMWare Workspace One(formerly Airwatch) Ivanti (formerly MobileIron) Microsoft Intune Connect Secure has to be registered with Pulse One for using Pulse Workspace as an MDM auth server. |
|
Server (Applicable to VMWare Workspace One(formerly Airwatch) and Ivanti (formerly MobileIron)) |
|
|
Server Url |
Specify the URL for the MDM server. This is the URL the MDM has instructed you to use to access its RESTful Web API (also called a RESTful Web service). You must configure your firewalls to allow communication between these two nodes over port 443. |
|
Viewer Url |
Specify the URL for the MDM report viewer. This URL is used for links from the Active Users page to the MDM report viewer. |
|
Request Timeout |
Specify a timeout period (5-60 seconds) for queries to the MDM server. The default is 15 seconds. |
|
Server (Applicable to Microsoft Intune) |
|
|
Tenant ID |
Specify Azure AD Tenant ID. |
|
Client ID |
Specify Web application ID that has been registered in Azure AD. |
|
Client Secret |
Specify Secret key of the web application registered in azure AD. |
|
Request Timeout |
Specify a timeout period (5-60 seconds) for queries to the MDM server. The default is 15 seconds. |
|
Administrator (Applicable to VMWare Workspace One(formerly Airwatch) and Ivanti (formerly MobileIron)) |
|
|
Username |
Specify the username for an account that has privileges to access the MDM RESTful Web API. |
|
Password |
Specify the corresponding password. |
|
Tenant Code |
AirWatch only. Copy and paste the AirWatch API tenant code. |
|
Device Identifier |
|
|
Device identity |
Policy Secure only. Select an option on whether to require that the MDM certificate is presented by the endpoint when signing in: Require - Require that the device certificate pushed to client devices during enrollment be used at sign-in. If this option is selected, and the client device does not have a certificate, authorization fails. Use this option when you require endpoints to adhere to your certificate security requirements. Use Certificate if present - Use the certificate to derive the device ID if the certificate is presented at sign-in, but do not reject authentication if the certificate is not present. You can use this option in conjunction with a role mapping rule and a remediation VLAN to identify devices that have not perfected MDM enrollment. Always Use MAC address - In some cases, the MDM certificate might be configured without a device identifier. When the endpoint uses an 802.1x framework to authenticate, Policy Secure can obtain the MAC address from the RADIUS return attribute callingStationID. The system can then use the MAC address as the device identifier. The Always Use MAC address option is not present in Ivanti Connect Secure. A device certificate is required to determine device identity. |
|
ID Template |
Construct a template to derive the device identifier from the certificate attributes. The template can contain textual characters as well as variables for substitution. The variables are the same as those used in role mapping custom expressions and policy conditions. Enclose variables in angle brackets like this <variable>. For example, suppose the certificate DN is: CN=<DEVICE_UDID>, uid=<USER_ID>, o=Company. With this configuration, the certificate could identify both the user and the device. In this example, the device ID template is <certDN.CN>. |
|
ID Type |
Select the device identifier type that matches the selection in the MDM SCEP certificate configuration: UUID - The device Universal Unique Identifier. This is the key device identifier supported by MobileIron MDM. Serial Number - The device serial number. UDID - The device Unique Device Identifier. This is the key device identifier supported by AirWatch MDM. IMEI - The device unique identifier. IMEI (15 decimal digits: 14 digits plus a check digit) or IMEISV (16 digits) includes information on the origin, model, and serial number of the device. This is the key device identifier supported by Microsoft Intune. |
Display the Active Users Page
The Active Users page lists data about current sessions, including access to realms that use the MDM server for device authorization.
To display the Active Users page, select Systems > Active Users.
The following figure shows the Active Users page for Ivanti Connect Secure:
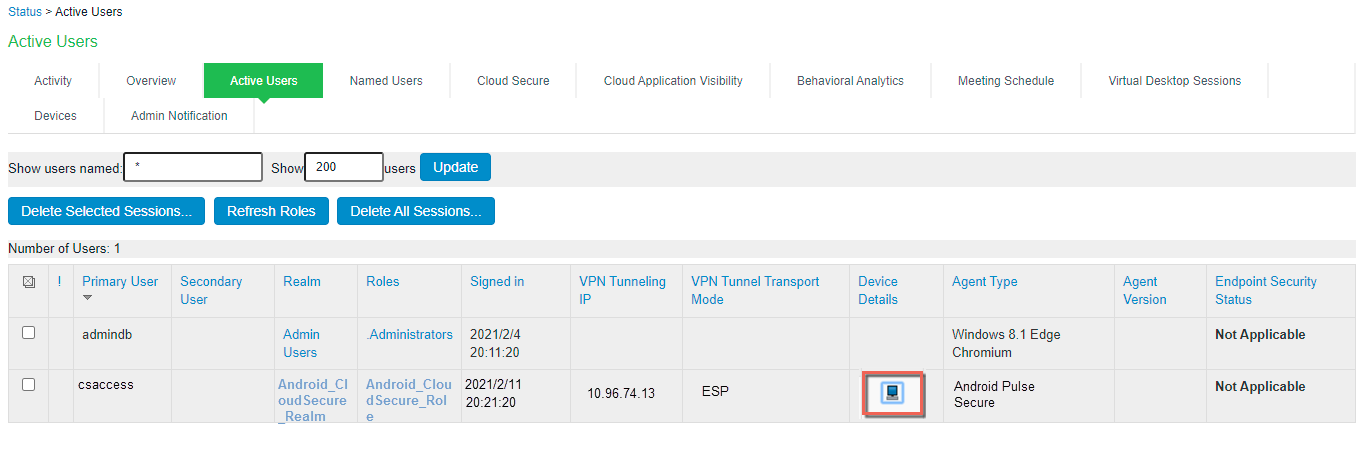
Click the icon in the Device Details column to navigate to the MDM report viewer page for the device.
Using a RADIUS Server
This topic describes integration with the RADIUS server.
RADIUS Server Overview
This section describes support for using an external RADIUS server.
Understanding RADIUS Server
A Remote Authentication Dial-In User Service (RADIUS) server is a type of server that allows you to centralize authentication and accounting for users.
The following authentication schemes are supported:
•Access-Request - The user enters the username and password to request access to RADIUS server.
•Access-Accept - The user is authenticated.
•Access-Reject - The user is not authenticated and is prompted to reenter the username and password, or access is denied.
•Access-Challenge - A challenge is issued by the RADIUS server. The challenge collects additional data from the user.
Feature Support
access management framework supports the following RADIUS features:
•RADIUS authentication.
•RADIUS attributes that can be used in role mapping.
•RADIUS directory services to retrieve user attributes in role-mapping rules.
•RADIUS accounting to track the services and the network resources used.
•RADIUS Disconnect messages. This feature is applicable for Ivanti Connect Secure.
Using Challenge Expressions
The access management framework supports the RSA Authentication Manager using the RADIUS protocol and a SecurID token (available from Security Dynamics). If you use SecurID to authenticate users, they must supply a user ID and the concatenation of a PIN and a token value.
When you define a RADIUS server, the access management framework allows administrators to use hard-coded (default) challenge expressions that support Defender 4.0 and some RADIUS server implementations (such as Steel-Belted RADIUS and RSA RADIUS) or to enter custom challenge expressions that allow the system to work with many different RADIUS implementations and new versions of the RADIUS server, such as Defender 5.0. The system looks for the response in the Access-Challenge packet from the server and issues an appropriate Next Token, New PIN, or Generic Passcode challenge to the user.
Using CASQUE Authentication
CASQUE authentication uses a token-based challenge/response authentication mechanism employing a CASQUE player installed on the client system. Once configured with CASQUE authentication, the RADIUS server issues a challenge with a response matching the custom challenge expression (:([0-9a-zA-Z/+=]+):). The system then generates an intermediate page that automatically launches the CASQUE player installed on the user's system.
PassGo Defender
If you are using a PassGo Defender RADIUS server, the user sign-in process is as follows:
1.The user is prompted for and enters a username and password.
2.The username and encrypted password are sent over the network to the RADIUS server.
3.The RADIUS server sends a unique challenge string to the system. The system displays this challenge string to the user.
4.The user enters the challenge string in a Defender token and the token generates a response string.
5.The user enters the response string on the system and clicks Sign In.
Using RADIUS Attributes
The following table describes the RADIUS attributes that are supported in RADIUS role-mapping:
|
Attribute |
Description |
|
ARAP-Challenge-Response |
Contains the response to the challenge of a dial-in client. Sent in an Access-Accept packet with Framed-Protocol of ARAP. |
|
ARAP-Features |
Includes password information that the network access server (NAS) must send to the user in an ARAP feature flags packet. Sent in an Access-Accept packet with Framed- Protocol of ARAP. |
|
ARAP-Password |
Appears in an Access-Request packet containing a Framed-Protocol of ARAP. Only one of User-Password, CHAP-Password, or ARAP-Password must be included in an Access-Request, or one or more EAP-Messages. |
|
ARAP-Security |
Identifies the ARAP security module to be used in an Access-Challenge packet. |
|
ARAP-Security-Data |
Contains the actual security module challenge or response, and is in Access-Challenge and Access-Request packets. |
|
ARAP-Zone-Access |
Indicates how to use the ARAP zone list for the user. |
|
Access-Accept |
Provides specific configuration information necessary to begin delivery of service to the user. |
|
Access-Challenge |
Sends the user a challenge requiring a response, and the RADIUS server must respond to the Access-Request by transmitting a packet with the Code field set to 11 (Access-Challenge). Access Challenge Response is not qualified over IPv6 |
|
Access-Reject |
Transmits a packet with the Code field set to 3 (Access-Reject) if any value of the received Attributes is not acceptable. |
|
Access-Request |
Conveys information specifying user access to a specific NAS, and any special services requested for that user. |
|
Accounting-Request |
Conveys information used to provide accounting for a service provided to a user. |
|
Accounting-Response |
Acknowledges that the Accounting-Request has been received and recorded successfully. |
|
Acct-Authentic |
Indicates how the user was authenticated, whether by RADIUS, the NAS itself, or another remote authentication protocol. |
|
Acct-Delay-Time |
Indicates how many seconds the client has been trying to send this record. |
|
Acct-Input-Gigawords |
Indicates how many times the Acct-Input-Octets counter has wrapped around 2^32 over the course of this service being provided. |
|
Acct-Input-Octets |
Indicates how many octets have been received from the port during the current session. |
|
Acct-Input-Packets |
Indicates how many packets have been received from the port during the session provided to a Framed User. |
|
Acct-Interim-Interval |
Indicates the number of seconds between each interim update in seconds for this specific session. |
|
Acct-Link-Count |
Indicates the count of links known to have been in a given multilink session at the time the accounting record is generated. |
|
Acct-Multi-Session-Id |
Indicates a unique Accounting ID to make it easy to link together multiple related sessions in a log file. |
|
Acct-Output-Gigawords |
Indicates how many times the Acct-Output-Octets counter has wrapped around 2^32 during the current session. |
|
Acct-Output-Octets |
Indicates how many octets have been sent to the port during this session. |
|
Acct-Output-Packets |
Indicates how many packets have been sent to the port during this session to a Framed User. |
|
Acct-Session-Id |
Indicates a unique Accounting ID to make it easy to match start and stop records in a log file. |
|
Acct-Session-Time |
Indicates how many seconds the user has received service. |
|
Acct-Status-Type |
Indicates whether this Accounting-Request marks the beginning of the user service (Start) or the end (Stop). |
|
Acct-Terminate-Cause |
Indicates how the session was terminated. |
|
Acct-Tunnel-Connection |
Indicates the identifier assigned to the tunnel session. |
|
Acct-Tunnel-Packets-Lost |
Indicates the number of packets lost on a given link. |
|
CHAP-Challenge |
Contains the Challenge Handshake Authentication Protocol (CHAP) challenge sent by the NAS to a PPP CHAP user. |
|
CHAP-Password |
Indicates the response value provided by a PPP CHAP user in response to the challenge. |
|
Callback-Id |
Indicates the name of a location to be called, to be interpreted by the NAS. |
|
Callback-Number |
The dialing string to be used for callback. |
|
Called-Station-Id |
Allows the NAS to send the phone number that the user called, using Dialed Number Identification Service (DNIS) or similar technology. |
|
Calling-Station-Id |
Allows the NAS to send the phone number that the call came from, using Automatic Number Identification (ANI) or similar technology. |
|
Class |
Sent by the server to the client in an Access-Accept and then sent unmodified by the client to the accounting server as part of the Accounting-Request packet, if accounting is supported. |
|
Configuration-Token |
Used in large distributed authentication networks based on proxy. |
|
Connect-Info |
Sent from the NAS to indicate the nature of the user's connection. |
|
Event-Timestamp |
Records the time that this event occurred on the NAS, in seconds since January 1, 1970 00:00 UTC. |
|
Filter-Id |
Indicates the name of the filter list for this user. |
|
Framed-AppleTalk-Link |
Indicates the AppleTalk network number used for the serial link to the user, which is another AppleTalk router. |
|
Framed-AppleTalk-Network |
Indicates the AppleTalk Network number which the NAS can probe to allocate an AppleTalk node for the user. |
|
Framed-AppleTalk-Zone |
Indicates the AppleTalk Default Zone to be used for this user. |
|
Framed-Compression |
Indicates the compression protocol to be used for the link. |
|
Framed-IP-Address |
Indicates the address to be configured for the user. |
|
Framed-IP-Netmask |
Indicates the IP netmask to be configured for the user when the user is a router to a network. |
|
Framed-IPv6-Pool |
Contains the name of an assigned pool used to assign an IPv6 prefix for the user. |
|
Framed-IPv6-Route |
Indicates the routing information to be configured for the user on the NAS. |
|
Framed-IPX-Network |
Indicates the IPX Network number to be configured for the user. |
|
Framed-MTU |
Indicates the maximum transmission unit to be configured for the user, when it is not negotiated by some other means (such as PPP). |
|
Framed-Pool |
Indicates the name of an assigned address pool used to assign an address for the user. |
|
Framed-Protocol |
Indicates the framing to be used for framed access. |
|
Framed-Route |
Indicates the routing information to be configured for the user on the NAS. |
|
Framed-Routing |
Indicates the routing method for the user, when the user is a router to a network. |
|
Idle-Timeout |
Sets the maximum number of consecutive seconds of idle connection allowed to the user before termination of the session or prompt. |
|
Keep-Alives |
Uses SNMP instead of keepalives. |
|
Login-IP-Host |
Indicates the system with which to connect the user when the Login-Service Attribute is included. |
|
Login-IPv6-Host |
Indicates the system with which to connect the user when the Login-Service Attribute is included. |
|
Login-LAT-Group |
Contains a string identifying the LAT group codes that this user is authorized to use. |
|
Login-LAT-Node |
Indicates the node with which the user is to be automatically connected by LAT. |
|
Login-LAT-Port |
Indicates the port with which the user is to be connected by LAT. |
|
Login-LAT-Service |
Indicates the system with which the user is to be connected by LAT. |
|
Login-Service |
Indicates the service to use to connect the user to the login host. |
|
Login-TCP-Port |
Indicates the TCP port with which the user is to be connected when the Login-Service Attribute is also present. |
|
MS-ARAP-Challenge |
Only present in an Access-Request packet containing a Framed-Protocol Attribute with the value 3 (ARAP). |
|
MS-ARAP-Password-Change-Reason |
Indicates the reason for a server-initiated password change. |
|
MS-Acct-Auth-Type |
Represents the method used to authenticate the dial-up user. |
|
MS-Acct-EAP-Type |
Represents the Extensible Authentication Protocol (EAP) type used to authenticate the dial-up user. |
|
MS-BAP-Usage |
Describes whether the use of BAP is allowed, disallowed, or required on new multilink calls. |
|
MS-CHAP-CPW-1 |
Allows the user to change password if it has expired. |
|
MS-CHAP-CPW-2 |
Allows the user to change password if it has expired. |
|
MS-CHAP-Challenge |
Contains the challenge sent by a NAS to a MS-CHAP user. |
|
MS-CHAP-Domain |
Indicates the Windows NT domain in which the user was authenticated. |
|
MS-CHAP-Error |
Contains error data related to the preceding MS-CHAP exchange. |
|
MS-CHAP-LM-Enc-PW |
Contains the new Windows NT password encrypted with the old LAN Manager password hash. |
|
MS-CHAP-MPPE-Keys |
Contains two session keys for use by the Microsoft Point-to-Point Encryption (MPPE). |
|
MS-CHAP-NT-Enc-PW |
Contains the new Windows NT password encrypted with the old Windows NT password hash. |
|
MS-CHAP-Response |
Contains the response value provided by a PPP MS-CHAP user in response to the challenge. |
|
MS-CHAP2-CPW |
Allows the user to change password if it has expired. |
|
MS-CHAP2-Response |
Contains the response value provided by an MS- CHAP-V2 peer in response to the challenge. |
|
MS-CHAP2-Success |
Contains a 42-octet authenticator response string. |
|
MS-Filter |
Transmits traffic filters. |
|
MS-Link-Drop-Time-Limit |
Indicates the length of time (in seconds) that a link must be underutilized before it is dropped. |
|
MS-Link-Utilization-Threshold |
Represents the percentage of available bandwidth utilization below which the link must fall before the link is eligible for termination. |
|
MS-MPPE-Encryption-Policy |
Signifies whether the use of encryption is allowed or required. |
|
MS-MPPE-Encryption-Types |
Signifies the types of encryption available for use with MPPE. |
|
MS-MPPE-Recv-Key |
Contains a session key for use by the MPPE. |
|
MS-MPPE-Send-Key |
Contains a session key for use by the MPPE. |
|
MS-New-ARAP-Password |
Transmits the new ARAP password during an ARAP password change operation. |
|
MS-Old-ARAP-Password |
Transmits the old ARAP password during an ARAP password change operation. |
|
MS-Primary-DNS-Server |
Indicates the address of the primary domain name server (DNS) server to be used by the PPP peer. |
|
MS-Primary-NBNS-Server |
Indicates the address of the primary NetBIOS name server (NBNS) server to be used by the PPP peer. |
|
MS-RAS-Vendor |
Indicates the manufacturer of the RADIUS client machine. |
|
MS-RAS-Version |
Indicates the version of the RADIUS client software. |
|
MS-Secondary-DNS-Server |
Indicates the address of the secondary DNS server to be used by the PPP peer. |
|
MS-Secondary-NBNS-Server |
Indicates the address of the secondary DNS server to be used by the PPP peer. |
|
Message-Authenticator |
Signs Access-Requests to prevent spoofing Access-Requests using CHAP, ARAP, or EAP authentication methods. |
|
NAS-IP-Address |
Indicates the identifying IP address of the NAS that is requesting authentication of the user, and must be unique to the NAS within the scope of the RADIUS server. |
|
NAS-IPv6-Address |
Indicates the identifying IPv6 Address of the NAS that is requesting authentication of the user, and must be unique to the NAS within the scope of the RADIUS server. |
|
NAS-Identifier |
Contains a string identifying the NAS originating the Access-Request. |
|
NAS-Port |
Indicates the physical port number of the NAS that is authenticating the user. |
|
NAS-Port-Id |
Contains a text string that identifies the port of the NAS that is authenticating the user. |
|
NAS-Port-Type |
Indicates the type of the physical port of the NAS that is authenticating the user. |
|
Password-Retry |
Indicates how many authentication attempts a user is allowed to attempt before being disconnected. |
|
Port-Limit |
Sets the maximum number of ports to be provided to the user by the NAS. |
|
Prompt |
Indicates to the NAS whether it should echo the user's response as it is entered, or not echo it. |
|
Proxy-State |
Indicates that a proxy server can send this attribute to another server when forwarding an Access-Request. The attribute must be returned unmodified in the Access-Accept, Access-Reject or Access-Challenge. |
|
Reply-Message |
Indicates that the text that can be displayed to the user. |
|
Service-Type |
Indicates the type of service the user has requested, or the type of service to be provided. |
|
Session-Timeout |
Sets the maximum number of seconds of service to be provided to the user before termination of the session or prompt. |
|
State |
Indicates that the packet must have only zero or one State Attribute. Usage of the State Attribute is implementation dependent. |
|
Telephone-number |
Using the Calling-Station-Id and Called-Station-Id RADIUS attributes, authorization and subsequent tunnel attributes can be based on the phone number originating the call, or the number being called. |
|
Termination-Action |
Indicates the action the NAS should take when the specified service is completed. |
|
Tunnel-Assignment-ID |
Indicates to the tunnel initiator the particular tunnel to which a session is to be assigned. |
|
Tunnel-Client-Auth-ID |
Specifies the name used by the tunnel initiator during the authentication phase of tunnel establishment. |
|
Tunnel-Client-Endpoint |
Contains the address of the initiator end of the tunnel. |
|
Tunnel-Link-Reject |
Indicates the rejection of the establishment of a new link in an existing tunnel. |
|
Tunnel-Link-Start |
Marks the creation of a tunnel link. |
|
Tunnel-Link-Stop |
Marks the destruction of a tunnel link. |
|
Tunnel-Medium-Type |
Indicates the transport medium to use when creating a tunnel for those protocols (such as L2TP) that can operate over multiple transports. |
|
Tunnel-Medium-Type |
Indicates the transport medium to use when creating a tunnel for those protocols (such as L2TP) that can operate over multiple transports. |
|
Tunnel-Password |
Specifies a password used to access a remote server. |
|
Tunnel-Preference |
Indicates that if RADIUS server returns more than one set of tunneling attributes to the tunnel initiator, you should include this attribute in each set to indicate the relative preference assigned to each tunnel. |
|
Tunnel-Private-Group-ID |
Indicates the group ID for a particular tunneled session. |
|
Tunnel-Reject |
Marks the rejection of the establishment of a tunnel with another node. |
|
Tunnel-Server-Auth-ID |
Specifies the name used by the tunnel terminator during the authentication phase of tunnel establishment. |
|
Tunnel-Server-Endpoint |
Indicates the address of the server end of the tunnel. |
|
Tunnel-Start |
Marks the establishment of a tunnel with another node. |
|
Tunnel-Stop |
Marks the destruction of a tunnel to or from another node. |
|
Tunnel-Type |
Indicates the tunneling protocol(s) to be used (in the case of a tunnel initiator) or the tunneling protocol in use (in the case of a tunnel terminator). |
|
User-Name |
Indicates the name of the user to be authenticated. |
|
User-Password |
Indicates the password of the user to be authenticated, or the user's input following an Access-Challenge. |
Understanding RADIUS Accounting
You can configure the device to send session start and stop messages to a RADIUS accounting server. The device sends a user-session start message after the user successfully signs in and the device maps to a role.
Whenever a user session is terminated, the device sends a user-session stop message to the accounting server. A user session is terminated whenever the user:
•Manually signs out
•Times out because of either inactivity or exceeding the maximum session length
•Is denied access because of Host Checker role-level restrictions
•Is manually forced out by an administrator as a result of dynamic policy evaluation
If users are signed into a device cluster, the RADIUS accounting messages might show the users signing in to one node and signing out of another.
The following table describes the attributes that are common to start and stop messages. The next table describes the attributes that are unique to start messages.
The following table lists the Attributes Common to Start and Stop Messages:
|
Attribute |
Description |
|
User-Name (1) |
Specifies the string that the device administrator specifies during RADIUS server configuration. |
|
NAS-IP-Address (4) |
Specifies the device's IPv4 address. |
|
NAS-IPV6-Address |
Specifies the device's IPv6 address. |
|
NAS-Port (5) |
The device sets this attribute to 0 if the user signed in using an internal port, or 1 if an external port is used. |
|
Framed-IP-Address (8) |
Specifies the user's source IPv4 address. |
|
Framed-IPv6-Address |
Specifies the user's source IPv6 address. |
|
NAS-Identifier (32) |
Specifies the configured name for the device client under the RADIUS server configuration. |
|
Acct-Status-Type (40) |
The device sets this attribute to 1 for a start message, or 2 for a stop message in a user-session or a sub-session. |
|
Acct-Session-Id (44) |
Specifies the unique accounting ID that matches start and stop messages corresponding to a user-session or to a sub-session. |
|
Acct-Multi-Session-Id (50) |
Specifies the unique accounting ID that you can use to link together multiple related sessions. Each linked session must have a unique Acct-Session-Id and the same Acct-Multi-Session-Id. |
|
Acct-Link-Count (51) |
Specifies the count of links in a multilink session at the time the system generates the accounting record. |
The following table lists Start Attributes:
|
Attribute |
Description |
|
Acct-Authentic (45) |
The device sets this attribute to: RADIUS - if the user is authenticated to a RADIUS server. Local - if the user is authenticated to a local authentication server. Remote - if the user is authenticated through any other RADIUS server. |
The following table lists Stop Attributes:
|
Attribute |
Description |
|
Acct-Session-Time (46) |
Specifies the duration of the user-session or the sub-session. |
|
Acct-Terminate-Cause (49) |
The device uses one of the following values to specify the event that caused the termination of a user session or a sub-session: User Request (1) - User manually signs out. Idle Timeout (4) - User is idle and times out. Session Timeout (5) - User's maximum session times out. Admin Reset (6) - User is forced out from active users page. |
Interoperability Requirements and Limitations
You must configure the third-party RADIUS server to communicate with the access management framework.
On the RADIUS server, configure the following settings:
•Hostname.
•Network IP address.
•Client type, if applicable. If this option is available, select Single Transaction Server or its equivalent.
•Type of encryption for authenticating client communication. This choice should correspond to the client type.
•Shared secret.
The following are the requirements and limitations for Interim update feature:
•If you want a server to receive interim accounting messages, you can statically configure an interim value on the client, in which case, the locally configured value overrides any value that might be included in the RADIUS Access-Accept message.
•The octet count reported in the accounting messages is the cumulative total since the beginning of the user session.
•The interim update byte count is only supported based on a user session, not on SAM or NC sessions.
Configuring Authentication with a RADIUS Server
To configure authentication with the RADIUS server:
1.Select Authentication > Auth. Servers.
2.Select RADIUS Server and click New Server to display the configuration page.
3.Complete the configuration as described in Table.
4.Save the configuration.
The following table lists RADIUS Server Settings:
|
Settings |
Guidelines |
|
Specify a name to identify the server within the system. |
|
|
NAS-Identifier |
Specify the name that identifies the Network Access Server (NAS) client to the RADIUS server. If you do not specify the NAS identifier, the value specified in the Hostname field on the System > Network > Overview page of the administrator console is used. If you use the RADIUS proxy feature, the NAS-Identifier field is not used. Proxy passes on the entire RADIUS packet including the NAS identifier from the client. |
|
Primary Server |
|
|
Radius Server |
Specify the name or IP address of the RADIUS server. |
|
Authentication Port |
Specify the authentication port value for the RADIUS server. Default port number: 1812, 1645 (legacy servers) |
|
NAS-IP-Address |
Specify the NAS IP address. If you leave this field empty, the internal IP address is passed to RADIUS requests. You can also fill this field with IPv6 address. If you configure the NAS IP address, then the system passes the value regardless of which cluster node sends the requests. If you use the RADIUS proxy feature, this field is not used. Proxy passes on the entire RADIUS packet including the NAS IP address from the client. |
|
Timeout (seconds) |
Specify the interval of time to wait for a response from the RADIUS server before timing out the connection. |
|
Retries |
Specify the number of times to try to make a connection after the first attempt fails. |
|
Users authenticate using tokens or one-time passwords. |
Select this option to prompt the user for a token instead of a password. For example, you can use this option to dynamically prompt for a password or token based on sign-in policies by configuring two instances of the same authentication server. You can use one instance for wireless users with this option enabled and that prompts the user for a token, and another instance for wired users with this option disabled and that prompts the user for a password. If you are using RADIUS proxy feature, this option is not used. |
|
Backup Server (required only if Backup server exists) |
|
|
Radius Server |
Specify the secondary RADIUS server. The authentication request is first routed to the primary RADIUS server, then to the specified backup server if the primary server is unreachable. Accounting messages are sent to the RADIUS server by each cluster node without consolidation. RADIUS accounting follows these assumptions: If the cluster is active/passive, all users are connected to one node at a time. If the cluster is active/active and does not use a balancer, users are connected to different nodes but are static. If the cluster is active/active and uses a balancer, the balancer usually enforces a persistent source IP. In this case, users are always connected to the same node. RADIUS does not support load balancing. |
|
Authentication Port |
Specify the authentication port. |
|
Shared Secret |
Specify the shared secret. |
|
Accounting Port |
Specify the accounting port. |
|
Radius Accounting |
|
|
User Name |
Specify the user information to the RADIUS accounting server. You can enter any of the applicable session variables. Applicable variables include those that are set the time after the user signs in and maps to a role. The default variables for this field are as follows: USER: Logs the username to the accounting server. REALM: Logs the realm to the accounting server. ROLE SEP=",": Logs the list of comma-separated roles assigned to the user. ROLE: Logs the role to the accounting server. If you assign the user to more than one role, the system separates them with commas. |
|
Interim Update Interval (minutes) |
Select this option to achieve more precise billing for long-lived session clients and during network failure.
If you are using the RADIUS proxy feature, the fields in this section are not used. The minimum interim update interval is 15 minutes. The data statistics (bytes in and bytes out) for RADIUS accounting might not be sent for a J-SAM/W-SAM/NC session if the session is less than 30 seconds long and the applications keep the connections open all the time. |
|
Send Interim Updates for sub sessions created inside parent sessions |
Enable this checkbox to send interim updates for sub sessions (child sessions) created inside parent sessions. |
|
Use VPN Tunnel assigned IP Address for FRAMED-IP-ADDRESS/FRAMED-IPV6-ADDRESS attribute value in RADIUS Accounting |
Select the Use NC assigned IP Address for FRAMED-IP-ADDRESS/FRAMED-IPV6-ADDRESS attribute value in Radius Accounting check box to use the IP address returned from Ivanti Connect Secure for the Framed-IP-Address attribute. Two IP addresses are recorded: one prior to authenticating with Ivanti Connect Secure, and one returned by VPN Tunneling after authentication. Select this option to use the VPN Tunneling IP address for the FRAMED-IP-ADDRESS/FRAMED-IPV6-ADDRESS attribute instead of the pre-authenticated (original) IP address. Framed IPv6 addresses based attribute fetching and parsing: NAS-IPv6-Address Login-IPv6-Host |
|
Radius Disconnect This feature is applicable for Connect Secure |
|
|
Enable processing of Radius Disconnect Requests |
Select this option to process Radius Disconnect Requests. The Radius Disconnect requests received from the backend Radius server will terminate sessions that match the attributes in the request. You must not configure multiple RADIUS authentication servers with the same backend server details. Radius Disconnect over IPv6 is not qualified. The Radius attributes that are used for session identification are: Framed-IP-Address (for sessions with VPN Tunnel only) Acct-Session-Session-Id Acct-Multi-Session-Id User-Name |
|
Next Token |
Specify the appropriate Next Token. |
|
New PIN |
Specify the New PIN. |
|
Generic Login |
Specify the Generic Login challenge to the user. |
|
Custom Radius Rules This feature is applicable for Connect Secure |
|
|
(Optional) Click New Radius Rule to add a custom challenge rule that determines the action to take for an incoming packet. When a user enters his or her username and password, the initial authorization request is sent to the server. The server may respond with a Challenge or Reject packet. In the Add Custom Radius Challenge Rule window, you select the packet type (Challenge or Reject) and then specify what action to take. For example, you can show a login page with a specific error message to the user, or automatically send an ACCESS-REQUEST packet back to the server. To create a custom challenge rule: Select the incoming packet type: Access Challenge - sent by the RADIUS server requesting more information in order to allow access Access Reject - sent by the RADIUS server rejecting access Specify an expression to evaluate, based on the Radius attribute, and click Add. If you specify more than one expression, the expressions are "ANDed" together. To remove an expression, click the delete icon next to the expression. Choose the action to take by selecting one of the following radio buttons: show NEW PIN page - user must enter a new PIN for the token show NEXT TOKEN page - user must enter the next tokencode show GENERIC LOGIN page - display an additional page to the user in response to an Access Challenge sent by the server. Sometimes a Radius server returns a Challenge packet and requires the user to enter additional information to continue the login process. For example, a server receives the initial username and password and sends an SMS message to the user's mobile phone with a one-time password (OTP). The user enters the OTP in the generic login page. show user login page with error - display the standard login page with an embedded error message. This option lets you bypass the standard message string sent by Connect Secure and display a custom error message to the user. Enter your custom message in the Error Message text box. There is no maximum character limit for this message. send ACCESS REQUEST with additional attributes - send an ACCESS-REQUEST packet with the specified attribute/value pair(s). Select an attribute, enter its value and click Add. To delete an attribute, click the delete icon next to the attribute/value pair. Click Save Changes to save your edits, then click Close to close this window. Your custom rules appear in the table under the Custom Radius Authentication Rule section. To delete a rule, select the check box next to the rule and click Delete. |
|
Displaying the User Accounts Table
To display user accounts, refer to the steps found in theDisplaying the User Accounts Table section.
Using an ACE Server
This topic describes integration with an ACE Server (now named RSA Authentication Manager).
RSA Authentication Manager Overview
This section describes support for using Ivanti Connect Secure with an ACE Server (now named RSA Authentication Manager).
Understanding RSA Authentication Manager
RSA Authentication Manager (formerly known as ACE/Server) is an authentication and authorization server that allows user authentication based on credentials from the RSA SecurID® product from RSA Security Inc.
When you use RSA Authentication Manager as the authentication and authorization service for your access management framework, users can sign in to Ivanti Connect Secure using the same username and password stored in the backend server.
The following table describes RSA SecurID hardware token and software token user sign-in methods:
|
Method |
Action |
|
Using a hardware token and the standard system sign-in page |
The user browses to the standard system sign-in page, and then enters the username and password (consisting of the concatenation of the PIN and the RSA SecurID hardware token's current value). The system then forwards the user's credentials to the authentication server. |
|
Using a software token and the custom SoftID system sign-in page |
The user browses to the SoftID custom sign-in page. Then, using the SoftID plug-in, the user enters the username and PIN. The SoftID plug-in generates a passphrase by concatenating the user's PIN and token and passes the passphrase to the authentication server. |
If the RSA Authentication Manager positively authenticates the user, the user gains access to the system. Otherwise, the RSA Authentication Manager:
•Denies the user access to the system.
•Prompts the user to generate a new PIN (New PIN mode) if the user is signing in to the system for the first time. Users see different prompts depending on the method they use to sign in.
•If the user signs in using the SoftID plug-in, then the RSA prompts the user to create a new pin; otherwise Ivanti Connect Secure prompts the user to create a new PIN.
•Prompts the user to enter the next token (Next Token mode) if the token entered by the user is out of sync with the token expected by RSA Authentication Manager. Next Token mode is transparent to users signing in using a SoftID token. The RSA SecurID software passes the token through the system to RSA Authentication Manager without user interaction.
•Redirects the user to the standard system sign-in page (SoftID only) if the user tries to sign-in to the RSA SecurID Authentication page on a computer that does not have the SecurID software installed.
Feature Support
access management framework supports the following RSA Authentication Manager features:
•New PIN mode
•Next-token mode
•Data Encryption Standard (DES)/ Secure Dial-In (SDI) encryption
•Advanced Encryption Standard (AES) encryption
•Slave Authentication Manager support
•Name locking
•Clustering
Interoperability Requirements and Limitations
The following limitations apply when defining and monitoring an RSA Authentication Manager instance:
•You can only add one RSA Authentication Manager configuration to the system, but you can use that configuration to authenticate any number of realms.
•You cannot customize the load balancing algorithm.
•When you enter the New PIN or Next Token mode, enter the required information within three minutes. Otherwise, the system cancels the transaction and notifies the user to reenter the credentials.
•The system can handle a maximum of 200 RSA Authentication Manager transactions at any given time. A transaction only lasts as long as is required to authenticate against the RSA Authentication Manager.
For example, when a user signs into the system, the RSA Authentication Manager transaction is initiated when the user submits the request for authentication and ends once the RSA Authentication Manager has finished processing the request. The user may then keep his or her session open, even though the RSA Authentication Manager transaction is closed.
Configuring Authentication with RSA Authentication Manager
To configure authentication with an ACE server:
1.Select Authentication > Auth. Servers.
2.Select ACE Server and click New Server to display the configuration page. Complete the configuration as described in the following table.
3.Save the configuration.
The following table lists the ACE Server Settings:
|
Settings |
Guidelines |
|
Name |
Specify a name to identify the server within the system. |
|
ACE Port |
Specify the default port of the authentication server. If no port is specified in the sdconf.rec file, the default port is used. |
|
Configuration File |
|
|
Current config file |
Specify the RSA Authentication Manager configuration file. You must update this file on the device anytime you make changes to the source file. |
|
Imported on |
Display the date on which the config file is imported. |
|
Import new config file |
Use the Choose File button to upload the sdconf.rec configuration file. |
|
Node Verification File |
|
|
Node |
Save the configuration to redisplay the configuration page. The updated page includes a section that lists a timestamp for the negotiation of the node secret between the system and the backend RSA server. The negotiation and verification automatically occur after first successful login. Do not expect entries in the table until at least one user has authenticated successfully. |
|
User Record Synchronization |
This feature is available only on Connect Secure. |
|
Enable User Record Synchronization |
Select this option to retain the bookmarks and individual preferences regardless of which system you log in to. |
|
Logical Auth Server Name |
Specify a logical authentication server name. |
Enabling RSA Risk Based Authentication (RBA) Support with ICS Cluster
RSA SecurID Risk-Based Authentication is a token less, multi-factor enterprise authentication solution. ICS integration with Risk based authentication works with the usage of custom sign in pages.
1.Open the PCS login page.
2.ICS immediately delegates authentication to RSA server by redirecting the user RSA Authentication Manager (AM) server to authenticate.
3.User is now prompted for step-up authentication based on the risk score. For example: The user is challenged to answer enter additional security questions if the user logs in from a different endpoint.
4.Once successfully authenticated to RSA AM, the user is redirected back to ICS with a one-time token key, validated by ICS.
5.Each agent in RSA AM is linked to an agent ID in the integration file. Download this file from RSA AM and add to custom sign-in page package.
6.In case of cluster (for example 2 node cluster) two integration files (node1.js and node2.js) are required in the custom sign-in page package and it can be used in LoginPage.thml.
For Example:
If the cluster node names are "node1" & "node2", add the similar lines inside the body (before the end) of LoginPage.thtml.
<% IF loginNode == "node1" %>
<script src='<% Home %>/node1.js' type="text/javascript"></script>
<% ELSE %>
<script src='<% Home %>/node2.js' type="text/javascript"></script>
<% END %>
<script>window.onload=redirectToIdP;</script>
7.In case of standalone ICS, the above conditional check with loginNode is not required. If the integration file name is am_integration.js, then add the integration file as part of custom sign-in page package and the below changes in LoginPage.thtml in Custom signin page would be sufficient.
<script src='<% Home %>/am_integration.js' type="text/javascript"></script>
<script>window.onload=redirectToIdP;</script>
Also, all the related LoginPage-*.thtml (like LoginPage-ipad.thtml in Custom) needs similar changes to reflect the RBA login experience for browser-based login from different devices.
Displaying the User Accounts Table
To display user accounts, refer to the steps found in the Displaying the User Accounts Table section.
Using the SAML Server
This topic describes the local SAML authentication server.
SAML Server Overview
This section describes support for using the local Connect Secure SAML authentication server.
Understanding SAML
SAML is an XML-based framework for communicating user authentication, entitlement, and attribute information. The standard defines the XML-based assertions, protocols, bindings, and profiles used in communication between SAML entities. SAML is used primarily to implement Web browser single sign-on (SSO). SAML enables businesses to leverage an identity-based security system like Connect Secure to enforce secure access to web sites and other resources without prompting the user with more than one authentication challenge.
For complete details on the SAML standard, see the OASIS web site:
http://www.oasis-open.org/committees/tc_home.php?wg_abbrev=security
SAML Feature Support
When deployed as SAML service provider, Ivanti Connect Secure runs a local SAML server that relies on the SAML identity provider authentication and attribute assertions when users attempt to sign in to Connect Secure. Note that authentication is only part of the Ivanti Connect Secure security system. The access management framework determines access to the system and protected resources.
Connect Secure supports :
•HTTP Redirect binding for sending AuthnRequests
•HTTP Redirect binding for sending/receiving SingleLogout requests/responses
•HTTP POST and HTTP Artifact bindings for receiving SAML responses
•RequestedAuthnContext context class specifications
Interoperability Requirements and Limitations
Before you begin:
•Check to see whether the SAML identity provider implements SAML 2.0 or SAML 1.1.
•Check to see whether the SAML identity provider uses HTTP POST or HTTP Artifact bindings for SAML assertions.
•Check to see whether the SAML identity provider has published a SAML metadata file that defines its configuration. If the SAML identity provider metadata file is available, configuration is simpler and less prone to error.
•Complete the system-wide SAML settings if you have not already done so. Select System > Configuration > SAML > Settings. For details, see Configuring Global SAML Settings.
•Add metadata for the SAML identity provider to the metadata provider list if you have not already done so. Select System > Configuration > SAML. For details, see Managing SAML Metadata Files
The sign-in URL for which a session needs to be established for Connect Secure as a service provider is identified by the RelayState parameter (HTTP URL parameter for artifact and HTML form parameter for POST.) In a service provider initiated case, the system populates RelayState as an HTTP URL parameter while sending AuthnRequest. In the IdP-Initiated scenario (Connect Secure is a service provider and there is a third-party IdP), the IdP must be configured to set the appropriate Sign-in URL of Connect Secure in the RelayState parameter of the HTML form containing the SAML response. For more information, see the SAML 2.0 specification.
Configuring Authentication with the SAML Server
To configure the SAML server:
1.Select Authentication > Auth. Servers.
2.Select SAML Server and click New Server to display the configuration page.
3.Complete the configuration as described in the following table.
4.Save the configuration.
You can configure multiple realms with one realm having machine auth and another realm with SAML authentication.
For more information on User Tunnel mode configured with SAML Authentication, see KB45726
The following table lists SAML Service Provider Profile:
|
Settings |
Guidelines |
|
Name |
Specify a name to identify the server instance. |
|
Settings |
|
|
SAML Version |
Select 2.0 or 1.1, depending on the SAML version used by the SAML IdP. |
|
SA Entity Id |
This value is prepopulated. It is generated by the system, based on the value for the Host FQDN for SAML setting on the System > Configuration > SAML > Settings page. |
|
Configuration Mode |
Select Manual or Metadata. If a metadata file or location is available from the SAML identity provider, use the metadata option to make configuration simpler and less prone to error. To upload or set the location for the published metadata file, select System > Configuration > SAML and click the New Metadata Provider button. |
|
Identity Provider Entity ID |
The identity provider entity ID is sent as the Issuer value in the assertion generated by the SAML identity provider. If you use the metadata option, this setting can be completed by selecting the identity provider entity ID from the list. The list is populated by the identity provider entities defined in metadata files added to the System > Configuration > SAML page. If you complete this setting manually, specify the Issuer value in assertions generated by the SAML identity provider. Typically, you ask the SAML identity provider administrator for this setting. |
|
Identity Provider Single Sign On Service URL |
The identity provider SSO service URL is a URL provisioned by the SAML identity provider. The setting is required to support service-provider-initiated SSO. If missing, the system cannot successfully redirect the user request. If you use the metadata option, this setting can be completed by selecting the SSO service URL from the list. The list is populated by the identity provider entities defined in metadata files added to the System > Configuration > SAML page. If you complete this setting manually, ask the SAML identity provider administrator for this setting. |
|
User Name Template |
Specify how the system is to derive the username from the assertion. If the field is left blank, it uses the string received in the NameID field of the incoming assertion as the username. If you choose a certificate attribute with more than one value, the system uses the first matched value. For example, if you enter <certDN.OU> and the user has two values for the attribute (ou=management, ou=sales), the system uses "management". To use all values, add the SEP attribute to the variable. For example, if you enter <certDN.OUT SEP=":">, the system uses "management:sales". The attributes received in the attribute statement in the incoming assertion are saved under userAttr. These variables can also be used with angle brackets and plain text. If the username cannot be generated using the specified template, the login fails. If the NameID filed of the incoming assertion is of type X509Nameformat, then the individual fields can be extracted using system variable "assertionNameDN". Currently supported NameIDs are - EMAIL, X509_SUBJECT, WIN_DOMAIN_QUALIFIED. If a SAML request is received with a different NameId format, then processing of the request fails with unsupported NameId format error message. |
|
Allowed Clock Skew (minutes) |
Specify the maximum allowed difference in time between the system clock and the SAML identity provider server clock. SAML is a time sensitive protocol. The time-based validity of a SAML assertion is determined by the SAML identity provider. If the SAML identity provider and SAML service provider clocks are askew, the assertion can be determined invalid, and you will receive the following error: "SAML Transferred failed. Please contact your system administrator. Detail: Failure: No valid assertion found in SAML response." We recommend you use NTP to ensure the clocks are synchronized and that you set an Allowed Clock Skew value that accommodates any expected or permissible skew. |
|
Support Single Logout |
Single logout is a mechanism provided by SAML for logging out a particular user from all the sessions created by the identity provider. Select this option if the system must receive and send a single logout request for the peer SAML identity provider. If you use the metadata option, the Single Logout Service URL setting can be completed by selecting the SLO service URL from the list. The list is populated by the identity provider entities defined in metadata files added to the System > Configuration > SAML page. The system sends Single Logout requests to this URL. In addition, if you use the metadata option, the Single Logout Response URL setting is completed based on your selection for Single Logout Service URL. If the identity provider has left this setting empty in its metadata file, the system sends the Single Logout response to the SLO service URL. If you complete these settings manually, ask the SAML identity provider administrator for guidance. The Support Single Logout service for the identity provider must present a valid certificate. |
|
SSO Method |
|
|
Artifact |
When configured to use the Artifact binding, the system contacts the Artifact Resolution Service (ARS) to fetch the assertion using SOAP protocol. If the ARS is hosted on a HTTPS URL, then the certificate presented by the ARS is verified by the system. For this verification to pass successfully, the CA of the server certificate issued to the identity provider ARS must be added to the trusted server CA on the system. Complete the following settings to configure SAML using the HTTP Artifact binding: Source ID. Enter the source ID for the identity provider ARS. Source ID is Base64-encoded, 20-byte identifier for the identity provider ARS. If left blank, this value is generated by the system. Source Artifact Resolution Service URL. For metadata-based configuration, this field is completed automatically from the metadata file and is not configurable. For manual configurations, enter the URL of the service to which the SP ACS is to send ArtifactResolve requests. ArtifactResolve requests are used to fetch the assertion from the artifact received by it. SOAP Client Authentication. Select HTTP Basic or SSL Client Certificate and complete the related settings. If you use an SSL client certificate, select a certificate from the device certificate list. Select Device Certificate for Signing. Select the device certificate the system uses to sign the AuthnRequest sent to the identity provider SSO service. If you do not select a certificate, the system does not sign AuthnRequest. Select Device Certificate for Encryption. Select the device certificate the system uses to decrypt encrypted data received in the SAML response. The public key associated with the device certificate is used by the identity provider for encryption. |
|
POST |
When configured to use the POST binding, the system uses a response signing certificate to verify the signature in the incoming response or assertion. The certificate file must be in PEM or DER format. The certificate you select should be the same certificate used by the identity provider to sign SAML responses. Complete the following settings to configure SAML using the HTTP POST binding: Response Signing Certificate. If you use the metadata-based configuration option, select a certificate from the list. The list is populated by the identity provider entities defined in metadata files added to the System > Configuration > SAML page. If you configure these settings manually, browse to and upload the certificate to be used to validate the signature in the incoming response or assertion. If no certificate is specified, the certificate embedded in the response is used. Enable Signing Certificate status checking. Select this option to check the validity of the signing certificate before verifying the signature. This setting applies to any certificate used for signature verification. If this option is enabled, the response will be rejected if the certificate is revoked, expired, or untrusted. If this option is selected, the certificate CA must be added to the Trusted Client CA store. If this option is not enabled, then the certificate is used without any checks. Select Device Certificate for Signing. Select the device certificate the system uses to sign the AuthnRequest sent to the identity provider SSO service. If you do not select a certificate, the system does not sign AuthnRequest. Select Device Certificate for Encryption. Select the device certificate the system uses to decrypt encrypted data received in the SAML response. The public key associated with the device certificate is used by the identity provider for encryption. |
|
|
|
|
|
|
|
Authentication Context Classes |
Use the Add and Remove buttons to select authentication context classes to be sent in the authentication requests to the SAML identity provider. These are included in the RequestedAuthnContext element. In the OASIS standard, an authentication context is defined as "the information, additional to the authentication assertion itself, that the relying party may require before it makes an entitlements decision with respect to an authentication assertion." This feature supports all authentication context classes specified in the SAML 2.0 OASIS Authn Context specification. For example, if you select X509, the system sends the following context: <samlp:RequestedAuthnContext> <saml:AuthnContextClassRef xmlns:saml="urn:oasis:names:tc:SAML:2.0:assertion"> urn:oasis:names:tc:SAML:2.0:ac:classes:X509</saml:AuthnContextClassRef> </samlp:RequestedAuthnContext> In response, the SAML IdP sends the context data along with the authentication results. The system stores the context data in the session cache and as a system variable named samlAuthnContextClass. The system variable can be used in role mapping rules and resource policy detailed rules. Specify a comparison attribute within the RequestedAuthnContext element. The comparison attribute specifies the relative strengths of the authentication context classes specified in the request and the authentication methods offered by a SAML IdP. The following values defined in the SAML 2.0 OASIS core specification can be selected: exact - Requires the resulting authentication context in the authentication statement to be the exact match of at least one of the authentication contexts specified. minimum - Requires the resulting authentication context in the authentication statement to be at least as strong as one of the authentication contexts specified. maximum - Requires the resulting authentication context in the authentication statement to be stronger than any one of the authentication contexts specified. better - Requires the resulting authentication context in the authentication statement to be as strong as possible without exceeding the strength of at least one of the authentication contexts specified. Select the same value that is configured on the SAML IdP. If none is specified in the SAML IdP configuration, the implicit default is exact. |
|
Service Provider Metadata Settings |
|
|
Metadata Validity |
Enter the number of days the metadata is valid. Valid values are 0 to 9999. 0 specifies the metadata does not expire. |
|
Do Not Publish SA Metadata |
Select this option if you do not want to publish the metadata at the location specified by the Entity ID field. |
|
Download Metadata |
This button appears only after you have saved the authentication server configuration. Use this button to download the metadata of the current SAML service provider. |
|
User Record Synchronization |
|
|
Enable User Record Synchronization |
Allow users to retain their bookmarks and individual preferences regardless of which device they log in to. |
|
Logical Auth Server Name |
Specify the server name if you have enabled user record synchronization. |
Displaying the User Accounts Table
To display user accounts, refer to the steps found in "Displaying the User Accounts Table
Using a Time-Based One-Time Password (TOTP) Authentication Server
This topic describes the Ivanti Connect Secure's integration with the Time-Based One-Time Password (TOTP) Authentication Servers.
TOTP Authentication Server Overview
This section describes support for using the Local/Remote Ivanti Connect Secure TOTP authentication server.
Understanding TOTP
Time-based One-Time Password (TOTP) algorithm as defined in RFC6238 is an authentication mechanism where a one-time password (a.k.a token) is generated by the authentication server and client from a shared secret key and the current time. ICS can act as TOTP authentication server. Any third-party TOTP applications (for example, Windows Authenticator or Google Authenticator) available on the mobile and desktop client platforms generate TOTP tokens. The TOTP authentication option is natively available on ICS without any additional products or license requirements. Customers can use TOTP authentication as part of their MFA policy, and strengthen their authentication mechanism for secure access scenarios.
Interoperability Requirements and Limitations
Before you begin:
•TOTP authentication server users' configuration is automatically synchronized within all nodes in a single cluster. If there are multiple clusters behind a DNS load-balancer, then the admin has to manually perform binary export/import user's configuration to all the nodes in different clusters.
•TOTP feature is configurable across clusters.
•First time users have to register a new TOTP user-account via web. End-users cannot use Ivanti Desktop applications and Ivanti Mac applications for new user registration.
•Two standalone nodes or separate clusters can be synced. For now, binary import/export of user configuration option can be used.
For the users who are already using custom sign-in pages:
For TOTP authentication to work, existing custom sign-in pages need to include following sign-in pages:
•TotpAuthRegister.thtml
•TotpAuthRegister-mobile-webkit.thtml
•TotpAuthRegister-ipad.thtml
•TotpAuthRegister-stdaln.thtml
•TotpAuthTokenEntry.thtml
•TotpAuthTokenEntry-mobile-webkit.thtml
•TotpAuthTokenEntry-ipad.thtml
•TotpAuthTokenEntry-stdaln.thtml
These files can be downloaded from sample custom sign-in pages URL: https://<<PCS>>/dana-admin/download/sample.zip?url=/dana-admin/auth/custompage.cgi?op=Download&samplePage=sample
Configuring Authentication with a TOTP Authentication Server
Configuring the TOTP Authentication Server Settings
To configure the TOTP server as Local:
1.Select Authentication > Auth. Servers.
2.Select Time based One-Time Password (TOTP) Server and click New Server to display the configuration page.
3.Complete the configuration as described in the following table.
4.Save the configuration.
The following figure depicts the TOTP Authentication Server Page - Local:
The following table lists the TOTP Auth Server Settings - Local
|
Settings |
Guidelines |
|
Name |
Specify a name to identify the server within the system. |
|
Server Type |
TOTP server can be configured as local or remote. Select Local. Local: TOTP context is created locally and user database is maintained locally on the same device. |
|
Time Skew |
Specify maximum time difference between Ivanti Connect Secure and end user device while authenticating a user's token. (minimum: 1 minute, maximum: 5 minutes). |
|
Number of attempts allowed |
Specify maximum number of consecutive wrong attempts allowed after which account will be locked (minimum: 1 attempt, maximum: 5 attempts). |
|
Custom message for registration page |
Specify a custom message which can be shown on new TOTP user registration web-page. |
|
Allow Auto Unlock |
When checked, locked account will be automatically unlocked after specified period. (minimum: 10 minutes, maximum: 90 days) |
|
Allow new TOTP user registration to happen via external port |
When unchecked (default), new TOTP user registrations will happen only via internal port |
|
Accept TOTP authentication from remote ICS devices |
When checked, REST access to this TOTP server is allowed from other Ivanti Connect Secure devices. |
|
Display QR code during user registration |
When checked, displays QR code during user registration. |
|
Disable generation of backup codes |
When unchecked, generates backup codes. |
To configure the TOTP server as Remote:
5.Select Authentication > Auth. Servers.
6.Select Time based One-Time Password (TOTP) Server and click New Server to display the configuration page. See Figure 16.
7.Complete the configuration as described in the following table.
8.Save the configuration.
If ICS is configured to use Remote TOTP server, then the remote ICS should have a valid certificate issued by a Trusted CA.
The following figure depicts the TOTP Authentication Server Page - Remote:
The following table lists TOTP Auth Server Settings - Remote:
|
Settings |
Guidelines |
|
Name |
Specify a name to identify the server within the system. |
|
Server Type |
TOTP server can be configured as local or remote. Select Remote. Remote: In this configuration, authentication checks take place on the remote TOTP server. The user local device (ICS to which user is logging in) will act merely as a proxy between the user's client device and TOTP server. The communication to the remote device happens on REST API. |
|
Allow new TOTP user registration to happen via external port |
If this option is not selected, new TOTP user registrations happen only via company intranet network. |
|
Host Name/IP |
Specify remote host name or IP address where the TOTP server is configured. The IP address or host name must match the common name mentioned in the remote TOTP server certificate. |
|
TOTP Server Name |
This is the name of the TOTP server configured on the Remote TOTP server. |
|
REST API Login |
Enter the REST API login name. |
|
REST API Password |
Enter the REST API password. |
|
REST Authentication Realm |
Enter the realm name, which refers to the realm that should be used for authenticating the REST user (using the auth. server mapped to the Realm). WARNING:This field is mandatory. If the realm field is not entered, user logins fail after upgrade. |
|
Test Connection |
This button is used to validate the connection to the remote TOTP server. |
Customer needs to upload proper certificate to the Remote TOTP server. Wildcard certificate is also supported.
Configuring Admin/User Realm to Associate a TOTP Authentication Server as Secondary Authentication Server
For example, to configure a user realm:
1.Select Users > User Realms > New User Realm.
2.Complete the settings for the user-realm.
3.Check the Enable additional authentication server option.
4.Under Additional Authentication Server, select any already created TOTP authentication-server from the Authentication #2 dropdown, as shown in the following figure.
Whenever admin selects TOTP authentication-server as the additional authentication server, then the Username: Predefined as <USER> and Password: specified by user in sign-in page options are set by default.
5.Click on Save Changes.
The following figure depicts Configuring Admin/User Realm to Associate a TOTP Auth. Server as Secondary Auth. Server:
Using Google Authenticator Application to Register to a TOTP Server
The admin can associate an end-user to a realm that has a secondary authentication server configured as TOTP authentication server.
For first time registration via web, perform the following steps:
For example: Admin associates an end-user User1 to a user-realm that has the TOTP authentication-server configured as the secondary authentication-server.
When User1 for the first time, performs a log in to the above configured user-realm:
1.After successful authentication with primary authentication-server, User1 is shown the TOTP registration page. See the following figure.
2.User1 is given a TOTP registration key in text form/QR image form and 10 backup codes. User saves 10 backup codes in a safe place for using it later during authentication when end-user device (where Google Authenticator app is installed) is not available (in emergency).
3.Now, User1 opens the device where Google Authenticator app is installed, then either scans the QR image (or) manually adds a new user (for example: GA-User1) by entering the above given secret registration key.
4.The Google-Authentication app (for GA-User1) generates a new 6-digit number called as a token once in every 30 seconds.
5.Enter the current token in the registration page. Click on Sign In. On successful authentication with that token, User1 will be taken to his/her home page.
The following figure depicts First Time Registration to a TOTP Server:
For already registered user, perform the following steps:
1.The already-registered user (For example: User1), whose realm was associated with secondary authentication server configured as TOTP authentication server, accesses ICS URL via web (User1 has already registered TOTP user in Google Authenticator app.)
2.After successful authentication with primary authentication server, user1 is shown TOTP Token entry page as seen in Figure 19.
3.User1 opens Google Authentication app that was installed in mobile (or PC), enters the current token to the Authentication Code. If mobile is not available, user can enter any of the unused backup codes.
4.On successful authentication with the token, User1 can enter any of the unused backup codes.
A backup code can be used only once to successfully authenticate with the TOTP authentication server. Once used, the same backup code cannot be reused.
The following figure depicts the Google Authentication Token:

Displaying the User Accounts Table
To display user accounts:
1.Select Authentication > Auth. Servers.
2.Click the link for the authentication server you want to manage.
3.Click the Users tab to display the user accounts table. The user accounts table includes entries for the accounts that have been created. See the following figure.
•The "Last Attempted" column shows the last time and date a user attempted to log in.
•The "Last Successful Login" shows the last successful sign-in date and time for each user.
•Under the "User Information" column, there are details available for a user's "Realm", "Primary AuthServer" and the "Status" columns
There are 3 possible states for the "Status" column:
•Active: TOTP user's account is in use (that is user has used this account less than stale period of this TOTP authentication server)
•Locked: TOTP user account has been locked due to maximum number of wrong login attempts
•Unregistered: TOTP user has seen registration page, but yet to complete the registration by entering the correct token in the registration page.
4.Use the controls to search for users and manage user accounts:
•To search for a specific user, enter a username in the Show users named field and click Update.
You can use an asterisk (*) as a wildcard, where * represents any number of zero or more characters. For example, to search for all usernames that contain the letters jo, enter *jo*. The search is case-sensitive. To display the entire list of accounts again, type * or delete the field's contents and click Update.
•To limit the number of users displayed on the page, enter a number in the Show N user's field and click Update.
•To unlock a user, select the specific user and click Unlock.
•To reset a user's credentials, select the specific user and click Reset.
The following figure depicts Displaying the User Accounts Table:
To unlock a TOTP user's account:
1.Go to the Users tab. The list of users is displayed.
2.Select the user whose account you choose to unlock.
3.Click on the Unlock button.
The following figure depicts Unlocking a User:

To reset a TOTP user's account:
1.Go to the Users tab. The list of users is displayed.
2.Select the user whose account you choose to reset.
3.Click on the Reset button. This removes the user entry from the table.
The following figure depicts Resetting a User:
Viewing/Generating Backup Codes
To view/generate TOTP backup codes after successful log in to a TOTP server via web:
1.User successfully authenticates to primary auth-server and TOTP auth-server via web.
2.Click on the Preference option on the top of the page.
3.In the Preference page, under TOTP Backup codes, click on either View or Generate to obtain user's TOTP backup codes.
The following figure depicts View/Generate Backup Codes:

Exporting/Importing TOTP Users
To export/import TOTP users:
1.Select Authentication > Auth. Servers.
2.Click the link for the authentication server you want to manage.
3.Click the Users tab to display the user accounts table. The user accounts table includes entries for the accounts that have been created. See the following figure.
4.Use the Export and Import buttons located at the bottom of the user accounts table to export and import TOTP users data.