Application Control
This page refers to an older version of the product.View the current version of the online Help.
Message SettingsIn this Section:
- About Message Settings
- Message Box Variables
- Configure Message Boxes Elements
- Message Style
- Self-Authorization
- Access Denied
- Network Connections
- Application Limits Exceeded
- Self-Elevation
- Time Limits
- System Controls
About Message Settings
Message Settings are used to define how message boxes are displayed to users and to specify the content of messages displayed when users attempt to launch applications in violation of a defined configuration.
Application Control message boxes can be customized to meet the requirements of an organization by specifying company colors, logos and fonts. More advanced styling can be achieved by using the Cascading Style Sheet (CSS), which is editable direct from the Message Style tab. Styling is applied to all the Application Control message boxes but the content of the messages can be amended individually.
Use the options in the Message Settings dialog available from the Global Settings ribbon to configure settings for messages issued to users. You can set up messages for situations where access is denied, application limits have been exceeded, and for self-authorization. Time limits for application behavior can be specified with warning and denied messages.
Message Box Variables
The message box caption and text may contain user and system-wide environment variables, and include the following environment variables. Environment variables are not expanded during testing.
| Environment Variable | Description |
|---|---|
| %ExecutableName% | The name of the denied application. |
| %FullPathName% | The full path of the denied application. |
| %DirectoryName% | The directory where the denied application is located. |
| %NetworkLocation% | The resolved IP address of the given hostname. |
|
%AC_Hash% |
The file hash. |
|
%AC_FileSize% |
The size of the file. |
|
%AC_ProductVersion% |
The version of the product. |
|
%AC_FileVersion% |
The version of the file. |
|
%AC_ProductName% |
The name of the product. |
|
%AC_CompanyName% |
The name of the company. |
|
%AC_Vendor% |
The name of the certificate signer. |
|
%AC_FileDescription% |
The description of the file. |
|
%AC_ParentProcess% |
The name of the process that started it. |
|
%AC_DecidingRule% |
The name of the allow rule in the AC configuration. |
|
%AC_FileOwner% |
The owner of the file. |
|
%AC_ClientName% |
The name of the connecting device. |
|
%AC_PortNumber% |
The name of the network port, only if applicable. If the port number is not 0, it will be displayed at the end of the blocked IP address. |
Configure Message Box Elements
For each type of message, define the following:
- Caption - The text to display at the top of the message. For example, you can change the default caption, Application Control, so that the user is not aware that Application Control has intervened.
- Message body - Enter the text to display in the body of the message.
-
Width - Specify the width of the message dialog. The width is measured in pixels and applies to all messages. The default value is 0.
-
Height - Specify the height of the message dialog. The height is measured in pixels and applies to all messages. The default value is 0.
When configuring messages, consider the following:
- Environment variables are supported for both the
caption and the message. In addition to system environment variables it
also supports the following for each file:
%ExecutableName%,%DirectoryName% and%FullPathName%. - When using hyperlinks in the message body, the full HREF attribute tag must be entered. For example, a
- If less-than or greater-than angle brackets are
to be displayed in the message body, use < and > respectively.
JavaScript is not supported.
You also have the option to view how the message will appear to others. Select Click here to see how the message will appear to users - Displays the message with the caption and body specified.
Message Style
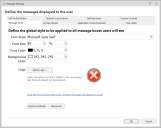
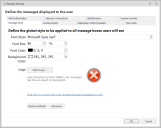
Application Control message boxes can be customized to meet the requirements of an organization by specifying company colors, logos and fonts. More advanced styling can be achieved by using the Cascading Style Sheet (CSS), which is editable direct from the Message Style tab. Styling is applied to all the Application Control message boxes but the content is managed for each message.
Define the required settings for all Application Control Message boxes:
- Font Style - Select the font type from the drop-down list.
- Font Size - Select the size of the font to be displayed. For specific font sizing, you can select the units by which the font is measured using the options available in the adjacent drop-down list.
- Font Color - Select the font color.
- Background Color - Select the background color of the message boxes.
- Logo - Use Select Logo to replace the default image on all Application Control message boxes. File sizes should be no larger than 100 kilobytes. Using logos may have an impact on the deployment of the configuration.
- Restore Defaults - Use Restore Defaults to undo any changes that have been applied to your message styles. For information on the options available, see Restore Defaults.
Use the Click here to see how the message will appear to users link to display an example of how the Access Denied message box will look when all the styles have been specified.
Restore Defaults
Use the Restore Defaults button to revert any changes that have been applied to your message styles. There are two options available:
- Restore to AppSense defaults - Select this option to restore the message box styling to the default settings. When this option is selected, the CSS and logo copied from the Application Control installed location overwrites any existing customization.
- Restore to Configuration defaults - Select this option to restore the message box styling to the styles specified in the configuration.
Advanced
Use the Advanced button to edit the message box style directly using CSS. When this option is selected the Advanced dialog displays. The dialog contains a basic CSS Editor, options to import, export and restore a CSS are also available.
It is recommended that an experienced user modifies the CSS. Any changes
to styling will impact all Application Control message boxes.
CSS3 is not supported.
Click the Export button and select a location to save the CSS file. When exported, the CSS file can be edited using another CSS editor and then re-imported when the amendments have been made.
Click the Import button and select the CSS file to open and use. The styles specified in the imported CSS will automatically overwrite any existing styles. These styles will take immediate effect but will not be applied until you save a configuration.
Self-Authorization
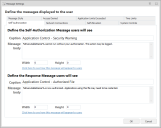
Self-Authorization is a security level within Application Control. Some applications require self-authorization by a user before they are allowed to run. You can specify the message displayed for both the initial message and the response. The self-authorization message displays when a self-authorizing user attempts to run a denied application and the file requires a user decision to run. The Response message displays when a self-authorizing user allows a DLL file that another application uses and the application may need to be restarted.
Configure the message that displays when self-authorization is required and the message that displays when an application has been authorized.
For more information, see Security Level.
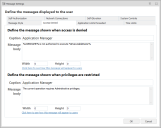
Access Denied
Access to applications can be denied or restricted for a user. Denied and restricted Items are specified in the Group, User, Device, Custom, Scripted, and Process rules.
Configure the messages that display when a user attempts to access an application that has been denied or when a user has insufficient privileges.
For more information, see Rules.
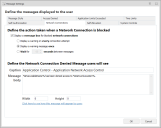
Network Connections
The Network Connections message displays when a connection is blocked. Configure the following settings to determine the action taken when a network connection is blocked:
-
Display a warning message for blocked network connections - Displays a message box for all blocked network connections. This option is enabled by default.
Selecting this option enables further settings and allows you to configure the content and dimensions of the connection denied message.
- Display a warning on every connection attempt - Displays a warning message every time a connection is attempted.
- Display a warning message once - Displays a message only on the first attempt per application within the same session.
- Wait ... seconds between messages - Specifies the number of seconds to wait before a new message is issued. Only one message displays per application within the specified period. No message displays for any subsequent attempts within the same period.
For more information, see Application Network Access Control.
Application Limits Exceeded
The Application Limits Exceeded message displays when the user is denied access to an application that has reached an application limit.
Configure the content and dimensions of the message that is displays when application limits are exceeded.
For more information, see Application Limits.
Self-Elevation
Configure the content and dimensions of the message that displays when a user requests self-elevation.
The messages are displayed if the Display a message box requiring a reason for Self-Elevation from the user option is selected in the Self-Elevation options.
- In the Global Settings ribbon, select Message Settings.
- Select the Self-Elevation tab.
-
In the Name field, enter the text to display for the self-elevation shortcut menu option.
The menu option is displayed when a user right-clicks a file with an extension on the Self-Elevation file associations list.
- Configure the caption, content, and dimensions for the message that displays when a user requests self-elevation.
- Click OK.
Time Limits
In Application Control, you can specify time limits for when applications can be accessed. For example, certain applications can be allowed to run only between 9 am and 5 pm, Monday to Friday. Two messages can be displayed:
- Warning Message: To inform the user that the time period is about to expire while the application is still running.
- Denied Message: To inform the user that they are attempting to run the application outside of the hours specified.
You can also specify whether the user is allowed to save their work before closing the application, or to just close the application upon the warning:
- Display an initial warning message - Select to display an initial warning message to the user when an application has exceeded time limits. Typically, this gives the user time to save their work and close the application. Use in conjunction with the Close application and Terminate application options. If you do not use this in conjunction with these options, only a message is displayed and application does not close.
- Close the application - Select to send a close message to the application. When most applications receive a close message they automatically give the user a chance to save their work. Select along with the Display an initial warning message option.
- Terminate the application - Terminate the application without allowing the user to save their work. Typically, this is used after the application has been sent a close message but has failed to terminate. Choose to select the Display an initial warning message or not, the application will terminate regardless.
- Wait - Specify the number of seconds to wait between each of the selected termination options. For example, if the user selects all three of the termination options and then selects 20 seconds, the warning message will be displayed, followed 20 seconds later by the close message and finally the application terminates after a further 20 seconds.
Configure the content and dimensions of the message that displays when time limits are exceeded.
System Controls
System Controls are used to prevent users from:
- Stopping named services
- Clearing event logs
- Uninstalling or modifying specific applications
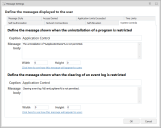
A message is displayed when the uninstallation of a program is restricted or when an event log cannot be cleared.
Configure the content and dimensions of the message that displays for both messages.
For more information, see System Controls.
Related topics
This page refers to an older version of the product.View the current version of the online Help.
The topic was:
Inaccurate
Incomplete
Not what I expected
Other
Copyright © 2019, Ivanti. All rights reserved.
