Rule Options
Allowed Items, Denied Items, Trusted Vendors, and User Privileges can be applied to Files, Folders, Drives, Digital Signatures, Signature Items, Network Connection Items, Windows Store Apps, and Group Items.
See Rule Items for more details on adding items.
Each rule option must be associated with one or more Rule Type.
In this section:
Rule Matching
Rule matching takes place when Application Control intercepts a file execution request and checks the configuration policy to determine whether a file is allowed to run.
Applying Rule Policies
The most lenient security policy is applied to a user profile that is affected by more than one rule. For example, a user who matches both a user rule assigned the Restricted security level and also a group rule that assigns the Self-Authorizing security level is granted self-authorizing privileges for all decisions and application use.
Matching Files and Rules
The Application Control agent applies rules by making a suitable match for the file type.

Matching is based on a three stage approach that considers security, matching order, and policy decisions:
- Security:
- Is the user restricted?
- Is ownership of the executable item trusted?
- Where is the executable located?
- Matching:
- Does the executable match a signature?
- Does the executable match an allowed or denied Item?
- Policy:
- Is Trusted Ownership checking enabled?
- Is there a timed exception?
- Is there
an application limit?
Example: File 'confidential.doc' is held within folder 'common'. A rule specifies that file 'confidential.doc' is denied but folder 'common' is allowed. The more granular rule takes precedence and the file confidential.doc will be denied.
Trusted Ownership Checking
During the rule matching process, Trusted Ownership checking is performed on files, folders, and drives to ensure that ownership of the items is matched with the list of trusted owners in the default rule configuration. If the check fails, a Trusted Vendor check is initiated.
If configured, when an executed file matches the predefined list of Allowed items, an additional security check ensures the ownership matches a user in the trusted owners list. If this check fails, Application Control attempts to match the digital signature of the file with the Trusted Vendor list. If a match still cannot be found the execution will be blocked.
Trusted Ownership checking is not necessary for items with digital signatures as these cannot be imitated.
When a default configuration is used, any new or existing file introduced to the system that is overwritten or renamed has its ownership changed to the current user. As a result, if the change is made by an untrusted user, any future execution requests will fail the trusted owners check.
Trusted Ownership checking can be used as a global rule or on a per item basis. To stop Application Control checking for trusted ownership, ensure Enable Trusted Ownership Checking is not selected in Global Settings > Trusted Owners.
Apply and Remove Rules
The Group rules node allows you to match security control rules with specific user groups within the enterprise.
The Group summary displays the group name, textual Security Identifier (SID) and security level of the rule. A SID is a data structure of variable length that identifies user, group, and computer accounts. Every account on a network is issued a unique SID when the account is first created. Internal processes in Windows refer to an accounts SID rather than the accounts user or group name. Likewise, Application Control also refers to a user or group SID unless the SID could not be found when added to the configuration.
Apply Rules
- From the Rules Items ribbon, click Add.
- Select the type of rule to be created:
- Group
- User
- Device
- Custom
- Scripted
Process
The Add Rule dialog displays.
- Enter the relevant information and click OK.
Remove Rules
-
To remove a group rule, highlight a rule and click Remove Rule on the Rules ribbon.
A confirmation message displays
- Click Yes to confirm the removal.
Metadata
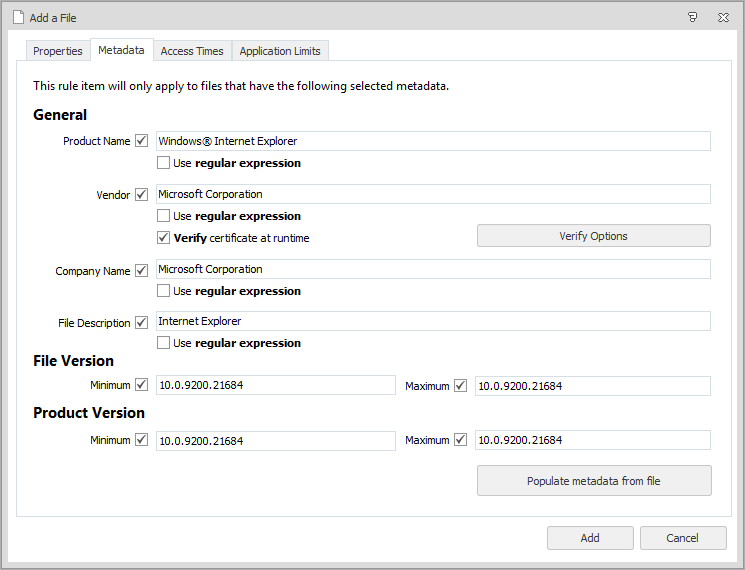
Metadata adds additional criteria for matching files and folders, once a match has been made with the file or folder properties. For example, adding metadata for a vendor, allows you to verify that a file is signed by a particular verified publisher.
Metadata is available for files and folders in allowed, denied, and user privilege application rule items. Metadata can be entered manually or added from an existing file. Select the Metadata tab for a file or folder for a compatible rule item:
- To add metadata from a file, select the Metadata tab and click Populate metadata from file and select the file from which you want to use the metadata. Select the check boxes for the required metadata.
- To add metadata manually, select a check box and add the required data.
To view the metadata for a file using Windows Explorer, right-click the file and select Properties. Metadata is displayed in the Details tab.
The following metadata can be configured for file and folder items:
-
Product Name - The name of the product.
-
Vendor - If the file has been digitally signed, the vendor name associated with the signature. A further option is available to test that the vendor metadata of the file can be trusted.
If Vendor metadata is enabled, a further option becomes available - Verify certificate at runtime. When this option is enabled, the agent verifies the certificate whilst it is matching the file. Click Verify Options to access a further set of criteria, used during file matching.
For further information, see Verify Options.
-
Company Name - The name of the company that produced the product.
-
File Description - The file or folder description as defined by the vendor or company.
The information displayed can be amended to criteria, which can include segments of the metadata, wildcards (*) can be used.
-
Minimum - Displays the minimum version number for the selected file.
-
Maximum - Displays the maximum version number for the selected file.
The information displayed can be amended to introduce a version range, where the maximum and minimum version number can be defined using wildcards and all versions of the file that falls between the range can be monitored.
-
Minimum - Displays the minimum product version number for the selected file.
-
Maximum - Displays the maximum product version number for the selected file.
The information displayed can be amended to introduce a version range, where the maximum version number can be defined using wildcards and all versions of the versions of the product that falls between the range can be monitored.
Wildcards can be used to substitute parts of the metadata information to allow you specify a required match based a segment of the selected metadata. For Example, if you had a vendor of Microsoft Corporation, but wanted anything associated with Microsoft, you could replace the word “Corporation” with a wildcard (*) to match anything associated with Microsoft not specifically “Microsoft Corporation”.
Rule items will only apply to files that match the selected metadata.