Environment Manager
This page refers to an older version of the product.View the current version of the User Help.
Sites
In this section:
- About Environment Manager Sites
- Add a Personalization Site
- Environment Manager Sites Hierarchy
- Environment Manager Site Membership Rules
- Environment Manager Site Conditions
- Servers and Virtual Hosts
About
Environment Manager Sites
Larger organizations typically utilize multiple sites to manage the User Personalization requirements of their users. Sites can be based on areas of the organization such as different departments, geographical location or any other logical division.
An Environment Manager site is made up of the following components:
- Client Endpoints
- Personalization Server(s)
- SQL Server
Each site uses this standard three-tier architecture and can be linked via their SQL servers through replication.
Within the Environment Manager console, sites are configured in the Sites node in the User Personalization navigation tree. All personalization configurations include a Default Site which contains the Personalization Server and database on which the software was installed and configured. This is typically set up as the main site for an organization, adding additional branch sites as required. If no further sites are configured, the Default Site is used.
Once a site has been created in the console, membership rules are used to define which endpoints have their personalization managed by that site. Personalization Servers and virtual hosts can then be added to the site as required.
When a user logs on to an endpoint, they connect to the Personalization Server listed in the AEMP configuration file. Once connected, the Personalization Server gathers details of the user, the endpoint and software to determine which site and personalization group the user belongs.
Add a Personalization Site
- In the User Personalization tree, select Personalization Settings > Sites.
- Select Add Site on the Server ribbon.
A New Site node is created and highlighted ready to be renamed in the navigation tree and the Site work area displays.
Environment Manager Sites Hierarchy
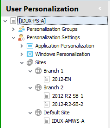
Environment Manager Sites are created in the User Personalization navigation tree. Users are assigned to the first site in the list where membership rules match. It is therefore important that sites are listed in order of priority to ensure users are assigned to the most relevant site.
An endpoint can match the membership rules of more than one site but will be assigned to the first matching site only.
To change the order, select a site and click Move Up and Move Down on the Edit ribbon.
Default Site
The Default Site is automatically included in all Environment Manager Personalization configurations. Any endpoint which does not match the membership rules for another site is assigned to the default site. Because of this, membership rules for the group cannot be defined. Servers and virtual hosts should be set up for this site which will be the default for a standard user within your organization.
Environment Manager Site Membership Rules
The membership rules for a site are governed by conditions which must be satisfied for an endpoint to use that site. The conditions are based on users, computer specifications and directory membership. Membership can be based on a single condition or a user may have to fulfill a number of conditions for membership of a site.
Similar to Personalization Groups, membership of a site can be based on two rule types:
- AND - Multiple conditions must be satisfied for membership of the site. This is called a condition group.
- OR - Membership is determined by satisfying the conditions for one of a number of conditions.
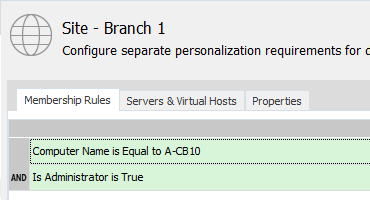
A condition group has been created containing two conditions:

Users must fulfill both conditions to be members of the site.
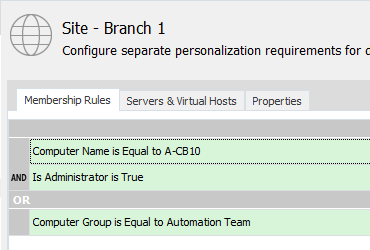
A second condition group has been added:

To be a member of this site, a user must fulfill all the conditions in the first condition group or the condition in the second condition group.
Create Site Membership Rules
- In the User Personalization tree, select Personalization Settings > Sites.
- Select a site.
-
Click in the Membership Rules work area.
The Memberships > Conditions ribbon is added and selected.
-
In the Conditions ribbon, select the required condition. User, Computer, and Directory Membership are available.
See Environment Manager Site Conditions for details.
The dialog box for the selected condition displays.
- Configure the condition and click OK. The new condition group displays under Membership Rules.
- To further define group
membership for the site, add more conditions:
- AND Rule - Right-click on an existing condition, select Insert Condition and configure the condition as required.
OR Rule - Right-click in the work area and select Add Condition Group and configure the condition as required.
Condition groups can be edited and deleted by selecting Edit Condition or Delete Condition from the shortcut menu.
Environment Manager Site Conditions
Using membership rules for sites enables you configure the conditions which govern who connects to which site in your organization. For example, if you set a User condition for a site you can ensure that when a user logs on, they are connected to the same site regardless of where they are and what computer they are logging onto.
If site membership rules are not configured, all managed users are assigned to the Default Site.
The table below list the available conditions for sites.
| Type | Condition |
|---|---|
| User | User Name User Group Is Administrator |
| Computer | Computer Name Computer Domain Computer NETBIOS Name Computer Group Computer IP Address |
| Directory Membership | User OU Membership Computer OU Membership Site Membership |
Servers and Virtual Hosts
Sites can be made up of multiple Personalization Servers and virtual hosts as defined by their individual requirements.
The servers and virtual hosts which have been set up for a site can be viewed by selecting the required site in the navigation tree and the Servers & Virtual Hosts tab.
Servers and virtual host can be deleted by selecting and clicking the appropriate button from the Edit ribbon.
Virtual Hosts should be added to a site to support network load balancing.
View and Edit Server and Virtual Host Properties
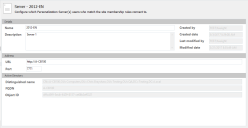
Select a server or virtual host from the navigation tree to display details in the work area. The display is the same for both virtual hosts and servers.
From the work area, the following properties can be edited for virtual hosts and servers:
- Name - A name what can easily identify the server or virtual host. This displays in the list of Servers & Virtual Hosts when a site is selected in the navigational tree.
- Description - A description for the server or virtual host.
- URL - The location of the server or virtual host. A valid URL must start with HTTP or HTTPS.
- Port - The connection method to the server or virtual host. The port range for is 7771 to 7790 and the default port is 7771.
Add Personalization Servers to a Site
- In the User Personalization tree, select Personalization Settings > Sites.
- Select a site.
-
Click Add Server from the Personalization ribbon. The Select Computers dialog box displays.
The Select Computers dialog box enables criteria to be used to search for servers by name or description and in specified directories, if required. The Advanced search button expands the dialog enabling the search to be further defined.
- Locate the server and click OK. The server is added as a new node under the site in the navigation tree.
Add Virtual Hosts to a Site
- In the User Personalization tree, select Personalization Settings > Sites.
- Select a site.
- Click Add Virtual Host from the Server ribbon. The Add Virtual Host dialog box displays.
- Enter the FQDN (Fully Qualified Domain Name) for the virtual host.
- Click OK. The virtual host is added as a new node under the site in the navigation tree.
Related Topics
Copyright © 2019, Ivanti. All rights reserved.


