This page refers to an older version of the product.View the current version of the online Help.
GeoSync
In this section:
- About GeoSync
- Associate Publishers and Subscribers
- Configure GeoSync for a Personalization Group
- Manage Syncs and Schedules
- Backup and Restore GeoSync Databases
About GeoSync
GeoSync provides a method of synchronizing user data and Environment Manager Personalization configurations between personalization server SQL server databases. This lets users access their data and settings at multiple locations, providing them with a consistent experience wherever they log on. Any changes they make are synchronized back to the published on the next sync.
GeoSync requires two or more personalization server databases - one to act as the publisher and the others as subscribers. Publishers and subscribers are associated using PowerShell Cmdlets provided when Environment Manager is installed. Subscribers are then assigned to personalization groups in the Environment Manager console, to determine which databases are synchronized.
Any changes that are made to the Users Data are synchronized between Publisher and Subscriber(s) to ensure that the latest changes are available. Whereas the User Data publication is a 'two-way' sync, Configuration is a One-Way sync from the Publisher to Subscriber(s). This is to enable a centralized configuration management, Administrators make any configuration updates on the Publisher Database which is then replicated out to Subscribers at next scheduled sync.
For example, an organization has offices in different locations throughout the world, each with their own personalization database. Staff who frequently move between offices are managed by a personalization group with GeoSync configured to synchronize daily. Their data is kept up to date and is available to them wherever they log in.
Configuration-only syncs can be performed. This is useful for organizations that maintain one configuration over multiple databases. You can choose to only synchronize configurations. An organization may use configuration-only syncs if they use one configuration over multiple databases. Each change to the configuration can be quickly synced to all the required subscribers without affecting user data.
Synchronized configuration items from the publisher are highlighted in purple when viewed in an Environment Manager console connected to a subscriber. The synchronized items cannot be edited in the subscriber.
For High Availability or Disaster Recovery of Personalization Server Databases, we recommend that you view our current Best Practice guide: DOC-46245
Depending on the customer environment different setup steps may be required. Below are the three scenarios supported by GeoSync:
New Subscriber Databases
For new subscriber databases, follow the steps in the sections below. If you are looking at setting up local-only Personalization Groups on your new subscriber (a Personalization Group on the subscriber which will not be managed by GeoSync on the publisher), they must be created after GeoSync has been successfully configured and the subscriber synchronized with the publisher.
Existing Subscriber Databases
If you intend to set up GeoSync on a subscriber that already contains a personalization configuration and data, the configuration and data must already exist on the publisher - either the subscriber is a backup of the publisher, or a database previously synchronized via SQL Server merge replication.
The following additional steps are required for the above scenario.
Caution Setting up GeoSync on an existing subscriber that contains a configuration or data that is not on the publisher will result in data loss and is not supported in this release. If you wish to use local-only Personalization Groups on your remote subscriber(s) these should only be set up after GeoSync has been configured.
- Associate the publisher and subscribers as described in Associate Publishers and Subscribers.
- In the personalization console on the publisher, configure GeoSync for your Personalization Group(s).
-
Run an initial synchronization from the console.
If duplicate Windows Settings Groups (WSGs) are identified on the subscriber, continue to step 5.
If no duplicates are identified, configuration is complete - the listed WSGs will prevent GeoSync synchronizing.
- Make a note of the current ProfileCleanUpDelayDays advanced setting and change to -1 on the subscriber. This ensures that, should the Background Service run its daily job, it will not attempt to clean up orphaned WSGs during the GeoSync setup
- On the subscriber remove the identified WSGs - do not remove any application groups from the subscriber.
-
Re-run step 3.
Once initial sync has successfully completed, the subscriber should now has the WSGs identified as duplicates restored and associated with the synced personalization group
- Restore ProfileCleanUpDelayDays setting back to its original value.
Satellite Database as a GeoSync Subscriber
This procedure addresses a situation where a personalization server database has been created by exporting some or all of the configuration from a larger, master database (using import/export functionality) and is used remotely for a smaller number of users. The customer wants to use GeoSync to automatically synchronize a subset of users between the master and satellite by making them GeoSync publisher and subscriber respectively. This wasn't possible using the existing merge replication scripts as they sync all of the database.
For full details about this scenario, see Satellite Database as a GeoSync Subscriber.
Associate Publishers and Subscribers
Set up GeoSync for your publisher and associate your subscribers using the ConfigureGeoSync.ps1 script. Set up can also be performed using the cmdlets supplied during Environment Manager installation. Some actions, such as adding new subscribers to existing publishers, can only be done using the cmdlets.
For further information about using the GeoSync cmdlets and how to use them in generated scripts, see GeoSync cmdlets.
SQL default language date
The default date format of the SQL Configurer account must match the US date format (mm/dd/yyyy).
Underlying SQL scripts require the US date format. Alternative date formats can cause the ConfigureGeoSync.ps1 script to fail and an error message to be displayed.
The Configurer account language setting can be viewed from Microsoft SQL Server Management Studio > Security > Logins > [Configurer Account] > right -click Properties > General Page > Default Language.
Further details can be found in this article.
SQL Express users: TCP/IP protocol must be enabled in the SQL Server Configuration Manager prior to performing the following process. This applies to both publishers and subscribers.
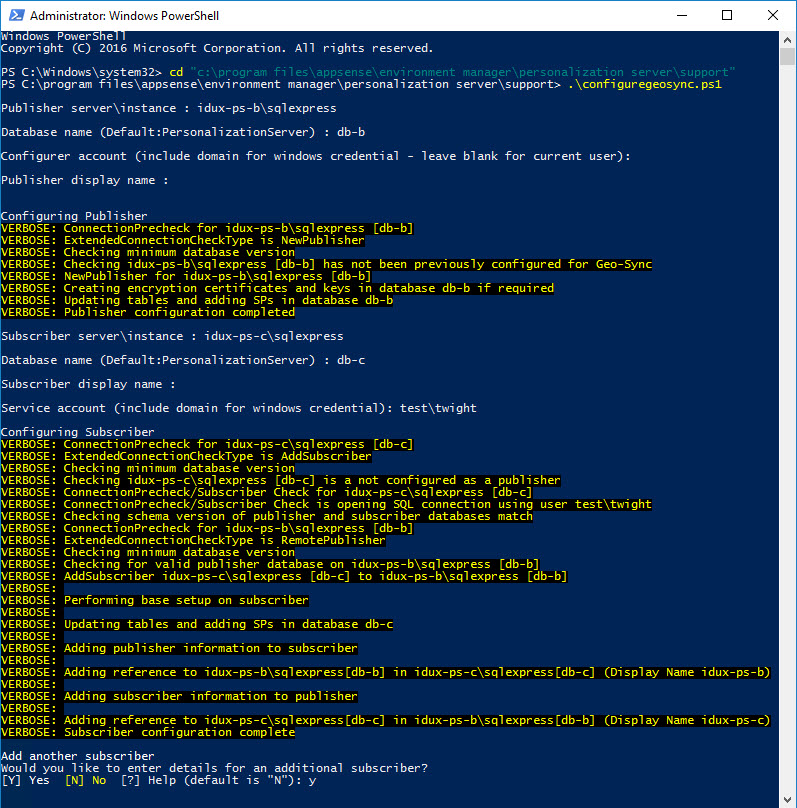
- Run Windows PowerShell as Administrator.
- Enter
cd "C:\Program Files\AppSense\Environment Manager\Personalization Server\Support"to set the location of the scripts. - Enter
.\ConfigureGeoSync.ps1 - Enter the following details when prompted:
- Publisher server\instance
- Publisher database name
- Configurer account - if using Windows credentials, include the domain name and leave blank to use the currently logged in user
- Publisher display name - this is optional, leave blank to use the SQL server name
- Subscriber server\instance
- Subscriber database name
- Subscriber display name - this is optional, leave blank to use the SQL server name
- Service account - if using Windows credentials, include the domain name
If successful, confirmation that configuration is complete displays. Further subscribers can be configured if required.
-
Enter
Yto add another subscriber orNto finish.
Configure GeoSync for a Personalization Group
Select subscribers for personalization groups, add conditions and configure sync types.
-
Select a Personalization group.
If GeoSync has been successfully configured, you should see the GeoSync tab - you might need to refresh your Environment Manager configuration.
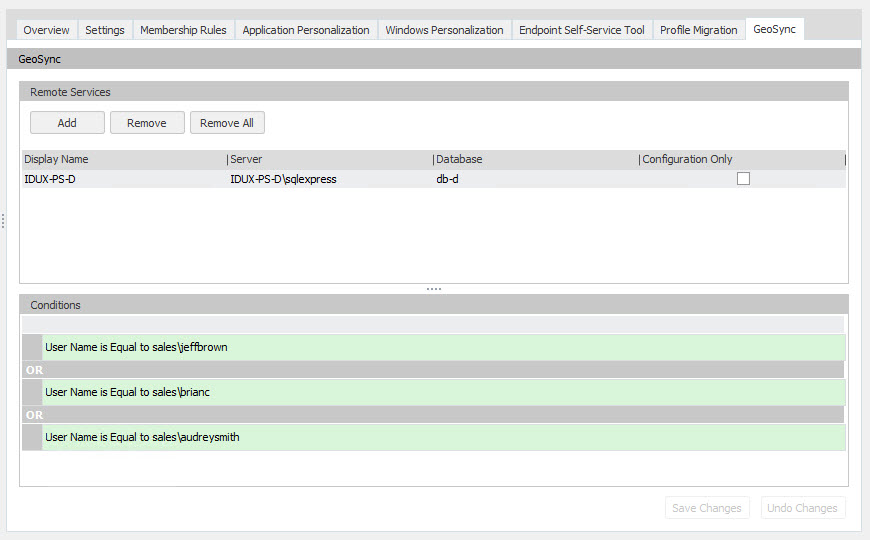
- Select the GeoSync tab.
-
Click Add and select the required subscribers from the Display Name drop-down.
All configured subscribers can be selected.
- Select the Configuration Only checkbox as required.
-
Optionally add user conditions to the personalization group.
This allows the sync to be further targeted, beyond personalization group membership rules.
-
Click Save Changes.
GeoSync is now set up for the personalization group.
Manage Syncs and Schedules
Configure, edit, and cancel sync schedules for subscribers or manually start a sync.
- In the Environment Manager console, connect to the personalization server for your publisher.
-
Select Manage > GeoSync.
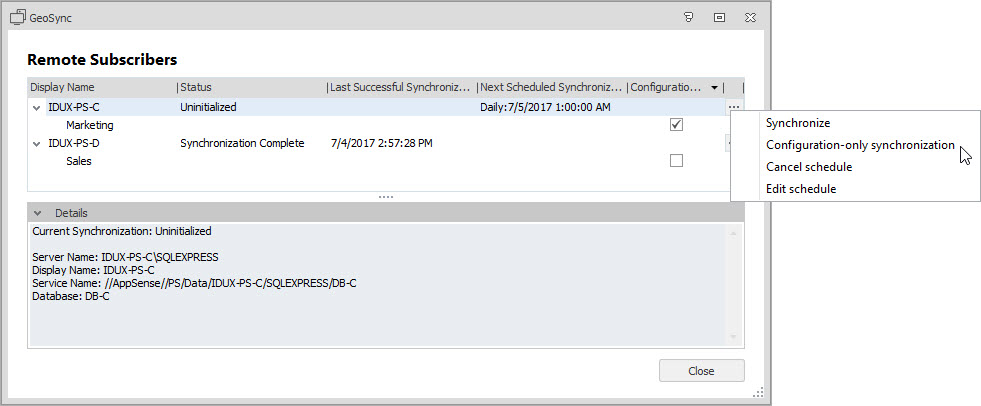
The GeoSync dialog displays the available subscribers. Any personalization groups that have already been set up for GeoSync are listed beneath the subscriber. The dialog also shows the sync status, details of the last and next scheduled syncs, and the sync type for each subscriber.
- Click the ellipsis for a subscriber and select the required option:
- Synchronize - Initiate an immediate sync of data and configuration for the selected subscriber.
- Configuration-only synchronization - Initiate an immediate configuration-only sync.
Schedule synchronization - Set the start time and whether the sync is run once or every 24 hours at the selected time.
Where a schedule exists for a subscriber, edit and cancel options are available.
Backup and Restore GeoSync Databases
The backup and restore of a GeoSync enabled Personalization Server database requires additional steps to that of a Personalization Server without GeoSync enabled. The Database Master Key, used for encrypting data in the database, requires backing up and depending on the conditions may be required when restoring the database. If a GeoSync enabled database is restored to a different SQL Server instance then a full reset and configuration is required. This is due to the database using specific server, instance, and database names in the synchronization settings.
It is recommended that the publisher and all subscriber databases are backed up and restored together.
GeoSync AlwaysOn Support
A GeoSync publisher database that is part of an AlwaysOn availability group can be set up using the New-EMPSPublisher cmdlet. See GeoSync-cmdlets.htm
The cmdlet includes two specific parameters:
• SecondaryReplicaServers - allows you to specify all secondary replicas. The cmdlet then adds the database master key credentials from the primary replica to all secondary replicas specified. This enables the master key credentials to be decoded after a failover.
•DatabaseMasterKeyPassword - allows you to specify the database master key password used to encrypt credentials.
It is important to retain this password, especially in the following scenarios:
•New replicas can only be added after the initial setup of GeoSync if the original database master key password is known.
•Should GeoSync be removed, the credentials remain in the database. The credentials can only be removed if the original password is known.
Backup GeoSync Databases
- Backup each of the subscriber databases.
- Backup the publisher database.
- Once the database backup is complete, backup the publisher's Database Master Key to a file using the following method:
- Using SQL Management Studio connect to the SQL Server instance containing the publisher database.
- Create a new query targeting the publisher database.
- Choose a secure password to encrypt the backup file. This password is required to restore the Database Master Key and is subject to complexity checks.
Run the
BACKUP MASTER KEYSQL command, for example:BACKUP MASTER KEY TO FILE = 'c:\backup\DatabaseMasterKey_PersonalizationServer.bak'ENCRYPTION BY PASSWORD = 'ruygn@KiHHas14m;%qG';
- Copy the database backups and Database Master Key backup file to a secure backup location.
Restore GeoSync Databases
Additional steps are required if the Personalization Server databases are to be restored to different SQL Server instances, or if the database has been renamed during the restore. Both processes are outlined below.
Restore to the same SQL Server Instances
Use this process if all the publisher and subscriber databases are being restored to the same SQL Server instances from which their backup where taken.
- Obtain the database backups and the Database Master Key backup file.
- Restore each of the subscriber databases from their backups.
- Restore the publisher database from its backup.
- Once restored, on the publisher SQL Server instance, enable the Service Broker using the following method:
- Using SQL Management Studio, connect to the SQL Server instance containing the publisher database.
- Create a new query targeting the publisher database.
Enable the Server broker using the command appropriate to your circumstances:
- This command requires exclusive access to the database - any other connections to the restored database have a shared lock on it, even when idle, thus blocking the ALTER DATABASE from completing. Close all connections to the database for the operation to complete:
ALTER DATABASE [PersonalizationServerDatabaseName] SET ENABLE_BROKER - If there are active connections to the database, the following command will roll-back any current transactions and close all existing sessions:
ALTER DATABASE [PersonalizationServerDatabaseName] SET ENABLE_BROKER WITH ROLLBACK IMMEDIATE - The following command creates a new Server Broker GUID. This command clears any messages waiting in the queue:
ALTER DATABASE [PersonalizationServerDatabaseName] SET NEW_BROKER WITH ROLLBACK IMMEDIATE
- This command requires exclusive access to the database - any other connections to the restored database have a shared lock on it, even when idle, thus blocking the ALTER DATABASE from completing. Close all connections to the database for the operation to complete:
- Restore the Database Master Key from its backup file using the following method:
- Using SQL Management Studio, connect to the SQL Server instance containing the publisher database.
- Create a new query targeting the publisher database.
Run the following RESTORE MASTER KEY SQL command targeting the publisher database. The decryption password is the one used in the BACKUP MASTER KEY SQL command, for example:
RESTORE MASTER KEYFROM FILE = 'c:\backup\DatabaseMasterKey_PersonalizationServer.bak'DECRYPTION BY PASSWORD = 'ruygn@KiHHas14m;%qG'ENCRYPTION BY PASSWORD = 'Gq%;m41saHHiK@ngyur'FORCE;The encryption password is used by SQL Server to re-encrypt the Database Master Key. There is no requirement to remember this encryption password.
Step 5. is not always required if the Service Master Key has not changed since the last backup. In such cases running this command will not return an error. Instead, SQL Server will report: The old and new master keys are identical. No data re-encryption is required.
Restore to a different SQL Server Instance
Use this process if any of the publisher or subscriber databases are being restored to a different SQL Server instance or the name of a database has changed.
- Follow all the steps in Restoring to the same SQL Server Instances.
- For the publisher and each of the subscriber databases, call the PowerShell cmdlet Reset-EMPSGeoSyncDatabase to remove the old GeoSync settings from each database. See GeoSync cmdlets for details on how to run this command.
- Set up GeoSync by following the steps in the Associate Publishers and Subscribers.
- Configure the required subscribers for each personalization group by following the steps in Configure GeoSync for a Personalization Group.
- Configure GeoSync schedule settings by following the steps in Manage Syncs and Schedules.