This page refers to an older version of the product.View the current version of the online Help.
Manage Layered Configurations
In this section:
Configure a Host
A host can be any AEMP file compatible with the version of the Environment Manager you are using. A host is no different to any other configuration - it is the term used to describe a configuration that contains layers.
-
Open a new or existing AEMP configuration in the Environment Manager console.
This initial layer will be your host configuration.
The configuration must have been created in the same version as the console you are using. Older configurations must be upgraded to the console version before they can be added as a layer.
For further information about Upgrading Configurations, see the User Workspace Manager help.
-
Enable Change Tracking, if required.
If you want to keep the history of layers being added to a layered configuration, Change Tracking must be enabled on the host.
- Configure the library and trigger sections you need in the host.
- Add Custom Settings, Personalization Servers and Auditing options. For a layered configuration, these options must be set in the host - they will not be included from the layers.
- Save the configuration.
Add a Layer
Once you have a host configuration, multiple AEMP configuration files can be added to create a layered configuration.
When you add a layer, it will either be new to that configuration or an update to an existing layer. When you select a layer to add, the icons denote whether it is a new or update.

- Before
adding a layer, ensure all the Add Layer Rules are satisfied:
- Layers must be valid configurations for the Environment Manager console they are being added to. For example, you cannot add an 8.3 configuration to an 8.5 console.
- Layers cannot be added if they are the same version or older than a layer already in the host.
- For example, Layer A version 2 exists in the layered configuration. You cannot add Layer A version 1 as it is an earlier version.
- Adding a new version of a layer will update all existing references of that layer to the new version.
- Configuration History is only added with a layer if Change Tracking is enabled on the host configuration.
- Open your host configuration.
-
In the Manage ribbon, in the Layers group, select Add.
The Add a layer dialog displays.
- Click the Add
drop-down and select one of the following:
- Configuration file from disk (Default - selected if the Add button is clicked)
- Configuration file from Management Center
Configuration file from SCCM
Each of these methods adds a layer.
-
Select the configuration(s) you want to add as layers - multiple configurations can be selected.
The selected layers are added to the dialog and analyzed for compatibility with the host and other layers. When adding layers to a new host, there are rules and conditions which a layer must satisfy.
If identically named nodes from different layers exist in the same trigger, they will run in parallel. For example, a new layer is added to a host. A node called "Node A" exists in the Process Started trigger at the same level in both configurations. The Process Started trigger in the layered configuration contains two nodes called "Node A" which would run in parallel.
Once analysis is complete, any errors arising from conflicts between the layers are identified. Click the link in the Errors column to view further details.
-
For each layer, select whether you want to add the full configuration or just the library settings.

-
Click OK.
The nodes and library settings from the layers are added to the configuration.
- Save the configuration.
The configuration can be distributed to endpoints using the Management Center or other deployment method.
Review Layer Changes
When adding an updated layer, the new and existing versions of the layer are compared to see what changes have been made in the new version. Click the View link in the History column to display a list of added, updated and deleted nodes resulting from the incoming layer. The history will also show details of any layers have been added or removed from that layer.

If Change Tracking is enabled in the configuration being added, the available history for that layer is displayed.

Remove a Layer
Removing a layer deletes all of that layer's nodes and library items from a layered configuration. You cannot delete a layer which has a dependency in another layer. As you create more complicated configurations, dependencies can be created between layers and between hosts and layers.
For example, Layer A has been added to a host configuration. Layer A contains a reusable node which is referenced by the host configuration on the logon trigger. You cannot delete Layer A without first removing the reference to the reusable node.
- Open a layered configuration.
-
In the Manage ribbon, in the Layers group, select Manage.
Each layer in the configuration is displayed in the Manage Layers dialog.
- Select the layer you want to remove from the configuration and click Delete.
The action will be analyzed to check that deleting the layer would not break a dependency with another layer. If an error is encountered, you will not be able to remove the layer.
If no errors are encountered, all nodes and library settings from that layer are removed from the layered configuration
Merge a Layer
Merging a layer allows you to take ownership of that layer, breaking any links with the original configuration. This is equivalent to copying every node and library item from the layer and pasting them into the host, making them writable.
- Open a layered configuration.
-
In the Manage ribbon, in the Layers group, select Manage.
Each layer in the configuration is displayed in the Manage Layers dialog.
- Select the layer you want to merge with the host and click Merge or if you want to combine all the layers in the configuration, click Merge All.
All nodes and library settings from the layer are added to the host. They now act as any other item in the host - they can be deleted and edited. The layer no longer exists in the layered configuration.
Merging Example
The layered configuration contains Layer 1 and Layer 2. Each contains one Computer Startup node, named Node 1 and Node 2 respectively.

Layer 1 is merged with the host. Although the layered configuration looks the same, Node 1 is now writable and part of the host configuration. Layer 1 is no longer a layer in the layered configuration.

If the layer being merged contains other layers those layers are not merged but become direct dependents of the host. In the example below, Layer 1 contains Layer 3. When Layer 1 is merged with the host, Layer 3 becomes a direct layer of the host.

Rollback a Layer
The Rollback function allows you to return a layer to an earlier version. To rollback a layer, you must have the access to the older version of the layer. It is therefore recommended that when using configuration layering, you keep copies of all versions of the layers you use.
- Open a layered configuration.
-
In the Manage ribbon, in the Layers group, select Rollback.
Each layer in the configuration is displayed in the Manage Layers dialog.
- Highlight the layer you want to rollback.
- Click the Browse
drop-down and select one of the following:
- Configuration file from disk (Default - selected if the Browse button is clicked)
- Configuration file from Management Center
- Configuration file from SCCM
-
Select the layer you want to roll back to. It must be an older version of the same layer.
The layers are analyzed to check that performing the rollback would not affect another layer. The larger the configuration, the longer the analysis takes. If an error is encountered the rollback cannot be completed.
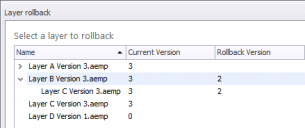
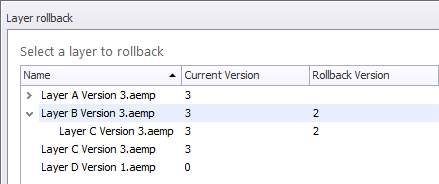
The current and rollback version numbers of the selected layer and its dependencies are displayed so you can ensure the right version of the layer has been selected for rollback.
- If there are no errors, click OK.
The layer is rolled back to the selected version.
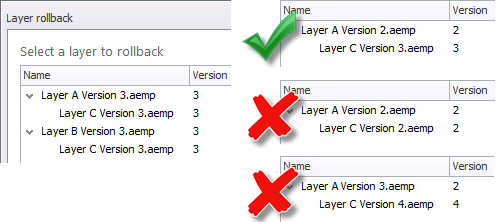
Rollback Rules
Layers cannot be rolled back if they contain an earlier OR later version of a layer which is referenced in another layer.
In the example below both layers contain Layer C version 3. You could not rollback to a layer which had an earlier or later version of Layer C as version 3 is referenced in the other layer.
Layer Properties
In the Manage ribbon, in the Layers group, select Properties to see details of the layers within a configuration.
The following information is displayed:
- Friendly Name - Use this field to give the configuration a meaningful name which allows you to easily identify it. Replace the AEMP filename in the Name field for a layer when adding, merging and deleting layers or when viewing the layer properties.
- Version - The version number of the layered configuration.
- Unique Identifier - The configuration ID number unique to each layer.
- Depends on Configurations - The configurations included in the layered configuration.
