Application Group Inclusions and Exclusions
Inclusions and exclusions for registry, folder and file paths can be added that apply to all applications within an Application Group.
It is recommended that inclusions and exclusions are added at Application Group level.
In this section:
- Add Application Group Inclusions using Application Data Collection
- Add Application Group Registry Inclusions or Exclusions Manually
- Add Application Group Folder Inclusions or Exclusions Manually
- Add Application Group File Inclusions or Exclusions Manually
- Application Group Properties
- About PVC virtualization
When an Application Group is selected in the User Personalization navigation tree, the work area displays a number of tabs. They display the personalization data that will be synced with your server for the selected Application Group. From here you can manually add further inclusions or exclusions as required.
•Applications
Lists the executables included within this group.
•Registry
Lists registry settings specified to be included or excluded when settings are synchronized with the Personalization Server.
•Folders
Lists folders specified to be included or excluded when settings are synchronized with the Personalization Server.
•Files
Lists files specified to be included or excluded when settings are synchronized with the Personalization Server.
•Properties
Display and edit group name and description. This section also includes an advanced group property.
Add Application Group Inclusions using Application Data Collection
Application Data Collection passively collects data from managed endpoints as users run applications.
Registry key and folder paths that are written to and read from are recorded for each application. On application close, the data is stored in the Environment Manager Personalization database.
- In the User Personalization navigation tree, select Personalization Settings > Application Personalization > Application Group.
- Select an application group.
-
From the Personalization ribbon, click Add Application > Select Application.
The Select Applications dialog displays.
-
Click New > From Application Data Collection.
The Add Application - Data Collection dialog displays. The dialog lists applications that have been collected by Application Data Collection.
- Select the application from which to add the folder or registry inclusions.
- Tick No, I want to configure this application manually (advanced).
-
Click Configure.
The dialog lists all registry keys and folder paths which have been collected by Application Data Collection for the selected application. Existing inclusions are selected.
- Tick the registry and folder paths to be added as inclusions for the Application Group. Unless explicitly excluded, child paths are included with their parent path. When a parent path is selected, the child paths are automatically deselected and disabled.
-
Click OK.
The Enter Details dialog displays. The Application name is read-only.
- Click OK.
The selected registry and folder paths are added as inclusions to the Application Group.
Add Application Group Registry Inclusions or Exclusions Manually
- In the User Personalization navigation tree, select Personalization Settings > Application Personalization > Application Groups.
- Select an application group.
- Select the Registry tab.
- In either the Include or Exclude area and select Add Registry Key.
The Select Registry Key dialog displays.
- In the Key field, select the ellipsis (...) to browse for the registry key or manually enter the path and key name into the field.
Wildcards can be used anywhere in a registry path
to represent one or more characters. For example, adding *.0 to the path
for Microsoft Outlook means all versions of Outlook can be included or
excluded with one entry.
HKCU\Software\Microsoft\Office\*.0\Outlook
The Browse Registry dialog displays. You can select from your local computer, current user or click Connect to display the Active Directory Select Computer dialog to select another computer to browse.
- Locate the required Registry Key and click OK.
The selected registry key is entered in the Select Registry Key dialog.
- Click OK.
The registry key is added as an inclusion or exclusion for the Application Group.
Add Application Group Folder Inclusions or Exclusions Manually
- In the User Personalization navigation tree, select Personalization Settings > Application Personalization > Application Group.
- Select an application group.
- Select the Folders tab.
-
In either the Include or Exclude area and select Add Folder.
The Select Folder dialog displays.
-
In the Path field, select the ellipsis (...) to browse for the folder. The path can also be entered manually into the field.
The Browse for Folder dialog displays. You can select an existing folder from your local computer or click the Make New Folder button to create a new folder for inclusion or exclusion.
- Locate the required folder and click OK.
- The selected folder path is entered in the Select Folder dialog.
- Click OK.
The folder path is added as an inclusion or exclusion for the Application Group.
Add Application Group File Inclusions or Exclusions Manually
- In the User Personalization navigation tree, select Personalization Settings > Application Personalization > Application Group.
- Select an application group.
- Select the Files tab.
-
In either the Include or Exclude area and select Add File.
The Select File dialog displays.
- In the Path field, select the ellipsis (...) to browse for the file. The path can also be entered manually into the field.
-
Locate the required file and click OK.
The selected file path is entered in the Select File dialog.
- Click OK.
The file path is added as an inclusion or exclusion for the Application Group.
Application Group Properties
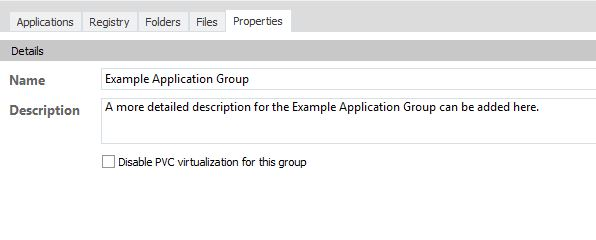
The Properties tab allows you to edit the Application Group name, and add or edit a description.

The tab includes the advanced feature Disable PVC virtualization for this group (Environment Manager 2021.3). Selecting this option requires careful review of your registry definition and of the specified includes and excludes. It is recommended only for experienced system administrators and/or on advice from Ivanti Support.
Selecting the Disable PVC option has the potential to significantly increase the amount of personalization data captured and could seriously impact user logon / logoff times and system performance.
There are two methods available for personalization of Application Groups:
•Standard virtualization (PVC is enabled)
•NVAG - PVC is disabled
(NVAG or Non-Virtualized Application Group)
Standard virtualization (PVC is enabled)
Essentially, with PVC (Process Vitualization Component) enabled, when personalization edits are made a copy of any updated registry definition and data is synced with the Personalization server. This is achieved by adding the PVC.DLL into the running application. Environment Manager then intercepts registry and file system events and any changes to personalization are captured and then synchronized. The process is efficient with only modified data being copied at group launch and close.
In some cases, personalized settings in third-party applications do not always function or display correctly when PVC is enabled (for example, bookmarks following update to Chrome 80). If an application has many plug-ins installed (such as Microsoft Outlook for example) performance can be affected as synchronization across each application and its multiple plug-ins) takes place.
PVC was originally introduced into Environment Manager to enable sandboxing where its use delivers consistent personalization regardless of the environment or machine in which an application is run. If you disable PVC virtualization, then this sandboxing facility is removed.
NVAG - PVC is disabled
Non-Virtualized Application Group or NVAG enables personalization when PVC is disabled. All personalization settings for the Application Group are synced when the first application in the group is launched, and when the last application in the group is closed:
•When the Application Group is started, personalization data for group is copied from the local cache into the Windows Registry
•Applications within the group start in sequence and read from the registry directly.
•When the Application Group is closed, personalization for the Application Group is copied from registry and then synced with the Personalization Server.
•Changes to registry setting values are overwritten; keys are merged
To Disable PVC:
1.From the Properties tab for your selected Application Group select the checkbox Disable PVC virtualization for this group.
2.A warning dialog is displayed. Select Yes to continue.
Understanding of the includes and excludes for your application groups is vital when using this setting.
Example: the user's profile is specified as an Include:
With PVC enabled - only files that have been changed are copied across at synchronization and this will perform acceptably.
With PVC disabled - ALL files in the user's profile will be synchronized when the group is opened and closed - and this could severely impact machine performance.
Checkbox not available
Advanced settings within Environment Manager can result in the checkbox being visible but not available for selection. Typically this is associated with very old legacy systems that have not upgraded to use registry hiving and where the UpgradeFbrToHive setting is set to False. Note that once this advanced setting is set to True, it is not possible to change it to False.
