Drives and Printers Actions
These actions map and unmap printers and drives as specified. They are useful for setting printers and mapping drives when users log on to a specific computer, giving access to printers and drives appropriate to their location.
In this section:
Map Drive
Create an action to map a drive on managed endpoints when triggered. For example, mapping users to a shared drive at logon so they have access to required resources. Drives are automatically unmapped at the end of a user session or following a configuration change unless the action is created under compatible triggers and the Permanent option is selected. Any drive can be mapped including SharePoint drives and local folders.
- In the Policy Configuration navigation tree, select or create a node or condition.
- In the Actions ribbon, select Drives & Printers > Map Drive.
-
Click Add and configure the following settings:
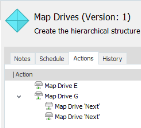
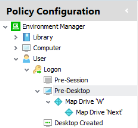
Field/Setting Description Drive Select which letter the drive maps to. The Next option is available on the Pre-Desktop and Desktop Created Logon triggers. This will attempt to map to the next unused drive letter. If you are using a mixture of actions that set specific drives and actions that use 'Next' drive setting, run the specific drive mappings first. This ensures all drives map correctly. To do this, make 'Next' map drive actions dependent children of specific drive mappings or create them in dependent child nodes.
Exclude Select which drive letters are ignored when the next available drive option is selected. The next available drive which is not on the exclude list is mapped. This is available on the Pre-Desktop and Desktop Created Logon triggers if Next has been selected as the drive. Path Enter the path or use the ellipsis to navigate to the required location. Friendly Name A name that will be displayed instead of the path on managed endpoints. The friendly name persists on endpoints unless explicitly cleared by mapping the same drive without a friendly name. Unmapping the drive does not clear the name. Retries
Enter the number of times endpoints will attempt to connect to the selected drive. If the endpoint exceeds this number of retries, the drive mapping fails.
Override Removes existing mapping to the specified drive on endpoints and remaps the drive based on the settings defined in the action. Hide The drive is mapped but is not visible in Windows Explorer on endpoints. Hidden drives can still be accessed by entering the drive letter in the Windows Explorer address bar or in a command window. This option is only available if the action is added to the Pre-Destop Logon trigger. Permanent The drive mapping persists on managed endpoints beyond the current session. If not selected, the drive is unmapped at logoff or following a configuration change.
The Permanent option is not available on the following triggers: Pre-Desktop, Process Started, Network Connected, Session Reconnected, Session Locked, and Session Unlocked.
Caution When mapping a drive as another user, selecting the Permanent option may expose the password to the logged on user. Caution must be used in highly secure environments.
- Complete
the optional tabs as required.
See also Configuring Actions in the Action Management help. - Click OK to save the action.
Unmap Drive
Create an action which unmaps a drive when triggered. For example, unmapping a drive when a user disconnects from the network.
- In the Policy Configuration navigation tree, select or create a node or condition.
- In the Actions ribbon, select Drives & Printers > Unmap Drive.
- Select the drive to disconnect.
- Complete
the optional tabs as required.
- General
Run As
See Action Management.
- Click OK to save the action.
Map Printer
Create an action to map a printer for users. For example, by combining this action with Computer IP Address conditions, users are automatically connected to the correct printer for their location.
- In the Policy Configuration navigation tree, select or create a node or condition.
-
In the Actions ribbon, select Drives & Printers > Map Printer.
The Map Printer dialog displays.
-
Complete the following fields and apply the required settings:
Field/Setting Description Remote printer path Enter the printer address or click the ellipses and select the required printer. The address can be in UNC, Direct IP or HTTP. If using an IP address, the default port, 9100, is used. To use an alternative port, add it to the end of the IP address, separated by a colon, for example, 123.456.789.012:9101.
Friendly Name If using an IP address for a printer, enter an optional friendly name. This allows you to easily identify the printer. Unmap at logoff Apply as required to determine whether the printer mapping persists beyond the user's current session or is unmapped when the user logs off. Set as default printer Select to make this printer the users' default. Retries Enter the number of times endpoints will attempt to connect to the selected printer. If the number of retries is exceeded, the printer is not mapped. Timeout (secs) Enter the time, in seconds, to wait between connection attempts. Driver Location If using an IP address for a printer, enter or select the location of the relevant printer driver INF file. If the driver specified in the Driver Name field does not already exist on an endpoint, the driver installs from the specified location. If the driver fails to install, the printer is not mapped. Driver Name If using an IP address for a printer, enter the name of the required driver. If already installed on endpoints, the printer is mapped. If not installed, the driver is installed from the specified driver location. - Complete
the optional tabs as required.
- General
- Connect As
- Click OK to save the action.
Set Default Printer
Create an action to set the default printer for users. For example, by combining this action with Computer IP Address conditions, users are automatically connected to the correct printer for their location.
- In the Policy Configuration navigation tree, select or create a node or condition.
- In the Actions ribbon, select Drives & Printers > Set Default Printer.
- Enter the Remote printer path or click the ellipses and select the required printer.
- The address can be in UNC, Direct IP or HTTP. If using an IP address, the default port, 9100, is used. To use an alternative port, add it to the end of the IP address, separated by a colon, for example, 123.456.789.012:9101.
- Apply the Unmap at logoff setting as required to determine whether the printer mapping persists beyond the user's current session or is unmapped when the user logs off.
- Complete
the optional tabs as required.
- General
Connect As
- Click OK to save the action.
Unmap Printer
Create an action to unmap a specific printer or all existing printer connections when triggered.
- In the Policy Configuration navigation tree, select or create a node or condition.
- In the Actions ribbon, select Drives & Printers > Unmap Printer.
- Do one of the following:
- To unmap all existing printer connections, select Unmap All.
To unmap a specific printer, enter the Remote printer path or click the ellipses and select the required printer.
The address can be in UNC, Direct IP or HTTP. If using an IP address, the default port, 9100, is used. To use an alternative port, add it to the end of the IP address, separated by a colon, for example, 123.456.789.012:9101.
- Click OK to save the action.

