Appliance network identity
In this section:
•Configure appliance network identity
•Change network identity settings (admin console)
Configure appliance network identity
Initial configuration of your first appliance is carried out using the File Director text console:
-
After the appliance has booted, click in the console and press F2.
The Password prompt displays.
-
Type the password and press Enter.
The main menu displays.
-
Use the arrow keys to select Configure Networking and press Enter.

The Configure networking box displays.
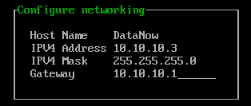
- Enter a host name. When you set a host name, the appliance uses it to generate a temporary self-signed SSL certificate.
- (2020.3 and later) If required, enter yes to enable DHCP support.
Note that if DHCP is enabled the IP address fields in this dialog are not required and their values can be ignored. For DHCP to be fully applied you will need to reboot the appliance at this stage and can then connect to the Admin console to configure your appliance. - If DHCP is not enabled, enter an IP address, subnet mask and a default gateway. The default gateway is the IP address of the internal gateway to services that include, for example, the DNS server, the Active Directory service, the email server and the file store.
- Press F10 to save the network settings.
- From the main menu, select Reboot and press Enter.

The server reboots then displays the host name and IP address.
If you subsequently make changes to your VM network and you have DHCP enabled, you will need to reboot the appliance to renew the DHCP lease.
Change network identity settings (admin console)
Once set up, the ongoing maintenance of appliance settings can be performed via either the text console or the admin console (2020.3 and later). The fields described in the example below apply equally to both consoles.
1.From the admin console, click Home > Networking.
The Network adapter configuration dialog is displayed, populated with the current configuration values.
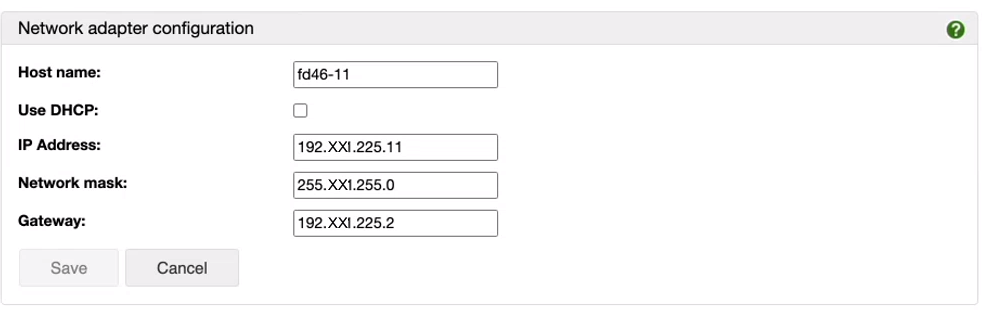
Host name - name of the appliance machine
Note, the following fields are populated only when the Use DHCPcheckbox is clear (or is selected but not yet saved).
IP Address , Network mask, Gateway - the IP address details are supplied from the DHCP server.
2.To change from static to dynamic IP address use, select the Use DHCP checkbox, then click Save.
3.A Network settings update message is displayed. Click OK to save your settings changes and reboot the node, or click Cancel to abandon your changes.
Note that when you confirm your changes, the reboot will result in you being logged out of the admin console as the IP address has now changed.