Install and start the File Director appliance
-
Log into Ivanti Support and download the required File Director appliance software.
Appliance software is available for ESXi 7.0 or later and Hyper-V 2016 and above.
- Extract the appliance image files and template.
- In the hypervisor or virtual machine manager, import the template.
- The template creates the required appliance environment.
- Start the appliance.
If you subsequently make changes to your VM network and you have DHCP enabled, reboot the appliance to renew the DHCP lease.
Examples:
- Log in to a Windows Server desktop.
- Download and extract the File Director Hyper-V zip file to a suitable storage location. Hyper-V uses the virtual hard disks from the location you choose.
- Start Microsoft Hyper-V Manager.
-
Select the Import Virtual Machine action.
If you are using System Center, select New Virtual Machine to import the template.
- Browse to the folder that you extracted. The Import Virtual Machine wizard requires the folder that contains the config.xml file.
- Select the option to copy the virtual machine and create a new unique ID.
- Click Import.
When deploying to ESX, the OVT template defaults networking to "Host Only" and must be manually assigned the correct network before using the appliance.
- Download and extract the File Director ESX zip on your local machine.
- Start the VMware vSphere Client and log in to the host of vCenter Server.
- From the menu, select File > Deploy OVF Template and follow the wizard.
Start the appliance and change your password
During deployment, connectivity can be lost when the appliance
is migrated to another node, for example following a reboot. Network configurations
are not applied because dynamic MAC addresses assigned in Hyper-V
are lost when the node is moved.
To solve this issue, configure a static MAC address in Hyper-V prior to
booting the appliance for the first time.
- Start or power on the virtual machine and wait for the appliance to boot.
-
If required, change the input locale. Press F9 to cycle through the available options. This sets the character mapping for your keyboard.

The default locale for keyboard mapping is US English. If you set a password which contains characters with different mapping in your locale, it could affect your login. For example, if your password is set to P@ssword through the console using a UK English keyboard, it is recorded as P"ssword Therefore, if you log in from the web client or an SSH client which supports character translation, the wrong password is supplied and login fails.
-
Press F2.
The password prompt displays.
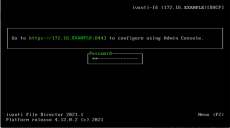
If you have a DHCP server, you can open the web browser and continue the configuration of your File Director appliance from there using the displayed URL.
If you have no DHCP server, continue in the text console to configure networking.
-
Enter the default password: Ivanti
The Main Menu displays.
The password must be changed before networking can be configured.
Do not forget the appliance password. It cannot be recovered. -
Select Change Password and press Enter.
The appliance password can also be reset from the Admin console (2021.1 and later), refer to Check the Appliance Status.
- Type the new password and press Enter.
-
Type the new password again to verify it and press Enter.
The Main Menu displays with the Configure networking option now available.


