Application Groups
Application Groups are a collection of applications whose CPU, memory and disk resources can be controlled together. Applications can be added either manually or using Application Discovery.
In the configuration, Application Groups can be combined with specific users to allocate resources at a granular level. A typical Application Group could contain graphic-intensive applications which utilize a high proportion of system resources. A rule could be added to allow members of the Graphics Design team to run these applications with adequate resources.
In this section:
Create Application Groups Manually
- Select Application Groups in the navigation tree.
-
Click Add New from the Resources Setup ribbon.
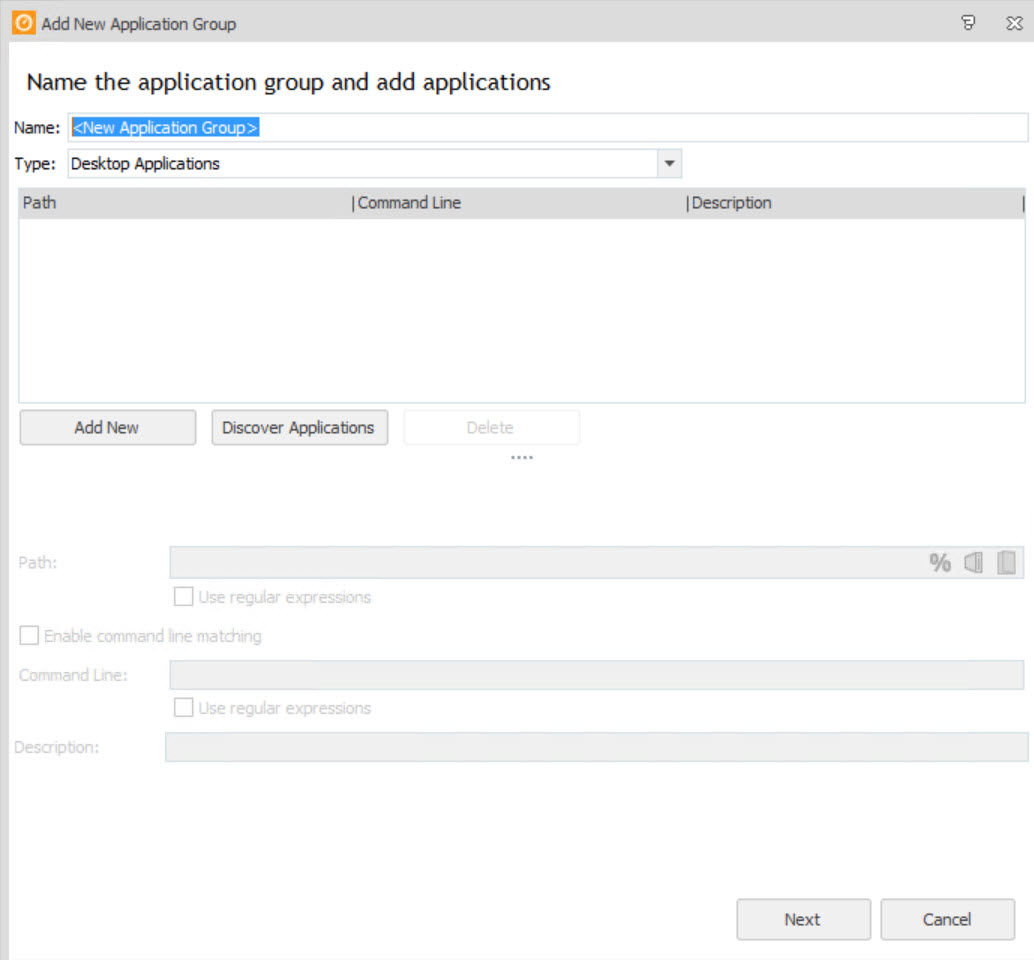
The Add New Application Group dialog displays.
- In the Name field, enter a name for the Application Group.
- From the
Type drop-down, select the type of applications to be added to the Application
Group:
- Desktop Applications.
- Services.
- 16-bit Applications.
- Click Add New.
-
Enter an executable name, executable path or folder path in the Path field.
Both the asterisk (*) and question mark (?) wildcard characters can be used in the file or folder path. The asterisk wildcard represents zero or more characters and the question mark wildcard represents zero or one character.
For example, C:\Folder* matches all executables within C:\Folder.To convert text to available Environment Variables, click the percentage sign and Convert To Use Environment Variables after entering the name or path.
- If the Path field contains regular expressions, select Use regular expressions.
- To match the command line, select Enable command line matching and enter the relevant command line.
- In the Description field, enter a description for the application.
-
Click Next.
The Select Where to Go dialog displays.
- Select one
of the following options:
- Allocate Resources - Adds the new Application Group to the Resource Planning node so that rules can be added.
- Finish - Does not add the Application Group to the Resource Planning node. The Application Group can be added manually by selecting Add Applications from the Resources Setup ribbon.
Create Application Groups Using Application Discovery
Application Discovery can be used to populate Application Groups with installed applications, running processes or file types.
Application Discovery can be run on the local or a remote computer with the Performance Manager Agent installed.
- Select Application Groups in the navigation tree.
-
Click Add New from the Resources Setup ribbon.
The Add New Application Group dialog displays.
- In the Name field, enter a name for the Application Group.
-
From the Type drop-down, select the type of applications to be added to the Application Group:
- Desktop Applications.
- Services.
- 16-bit Applications.
-
Click Discover Applications.
A dialog to select the endpoint displays.
-
Select the endpoint on which to perform the analysis:
- Select the local machine name to perform an analysis on the local endpoint.
- Select A remote computer to perform an analysis on a remote computer. The Connect to a Remote Computer dialog displays. Specify or navigate to the remote computer. Options are available to navigate to a computer on the network, one in the Management Center or to a favorite computer.
The Application Discovery dialog displays.
The dialog contains tabs to select installed applications, running processes and file types. It may take a few minutes to populate the data from the endpoint.
Once the data is populated, select the installed applications, running processes and file types to add to the Application Group. Filters can be applied by entering text into the Filter field.
-
Click Next.
The Add New Application Group dialog displays.
The selected items from Application Discovery are added to the dialog. Review the contents and, if necessary, amend the Path, Command Line and Description fields for each application.
-
Click Next.
The Select Where to Go dialog displays.
- Select one of the following options:
- Allocate Resources - Adds the new Application Group to the Resource Planning node so that rules can be added.
- Finish - Does not add the Application Group to the Resource Planning node. The Application Group can be added manually by selecting Add Applications from the Resources Setup ribbon.