Backups for Multiple Users
Create a batch job that can include multiple backup management tasks, which you can apply to either all users in a Personalization or Active Directory (AD) group or to specific targeted users.
The AD group information in the database comes from endpoint machines. When a user logs on using a version 10.0 or later endpoint, the endpoint provides a list of the AD groups to which the user belongs. Endpoints running earlier versions of Environment Manager do not provide this information, so in a newly-upgraded system there is no AD group information at all, and selecting users by AD group is not possible. As the endpoints are upgraded and users log on, the database receives AD group information about the users and searching for AD groups works.
In this section:
- Delete All Backups for a Group for Multiple Users
- Create a Group Backup for Multiple Users (Quick Task)
- Create a Group Backup for Multiple Users (Custom Task)
- Protect a Group Backup for Multiple Users
- Delete a Group Backup for Multiple Users
- Restore the Latest Group Backup for Multiple Users
- Restore a Specific Backup for Multiple Users
Delete All Backups for a Group for Multiple Users
Perform a quick task to delete all unprotected backups for all Windows Settings Groups or a selected Application Group for multiple users at a time.
-
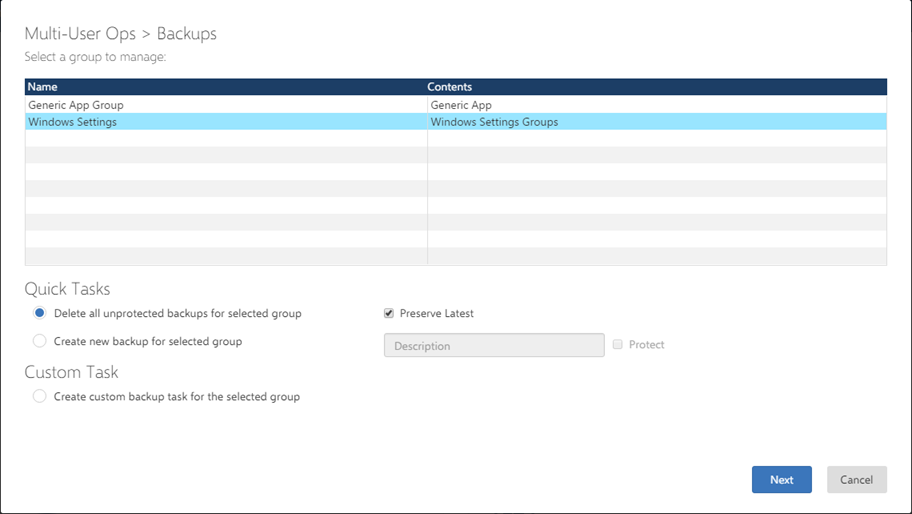
In the Home page, click the Backups Multi-User Ops button.
The Multi-User Ops > Backups dialog displays. It lists the names and contents of Windows Settings and Application groups.
- In the table of configuration groups, select whether to delete backups for all Windows Settings Groups or an Application Group.
- Under Quick Tasks, select Delete all unprotected backups for selected group.
- To retain the most recent backup, you can select Preserve Latest.
- Click Next.
- Specify the users to
whom the deletion applies as follows:
To apply to all users in a Personalization Group, select the group in the drop-down and click Add all to targets.
Master Administrators have the additional option to apply the change to all users in all Personalization Groups. For Administrators, this option applies to all their assigned Personalization groups.
- To apply
to specific users:
- select a Personalization Group in the drop-down.
The table below is populated with the members of the group.
If required, refine the results by searching for Active Directory users and groups. The users available for selection are those running version 10.0 and higher.
Select the checkboxes for one or more users in the group in the table below, and click Add selected to targets.
Your selections are added to the Targets table.
-
To add custom actions for another group, click Manage Another Group.
You return to the current settings dialog, where you can select another group.
-
When you have added all the required actions, click Next.
The dialog displays the Task Summary of the actions you created and the users and groups that you targeted.
- In the Options section, enter a name for the task in the text box.
- Select an Execution
Option:
- Execute immediately - Adds the task to the task queue for execution.
- Defer - Select a deferral period (in hours) in the drop-down.
-
Click Finish.
A success message displays. Depending on the execution option, your task is added to either the execution queue or the deferred queue.
Create a Group Backup for Multiple Users (Quick Task)

Perform a quick task to create a new backup for all Windows Settings Groups or a selected Application Group.
-
In the Home page, click the Backups Multi-User Ops button.
The Multi-User Ops > Backups dialog displays. It lists the names and contents of Windows Settings and Application groups.
- In the table of configuration groups, select whether to delete backups for all Windows Settings Groups or an Application Group.
- Under Quick Tasks, select Create new backup for selected group and enter a description for the new backup.
- To make the backup a protected backup, select Protect.
- Click Next.
- Specify the users to
whom the new backup applies as follows:
To apply to all users in a Personalization Group, select the group in the drop-down and click Add all to targets.
Master Administrators have the additional option to apply the change to all users in all Personalization Groups. For Administrators, this option applies to all their assigned Personalization groups.
- To apply
to specific users:
- select a Personalization Group in the drop-down.
The table below is populated with the members of the group.
If required, refine the results by searching for Active Directory users and groups. The users available for selection are those running version 10.0 and higher.
Select the checkboxes for one or more users in the group in the table below, and click Add selected to targets.
Your selections are added to the Targets table.
-
To add custom actions for another group, click Manage Another Group.
You return to the current settings dialog, where you can select another group.
-
When you have added all the required actions, click Next.
The dialog displays the Task Summary of the actions you created and the users and groups that you targeted.
- In the Options section, enter a name for the task in the text box.
- Select an Execution
Option:
- Execute immediately - Adds the task to the task queue for execution.
- Defer - Select a deferral period (in hours) in the drop-down.
-
Click Finish.
A success message displays. Depending on the execution option, your task is added to either the execution queue or the deferred queue.
Create a Custom Backup for Multiple Users
Create a custom backup for all Windows Settings Groups or a selected Application Group.
-
In the Home page, click the Backups Multi-User Ops button.
The Multi-User Ops > Backups dialog displays. It lists the names and contents of Windows Settings and Application groups.
- In the table of configuration groups, select whether to create a backup for all Windows Settings Groups or an Application Group.
- Under Custom Tasks, select Create custom backup task for selected group.
- Click Next.
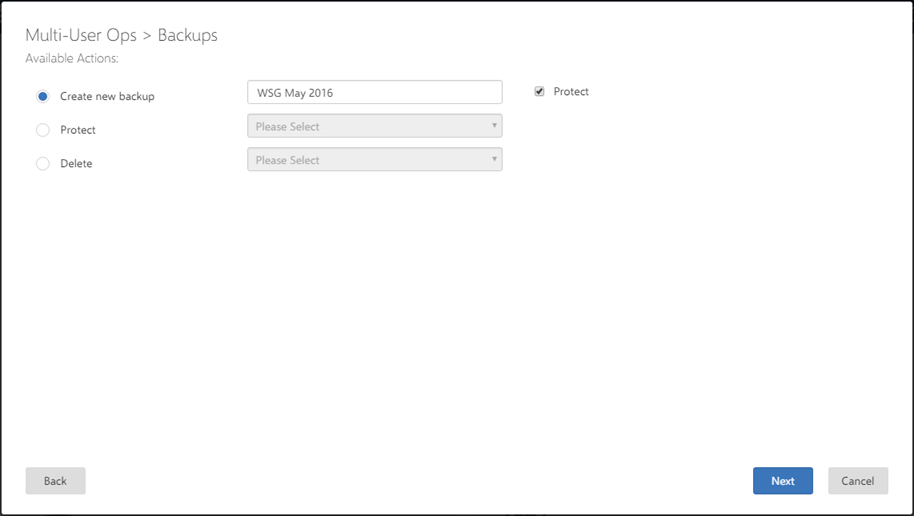
- Under Available Actions, select Create new backup.
- Enter a description and select Protectif you want to make the backup protected.
- Click Next.
- Specify the users to
whom the custom backup applies as follows:
To apply to all users in a Personalization Group, select the group in the drop-down and click Add all to targets.
Master Administrators have the additional option to apply the change to all users in all Personalization Groups. For Administrators, this option applies to all their assigned Personalization groups.
- To apply
to specific users:
- select a Personalization Group in the drop-down.
The table below is populated with the members of the group.
If required, refine the results by searching for Active Directory users and groups. The users available for selection are those running version 10.0 and higher.
Select the checkboxes for one or more users in the group in the table below, and click Add selected to targets.
Your selections are added to the Targets table.
-
To add custom actions for another group, click Manage Another Group.
You return to the current settings dialog, where you can select another group.
-
When you have added all the required actions, click Next.
The dialog displays the Task Summary of the actions you created and the users and groups that you targeted.
- In the Options section, enter a name for the task in the text box.
- Select an Execution
Option:
- Execute immediately - Adds the task to the task queue for execution.
- Defer - Select a deferral period (in hours) in the drop-down.
-
Click Finish.
A success message displays. Depending on the execution option, your task is added to either the execution queue or the deferred queue.
Protect a Group Backup for Multiple Users

Create a custom backup task to protect a specific backup for Windows Settings Groups or a selected Application Group.
-
In the Home page, click the Backups Multi-User Ops button.
The Multi-User Op > Backups dialog displays. It lists the names and contents of Windows Settings and Application groups.
- In the table of configuration groups, select whether to protect a backup for the Windows Settings Groups or an Application Group.
- Under Custom Tasks, select Create custom backup task for selected group.
- Click Next.
-
Under Available Actions, select Protect.
The Protect drop-down becomes active.
- In the drop-down, select
one of the following:
- latest backup
- backup closest to date - Either type a date in the text box (dd/mm/yyyy) or select a date in the date picker.
- Click Next.
- Specify the users to
whom the protected backup applies as follows:
To apply to all users in a Personalization Group, select the group in the drop-down and click Add all to targets.
Master Administrators have the additional option to apply the change to all users in all Personalization Groups. For Administrators, this option applies to all their assigned Personalization groups.
- To apply
to specific users:
- select a Personalization Group in the drop-down.
The table below is populated with the members of the group.
If required, refine the results by searching for Active Directory users and groups. The users available for selection are those running version 10.0 and higher.
Select the checkboxes for one or more users in the group in the table below, and click Add selected to targets.
Your selections are added to the Targets table.
-
To add custom actions for another group, click Manage Another Group.
You return to the current settings dialog, where you can select another group.
-
When you have added all the required actions, click Next.
The dialog displays the Task Summary of the actions you created and the users and groups that you targeted.
- In the Options section, enter a name for the task in the text box.
- Select an Execution
Option:
- Execute immediately - Adds the task to the task queue for execution.
- Defer - Select a deferral period (in hours) in the drop-down.
-
Click Finish.
A success message displays. Depending on the execution option, your task is added to either the execution queue or the deferred queue.
Delete a Group Backup for Multiple Users
Create a custom task to delete either all backups for Windows Settings Groups or a selected Application Group, or those within a date range.
-
In the Home page, click the Backups Multi-User Ops button.
The Multi-User Ops > Backups dialog displays. It lists the names and contents of Windows Settings and Application groups.
- In the table of configuration groups, select whether to delete backups for the Windows Settings Groups or an Application Group.
- Under Custom Tasks, select Create custom backup task for selected group.
- Click Next.
-
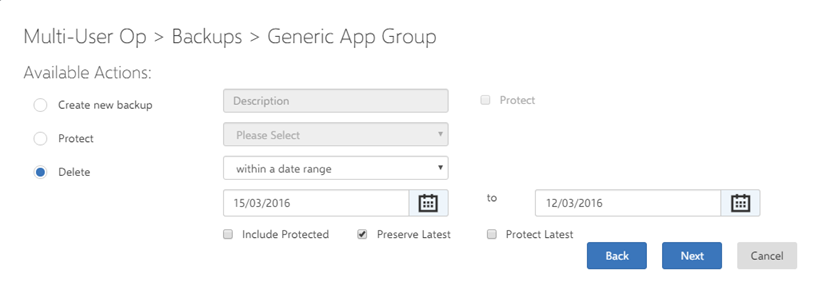
Under Available Actions, select Delete.
The Delete drop-down becomes active.
- In the drop-down, select
one of the following:
- all backups
- within a date range - To specify the date range, either type dates in the text boxes (dd/mm/yyyy) or select dates in the date pickers. Select Include Protected to delete all backups in the date range, including the protected backups.
- Click Next.
- Specify the users to
whom the deletion applies as follows:
To apply to all users in a Personalization Group, select the group in the drop-down and click Add all to targets.
Master Administrators have the additional option to apply the change to all users in all Personalization Groups. For Administrators, this option applies to all their assigned Personalization groups.
- To apply
to specific users:
- select a Personalization Group in the drop-down.
The table below is populated with the members of the group.
If required, refine the results by searching for Active Directory users and groups. The users available for selection are those running version 10.0 and higher.
Select the checkboxes for one or more users in the group in the table below, and click Add selected to targets.
Your selections are added to the Targets table.
-
To add custom actions for another group, click Manage Another Group.
You return to the current settings dialog, where you can select another group.
-
When you have added all the required actions, click Next.
The dialog displays the Task Summary of the actions you created and the users and groups that you targeted.
- In the Options section, enter a name for the task in the text box.
- Select an Execution
Option:
- Execute immediately - Adds the task to the task queue for execution.
- Defer - Select a deferral period (in hours) in the drop-down.
-
Click Finish.
A success message displays. Depending on the execution option, your task is added to either the execution queue or the deferred queue.
Example: Create a multi-user task to create backups for all Windows Settings Groups and delete backups for an Application Group
Restore the Latest Group Backup for Multiple Users

Use a quick task to restore the most recent backup for Windows Settings or Application Groups for multiple users.
-
In the Home page, click Current Settings Multi-User Ops.
The Multi-User Ops> Current Settings dialog displays. It lists the names and contents of Windows Settings and Application groups.
- In the table of configuration groups, select whether to restore a backup for Windows Settings Groups or an Application Group.
- Under Quick Tasks,
select Restore latest backup.
If you are restoring a backup for Windows Settings Groups, select
the appropriate Windows Settings option(s) in a second select box, for
example:
- all windows settings groups
- Taskbar and Start Menu
- IE10+ Cookies and History
Windows Desktop
You can restore backups for single or multiple Windows Settings Groups.
- You have the option to Back up current settings first. If you select this option, enter a description for the new backup.
- Click Next.
- Specify the users to
whom restoring the backup applies as follows:
To apply to all users in a Personalization Group, select the group in the drop-down and click Add all to targets.
Master Administrators have the additional option to apply the change to all users in all Personalization Groups. For Administrators, this option applies to all their assigned Personalization groups.
- To apply
to specific users:
- select a Personalization Group in the drop-down.
The table below is populated with the members of the group.
If required, refine the results by searching for Active Directory users and groups. The users available for selection are those running version 10.0 and higher.
Select the checkboxes for one or more users in the group in the table below, and click Add selected to targets.
Your selections are added to the Targets table.
-
To add custom actions for another group, click Manage Another Group.
You return to the current settings dialog, where you can select another group.
-
When you have added all the required actions, click Next.
The dialog displays the Task Summary of the actions you created and the users and groups that you targeted.
- In the Options section, enter a name for the task in the text box.
- Select an Execution
Option:
- Execute immediately - Adds the task to the task queue for execution.
- Defer - Select a deferral period (in hours) in the drop-down.
-
Click Finish.
A success message displays. Depending on the execution option, your task is added to either the execution queue or the deferred queue.
Restore a Specific Group Backup for Multiple Users
Create a custom task to restore a specific backup for a Windows Settings or Application Group.
-
In the Home page, click Current Settings Multi-User Ops.
The Multi-User Ops > Current Settings dialog displays. It lists the names and contents of Windows Settings and Application Groups.
- In the table of configuration groups, select whether to restore a backup for Windows Settings Groups or an Application Group.
- Under Custom Tasks, select Restore a specific backup.
- Click Next.
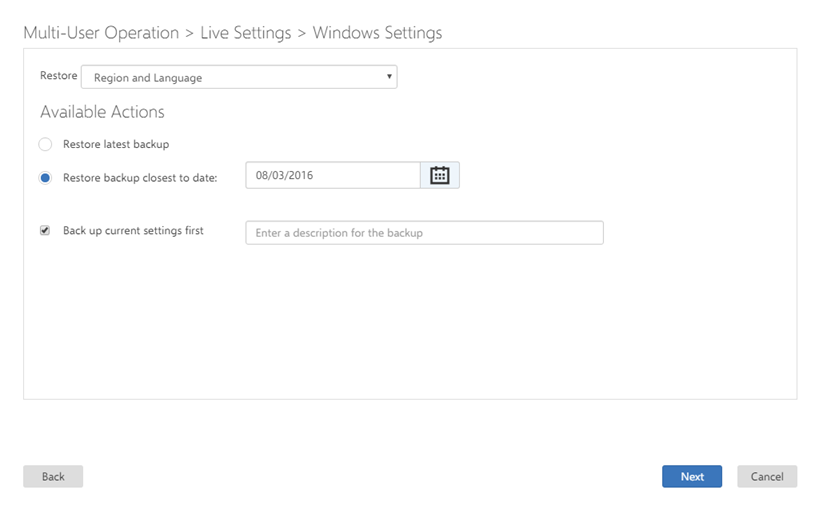
- If you are restoring a backup for an Application Group, go directly to step 6. If you are restoring a backup for Windows Settings group, select the Windows Settings Group in the Restore drop-down.
- Under Available Actions,
select one the following options:
- Restore latest backup
- Restore backup closest to date - Type a date in the text box (dd/mm/yyyy) or select a date in the date picker.
- You have the option to Back up current settings first. If you select this option, enter a description for the new backup.
- Click Next.
- Specify the users to
whom restoring the backup applies as follows:
To apply to all users in a Personalization Group, select the group in the drop-down and click Add all to targets.
Master Administrators have the additional option to apply the change to all users in all Personalization Groups. For Administrators, this option applies to all their assigned Personalization groups.
- To apply
to specific users:
- select a Personalization Group in the drop-down.
The table below is populated with the members of the group.
If required, refine the results by searching for Active Directory users and groups. The users available for selection are those running version 10.0 and higher.
Select the checkboxes for one or more users in the group in the table below, and click Add selected to targets.
Your selections are added to the Targets table.
-
To add custom actions for another group, click Manage Another Group.
You return to the current settings dialog, where you can select another group.
-
When you have added all the required actions, click Next.
The dialog displays the Task Summary of the actions you created and the users and groups that you targeted.
- In the Options section, enter a name for the task in the text box.
- Select an Execution
Option:
- Execute immediately - Adds the task to the task queue for execution.
- Defer - Select a deferral period (in hours) in the drop-down.
-
Click Finish.
A success message displays. Depending on the execution option, your task is added to either the execution queue or the deferred queue.