Tour the Cherwell Outlook Add-In
The Cherwell Outlook Add-In interacts with Business Object Records directly from Microsoft Outlook. What each User sees in the Add-In is controlled by Outlook Integration Configurations (defined in CSM Administrator), as well as by the options defined in the Cherwell Outlook Add-In setup.
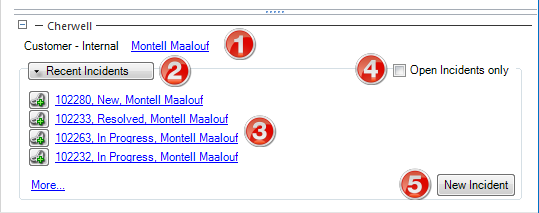
In the Inbox (or other monitored folder), expand or close the Add-In by
clicking the
 or
or
 buttons. If the Add-In cannot automatically find one
specific record to link to, it lists the most recent Business Object Records
(potential link items) for Users to select from and
manually
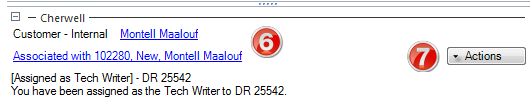
link e-mails to. If an e-mail is linked (either automatically or
manually) to a specific Business Object Record, the Add-In lists only the
associated record.
buttons. If the Add-In cannot automatically find one
specific record to link to, it lists the most recent Business Object Records
(potential link items) for Users to select from and
manually
link e-mails to. If an e-mail is linked (either automatically or
manually) to a specific Business Object Record, the Add-In lists only the
associated record.
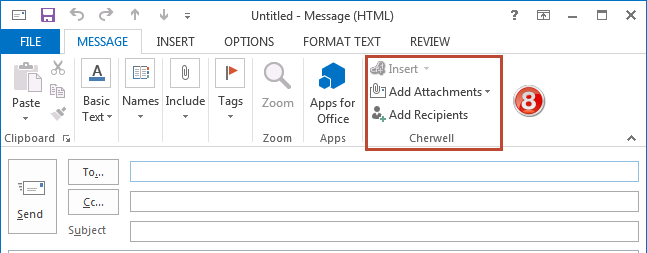
When sending (replying to, forwarding, or sending new) e-mails from Outlook, the Add-In provides a Cherwell Group in the Outlook ribbon with options for inserting links to Business Objects, inserting Attachments, and choosing additional recipients.
The Cherwell Outlook Add-In has several pieces of functionality:
- View or change Customer: Click the Customer's name to open a context
menu to select from the following options:
The Customer that appears here is based on the Customer Identification settings configured for the Outlook Integration Configuration being used. If a Customer cannot be found, the Customer shows as Unknown. The Customer Object (example: Customer - Internal) precedes the Customer's name.
- Quick View: Opens the Customer Record in a second window to take a quick look at the details.
- Go to Record: Navigates to the
Customer Record in
CSM.
Note: Users might have to log in to CSM before opening the Customer Record in CSM.
- Choose from Cherwell: Opens the CSM Contact Manager to select a different Customer to associate with the e-mail.
- Choose from Current Recipients: Opens another context menu with a list of the names in the To line of the e-mail. Select one of the names to associate the e-mail with that person.
- Remove Customer Association: Unlinks
the e-mail from the Customer (changes the Customer to Unknown).
Note: If any of the options that change or remove the Customer association are selected, the Business Object Records listed in the Cherwell Outlook Add-In change to show the most recent records associated with the newly selected Customer.
- Select Type of Business Object: Click the Business Object drop-down
to select the
types of Business Object Records to list.
If only one type of Business Object is defined in the Outlook Integration Configuration (Objects page), only that Business Object appears in the drop-down (example: Incident).
- View or Link a Business Object Record: Click a
Business Object Record from the list of
most recent records (potential link items) to view or open the record, or to
link the record to the current e-mail.
The list of recent Business Object Records (potential link items) is based on the Business Object settings for the Outlook Integration Configuration being used. It only appears if the Add-In cannot automatically find one specific record to link an e-mail to. Click More to expand the list of linkable Business Object Records.
- View Open Business Objects only: Select this check box to filter the list of potential link items to only show records that have not been closed
- Create a New <Business Object (example: Incident)>: Click this
button to create a new Business Object Record from the current e-mail.
- View Associated Business Object Record (if an e-mail has been automatically or manually linked to a specific record): Click the associated Business Object Record to open a context menu to view the record, open the record, or unlink the record.
- Select Actions: Click the Actions drop-down to select the
One-Step that executes against the associated
Business Object Record.
The One-Step Actions that appear in the drop-down menu are based on the available Actions configured for the Outlook Integration Configuration being used.
- Select Add-In options for outgoing e-mails:
- Insert [Business Object Record (example:
Incident 101323)]: Inserts a link to open a linked Business Object Record
in the
CSM Desktop Client, Portal, or Browser Client.
Note: This option is only available when sending an e-mail that is linked to a specific Business Object Record.
- Add Attachments: Inserts Attachments from the Business Object Record or Attachment Manager into the e-mail. Select Attachments in the drop-down.
- Add Recipients: Opens the
CSM Address Book to select recipients to add to the To, Cc, or Bcc
lines.
- Insert [Business Object Record (example:
Incident 101323)]: Inserts a link to open a linked Business Object Record
in the
CSM Desktop Client, Portal, or Browser Client.