KACE Integration
Overview
Dell® KACE provides detailed hardware and software inventory information for Windows®, Mac®, and Linux® systems. KACE integrates so that inventory data (ex: workstations, installed programs/software, installed services, disks, etc.) can be shared with and used within the CSM CMDB (as Configuration Item records).
How the Integration Works
Shared external data is either imported or linked. Both imported and linked data are accessed using a created External Connection; however:
- When importing external data into CSM, import it into the Cherwell database. From that point forward, the records can diverge, although data can be re-imported (entirely replacing existing data or appending/updating changed data) if desired. Re-imports can be run manually or they can be regularly scheduled using the CSM Scheduler. A Business Object keeps track of the external data and facilitates viewing/updating that data in CSM.
- When linking to external data, view (and sometimes update) the external data in CSM but it continues to reside in the External Database. A special External Business Object keeps track of the external data and facilitates viewing/updating that data in CSM keeps track of the external data and facilitates viewing/updating that data in CSM.
Typically, KACE workstation data is imported into the Config-Computer Business Object, and all other data (installed programs/software, installed services, disks, etc.) is linked to using supporting Business Objects (either existing or newly created External Supporting Business Objects). CSM provides several wizards to walk Users through the steps to create the External Connection, create the External Business Object, and import/link the external data.
Recommendations
When sharing data with an KACE Database, Users will most likely want to:
- Create Views of the KACE data to share, for example:
- Workstations View: For workstation data.
- Installed Software: For installed programs/software.
- Installed Services: For installed services
- Disk View: For logical disk data/drives.
- Create an External Connection (SQL Server) to the KACE data.
- Map and Import the KACE Views into existing
CSM Business Objects, for example:
- Workstation View = Config-Computer Business Object
- Installed Software View = Installed Software Business Object
- Installed Services View = Installed Services Business Object
- Disk View = Drive Info Business Object
Note: CSM provides the above default Business Objects with appropriate Fields, Relationships, Forms, and Grids for mapping/importing inventory data; however, also create new External Business Objects for the data, if needed. If creating additional Business Objects and/or Relationships, the settings should be set up similar to the default. See Edit Major External Business Object Properties, Edit Supporting External Business Object Properties, andEdit the Parent and Supporting Business Object Relationship Properties.
Steps to Integrate
Perform the following high-level steps to import/link KACE data. For detailed step-by-step instructions, refer to the Share data with an External Database section in our online help.
- Create
CSM Database Views. For example:
- Workstations
- Installed Software
- Installed Services
- Disks
Note: Create the Views in the KACE database or in the CSM database. (If choosing to create Views in a CSM Database, an onsite DBA might need to create a Linked Server in SQL.)
- Create a Blueprint.
- Create
an External Connection to the KACE data.Data is either in the external KACE Database or in the database
Views, which are accessed through a Linked Server. Accessing a Linked server
depends on the configuration of
CSM.
Use the CSM External Connection Wizard (CSM Administrator>Blueprint>Tools>External Connections) to create an External Connection. Typically:
- Data Source: Select SQL Server.
- Database Location, Name, and Login Options for the KACE database: Ask a DBA.
- Database Owner or Schema: Auto-populated by the database selection.
- Pooling Options: Keep defaults.
The new connection is shown in the External Connections window.
- Map
each
CSM Business Object to the appropriate KACE View:
Use the CSM External Data Wizard (CSM Administrator>Blueprint>[Business Object]>Map to external Data) to map the data. Typically:
- Import vs. Linked: Click Import Data.
- Data Source: Select the External Connection just created.
- External Table to Map: Select the View in the external database.
- Fields to Map: Map each individual field from the View to a field in the Business Object.
- Unique Key: Varies (uses the field mapped to the Unique ID value).
- Timestamp Fields: None.
- Import
each KACE View into the appropriate
CSM Business Object.
Use the External Data Import Wizard (CSM Administrator>Database>Import External Data) to import the data. Typically:
- Select Business Object: Select the appropriate Business Object (ex: Config-Computer, Installed Software, Installed Service, and Drive Info) .
- Existing Records: Select Update Existing Records.
- Choose Filter: Select All Records (typically, data in a View is already filtered).
- Edit Relationships so that data can be shared and displayed between
Business Objects:
Use the Relationship Editor (CSM Administrator>Blueprint>"Business Object">Edit Relationships) to edit Relationships.
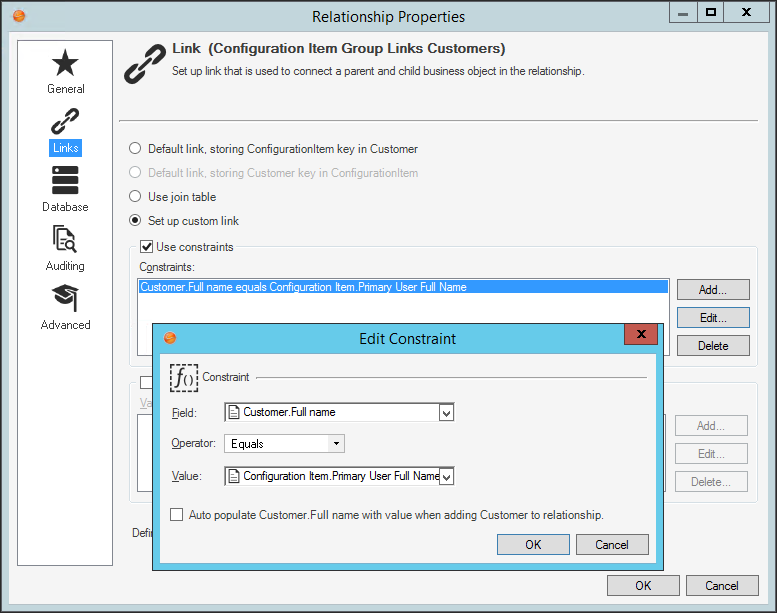
- Edit the
Configuration Item Group Links Customers Relationship to
use custom link constraints similar to:
Customer.FullName = ConfigurationItem.PrimaryUserFullName.
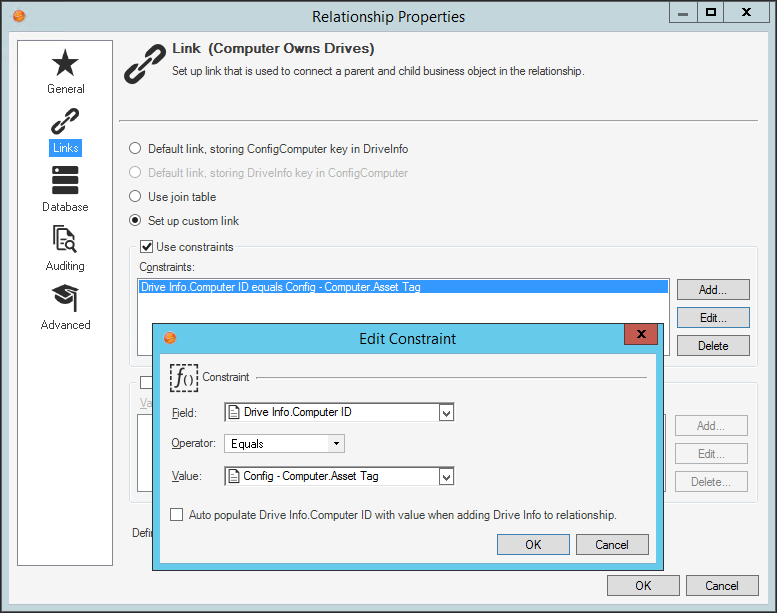
- Edit the following existing Relationships to use a custom link
constraint similar to:
Config-ComputerAssetTag = ComputerID.
ComputerID is used for:
- Computer Owns Drives.
- Computer Owns Installed Services.
- Computer Owns Installed Software.
- Edit the
Configuration Item Group Links Customers Relationship to
use custom link constraints similar to:
- (Optional) If there is additional mapped data, edit the Business
Object Forms and Grids to display the additional information.
Use the Form Editor to add Form Controls to the Form that show (and allow editing) of the values in the fields; use the Grid Editor to define which fields are displayed as columns in the the Business Object Grid.
- Publish the Blueprint.