Create an IT Training Record
Use the Course Form in the CSM Desktop Client to create an IT Training record.
To create an IT Training record:
Good to know:
- When a value is provided in the Category field and the record is saved, the new category is saved as an option in the drop-down for future Course records.
- Frequency and Type fields are populated based on Lookup Table values in Table Management. Add, edit, or delete field values by selecting the field, and then pressing F3.
- The Frequency field is only required for Recurring Courses.
- The Start Date field is only required for One-Time and Recurring Courses. The start date for Initial Courses is automatically recorded on the day that the Course is created.
- The Initial Training Period field is only required for Initial Courses, and calculates a deadline for the Course (number of days after the Course record is created in which the User must complete the Course).
- Assign Courses using:
- Course record: In the Main Pane, click the Assign to Department button or the Assign to Individual button.
- Customer record: In the Form Arrangement, click the Training Course tab, and then click the New Customer Training button.
- You can assign a One-Time or Recurring Course to either an individual User or an entire Department. You can assign an Initial Course only to an individual User.
- Use the I Want To section of the Quick Info Tile to:
- Take Ownership: Click the link to make yourself the User owner.
- View Detailed Date/Time Information: Click the link to open the Information window, where you can view current status, created date and time, creator name, and last edited date and time. Time Date/time format is MM/DD/YYYY HH:MM.
- Place Course on Hold: Click the link to change the Courses status to On Hold.
- Clone Course: Click the link to create a new Course record that includes field values from the original Course.
- Retire a Course by clicking the Retire Course link in the Status bar when the Course has a status of Active.
- View real-time training data using the Training Status Dashboard (Dashboards>Dashboard Manager>Global folder>Dashboards>Training Dashboard>Training Status).
- On the
CSM Desktop Client toolbar, click
New>New Training Course.
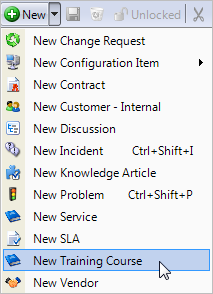
A new Course record is created with a status of New.
- Record the Course details:
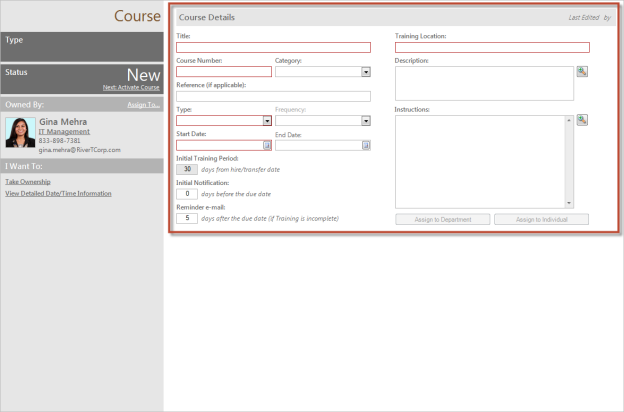
- Title: Provide a title for the Course (example: IT Security Overview).
- Course Number: Provide letters and/or numbers that uniquely identify the Course (example: IT01).
- Category: Provide a category for the Course (example: IT).
- Reference (if applicable): Provide a reference for the Course, such as a specific government regulation or company policy.
- Type: From the drop-down, select the type of Course (example: Initial).
- Frequency: From the drop-down, select the frequency of the Course.
- Start Date: Click the
Date Selector button
 to select the day in which the Course begins.
- End Date: Click the
Date Selector button
to select the day in which the Course ends
(example: 3/25/2015 8:00 AM).
Note: The Course status automatically changes to Retired when the Course reaches the defined End Date.
- Initial Training Period: [number] days from hire/transfer date: Specify the number of days from the start date that the Customer must complete the Course (example: 14).
- Initial Notification: [number] days before the due date: Specify the number of days before the start date that the initial e-mail is sent.
- Reminder E-mail: [number] days after the due date (if Training is incomplete): Specify the number of days after the due that that a reminder e-mail is sent (example: 5).
- Training Location: Provide a location for the Course (example: Gina Mehra's Office).
- Description: Provide a description for the Course (example: The IT Security Overview provides new employees with an overview of IT security practices, which includes information regarding the employee's ID card, system PIN, network access, and safe e-mail practices).
- Instructions: Provide instructions for the Customer, which will display in the initial e-mail.
- Activate the Course:
- In the Status bar, click the
Activate link.
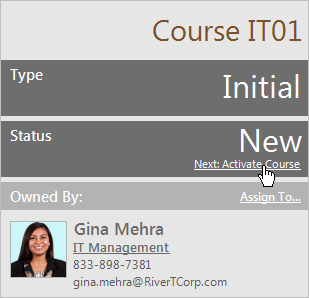
The Course is active.
- In the Status bar, click the
Activate link.
- Assign the Course to either a User or entire Department:
Note: Assignment options vary based on the type of course. One-Time and Recurring Courses can be assigned to either an individual User or an entire Department. Initial Courses can be assigned only to an individual User.
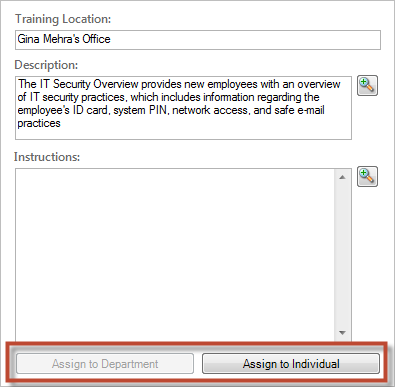
- Assign to Department:
- Click the
Assign to Department button.
A prompt opens.
- From the drop-down, select a Department.
Select OK.
A Training Course record displays in the Form Arrangement for each User in the Department, a notification e-mail is sent to Users in the Department and their manager, and a Training Task is created in the Customer Portal for each User in the Department.
- Click the
Assign to Department button.
- Assign to Individual:
- Click the
Assign to Individual button.
A prompt opens.
- Click the Ellipses button
 to open the Customer Selector.
The Customer Selector opens.
- Select a Customer (example: Josh Wilson).
Select OK.
A Training Course record displays in the Form Arrangement, a notification e-mail is sent to the User and his manager, and a Training Task is created in the Customer Portal for the User.
- Click the
Assign to Individual button.
- Assign to Department: