Use a
One-Step™
Action
to migrate multiple Business Objects to use the Business Object Lifecycle
Editor. Using this method, you can migrate records with several different
statuses at once.
These steps use an Incident as an example but you can use this
One-Step Action
to transition any Major or Supporting Business Object from the legacy lifecycle
to the new lifecycle. You can also use the
One-Step Action
to migrate records forwards or backwards in a lifecycle, between branches in a
lifecycle, or to assign a status to an object that has never had a lifecycle.
To use a
One-Step Action
to migrate a legacy Business Object lifecycle for several statuses at a time:
- Log in to
CSM Administrator.
- Create a new Blueprint.
- In the Object Manager, select a Business Object in the Object tree
(example: Incident), and then select the
Edit Business Object task in the
Structure area (or double-click a Business
Object in the Object tree).
- Select
Bus Ob Properties.
- Clear the
Has lifecycle check box on the
Lifecycle page. See
Define Lifecycle Properties for a Business Object.
- Create a new lifecycle for that Business Object. See
Business Object Lifecycle Editor.
- Edit your existing forms for the affected Business Objects to
remove the old form controls and add the new form controls. See
Add Lifecycle Controls to a Form.
- Publish the Blueprint.
- Log in to the
CSM Desktop Client.
- Open an existing record and note that the Transition Status
Control currently allows access to
any
status in the drop-down list. Also note that the record is
showing as
not having a state on the Lifecycle Progress Indicator.
- In the
CSM Desktop Client,
select
.
- Set the Business Object
Association field to the Business Object that
you want to migrate to the new lifecycle (example: Incident).
- Select
Create New.
- Provide a name and description (example: Move many statuses).
- Select
OK.
- Select the
Conditions page and then select
Specific group from the
Allow One-step to run against drop-down list.
- Select a
Specific search group (example: All
Incidents).
This finds all the records using the legacy lifecycle.
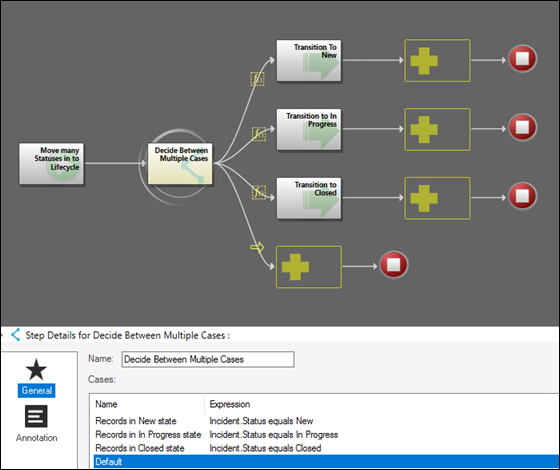
- Add the Advanced Action
Decide between Multiple Cases to the designer
board.
- Add a
Transition a Business Object Action to the
designer board for each status you need to upgrade.
- Select each case for the
One-Step Action Decide Between Multiple Cases and select
Edit Case.
- In the
Edit Case Action condition window, name each
case (example: Records in New state, Records in In Progress state). Then define
the expression (example: Incident.Status Equals New, Incident.Status equals In
Progress).
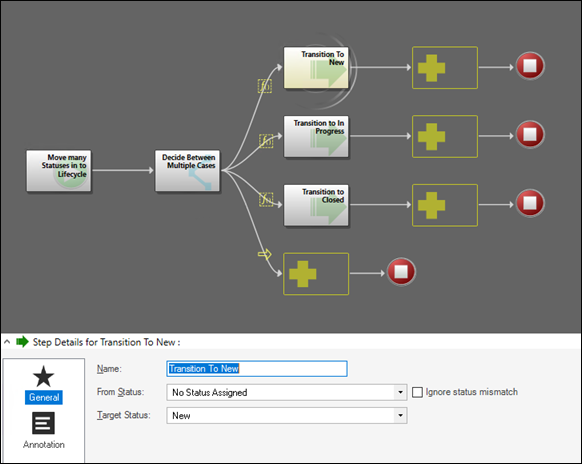
- For each corresponding
Transition a Business Object One-Step Action,
select it on the designer board and enter a name (example: Transition to New).
- Select
No Status Assigned
from the
From Status drop-down list.
- Select your chosen target status from the
Target Status drop-down list (example: New).
- Select
Ignore status mismatch. If this option is
selected, when the
From Status of a record doesn't match those
specified in the
One-Step Action,
the record gets ignored and the
One-Step Action
continues. If you want the
One-Step Action
to stop if it finds a status mismatch, then clear the check box, at which point
you get an error message and the
One-Step Action
stops immediately.
- Save the
One-Step Action
and return to your
Desktop Client
dashboard.
- Run your
One-Step Action
(example: Move many statuses).
- Review some existing Incidents that were using the legacy
lifecycle and they should now be migrated.
The Lifecycle Progress Indicator now shows the records with
their new statuses and all the records that were using the legacy lifecycle
have been migrated to the new Business Object Lifecycle Editor. A journal entry
is created for each Business Object transitioned as a result of the action.