Define a Decide Between Multiple Cases Action
Use the Decide Between Multiple Cases Action to define multiple cases (or paths) that the One-Step™ Action executes next based on defined conditions.
With this Action, Users can build branching logic into One-Step Actions to create advanced workflows to manage and automate processes.
The Decide Between Multiple Cases Action allows Users to:
- Add an unlimited number of Actions to each path, including other Decide Between Multiple Cases Actions.
- Use Go To Actions on or before paths to jump into or out of other paths, or anywhere else within the One-Step. For example, use a Go To Action to conditionally run the Actions in another path after the current path completes execution.
When a decision Action executes, the cases are evaluated in the order defined in the step details for the Action. The case with the first true condition is executed, including all of the Actions on its path. The Decide Between Multiple Cases Action is completed after all of the Actions on the path with the true condition have been executed. At that point, overall One-Step execution is also completed unless Go To Actions are used to jump to other Actions within the One-Step Action.
When you add a Decide Between Multiple Cases Action to the Designer Board, two cases are automatically created: a default case and a standard case. The default case (indicated with an arrow on the Designer Board) is executed if none of the conditions for any of the other cases are true. The default case cannot have conditions and cannot be deleted. There must always be at least one standard case. If there is only one, it cannot be deleted.
When defining cases, consider the following:
- All cases with Actions on their paths must have conditions defined.
- A case with no Actions on its path (an empty case) has no effect on execution.
- No part of a case with a false condition will be executed, unless a Go To Action jumps to an Action within that case.
When you add an Action to a case, a new empty case is automatically created if one does not already exist. This provides a way to easily begin adding Actions to new cases as needed. If a new case is not needed, it can be deleted in the step details or by deleting the Decide Between Multiple Cases Action. Empty cases are not deleted when Actions are removed from a case.
A Decide Between Multiple Cases Action is considered one Action even though it can contain an unlimited number of other Actions on its path. If a decision Action is deleted, the options Delete Action and Delete Action and Children behave identically: the Decide Between Multiple Cases Action and all of the Actions on its path are deleted.
Actions cannot be added after a Decide Between Multiple Cases Action. The end of a path is the end of the sequence of Actions for the overall One-Step Action. If another Decide Between Multiple Cases Action is included on a path, it is still treated as one Action in the series of Actions on the path. Go To Actions can significantly alter execution behavior by jumping in or out of other paths, or anywhere else within the One-Step Action.
Define a Decide Between Multiple Cases Action for a One-Step Action
- Open the One-Step Editor.
- Add a
Decide Between Multiple Cases Action to the
Designer Board.
- Define general properties for the Decide Between Multiple Cases
Action:
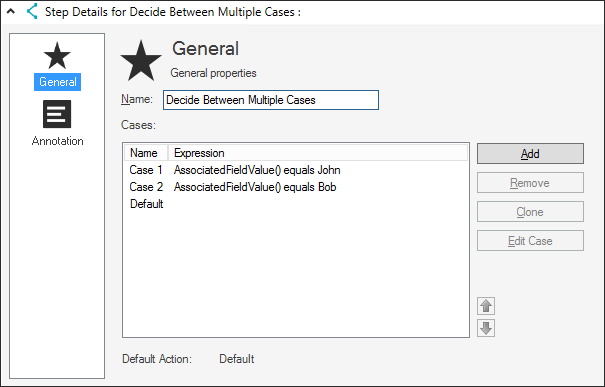
Option Description Name Provide a display name for the Action (this is how the Action is identified within the One-Step Action). Define a list of cases - Add: Add a case to the list.
- Remove: Remove a selected case from the list.
- Clone: Copy a selected case, including all of the Actions on its path.
- Edit Case: Edit the name and condition for a selected case.
- Up/Down Arrows: Change the order of the cases.
Unlink Remove records from the selected Relationship. Business Object Select the Business Object to link/unlink. Link to Relationship Select the Relationship to which the Business Object records are linked/unlinked. - Define a condition for each case:
- Select a case from the list in the step details and click
Edit Case, or double-click the
function icon
 before a case on the Designer Board.
- Define an Expression.
- Select the Terminate parent one-steps and action blocks check box to end the Action's parent One-Step Action or Action Block after the steps for the current case have executed.
- Select a case from the list in the step details and click
Edit Case, or double-click the
function icon
- Define Annotation properties.
- Click Save.