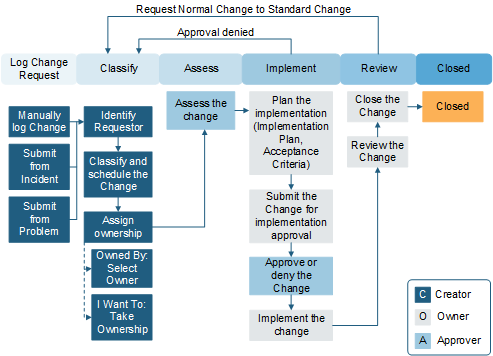
Normal Change requests require approval.
Normal Change types have six stages: Classify, Assessment,
Authorization, Implementation, Review, and Closed.
To create a Normal Change Request:
- Create a Change Request and select
Normal from the
Change Type drop-down menu.
- Complete the required fields.
- Select
Next: Risk Analysis.
- Select the
Risk Assessment link to fill out the Risk
Assessment survey (required).
You can't edit a Risk Assessment after you submit it.
- Select
Next: Plan to change the status to Planning.
CSM
automatically generates a peer review task when you enter the Planning status.
- Complete the implementation, validation, and back out plans.
Optionally, you can provide evidence of testing and add tasks.
- Select scheduled start and end dates.
- Assign the peer review.
- Select
Next: Approval to submit the Change Request
for authorization.
CSM
calculates lead times and an approval deadline. If the proposed start date
doesn't meet the lead time requirement, you'll have to either reschedule the
Change or submit it as an exception.
If the CAB approves the Change Request, the status moves to
Scheduled. If it's denied, the status moves to Rejected.
- Select
Next: Begin Work when you're ready to begin
implementation tasks.
The status moves to In Progress. You can also place the
Change Request on Hold.
- Add implementation notes and actual start and end dates.
- Add the close code, close notes, and complete all tasks.
- After the Change is deployed,
Select Next: Validate Change to change the
status to Validation.
You can't advance to the next status until you close all
implementation tasks.
- Select
Next: CMDB Update.
After the Change owner updates the CMDB, select the
CMDB Update Complete checkbox.
- Select
Next: Mark as Complete to change the status to
Closed.