Define JIRA Options in the CSM Desktop Client
Define a JIRA Project, Statuses and Issue Types to complete implementation of the JIRAmApp Solution.
The following procedures are the second step in configuring the JIRA V2.0 mApp Solution
Steps to Define JIRA Options in CSM
To configure Projects in the mApp Solution using the Desktop Client:
- In the CSM Desktop Client, open the Table Management Interface (under Tools in the menu bar).
- In the Type drop-down, select JIRA Project.
- Select
New
next to the JIRA icon in the toolbar.
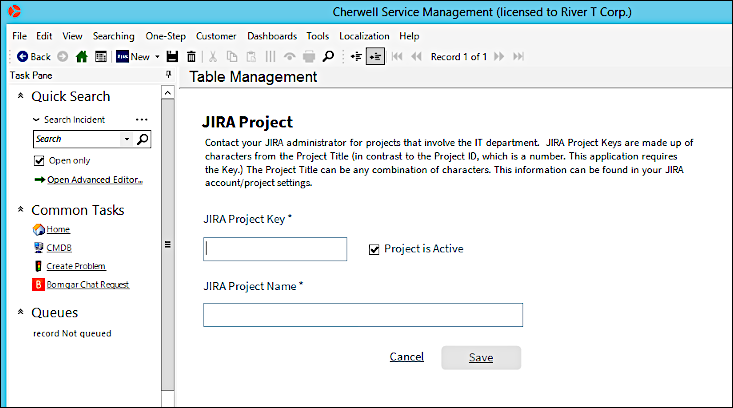
- Create a new JIRA Project record for each project within JIRA that
you want to post Cherwell Incidents and Projects to.
Note: Ask your JIRA administrator for the JIRA Project Names and Keys for each project you want to add to CSM.
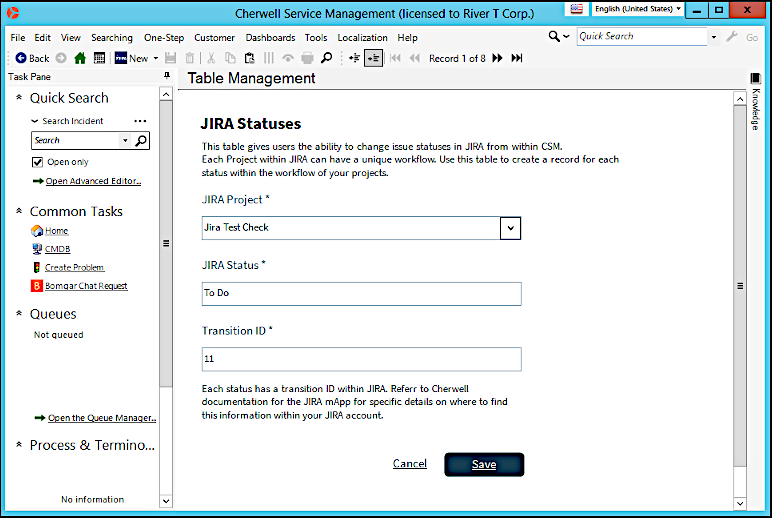
To define JIRA Statuses:
- In the CSM Desktop Client, open the Table Management Interface (under Tools in the menu bar).
- In the Type drop-down list, select JIRA Status.
- Select the JIRA icon in the toolbar and then select Add a JIRA Status.
- Create a new JIRA status record for each status in your JIRA
projects.
- Select the Project Name.
- Enter the JIRA Status.
- Enter the JIRA Status Transition Number.
To modify the status options using Expressions:
- In CSM Administrator, create a new Blueprint.
- Select Managers from the menu bar and then select One-Step.
- Set the Association to Incident.
- Edit the Change JIRA Status One-Step found in the Blueprint/JIRA folder.
- Select the second step Validate Stored Values and double-click on the Prompt.
- In the Constraints sections, add additional Expressions to limit the statuses shown.
- Repeat steps 3-6 for Problem.
- Publish the Blueprint.
- In CSM Administrator, create a new Blueprint.
- Select the Incident Business Object and select Edit Business Object.
- Select JIRA Status in the list of fields and then select Field Properties.
- Select Validation/Auto-populate from the sidebar.
- Clear the Validate from JIRA Status Table check box.
- Clear the Auto-populate check box.
- Select OK to save.
- Locate the JIRA Status ID field.
- Repeat steps 1-7.
- Select the Problem Business Object.
- Repeat steps 1-9 for the Problem Business Object.
Note: Ensure you do not add the Change JIRA Status buttons or links to your Problem and Incident Forms if you choose not to use this feature.
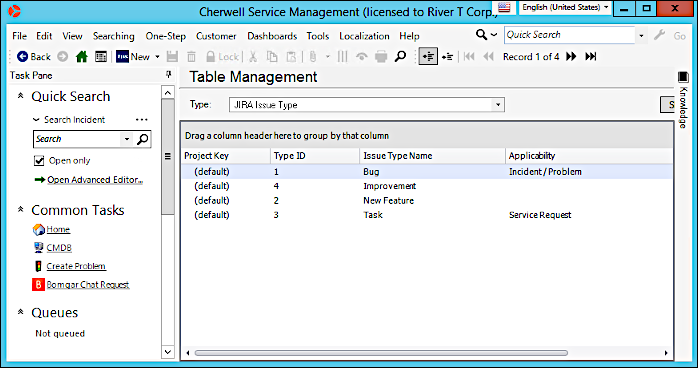
Configuring Issue Types
JIRA supports multiple Project types and allows for custom issue types on a per-Project basis. Coordinate with the JIRA administrator about the types of Issues associated with each Project. The most common issue types are preloaded as default issue types in the JIRA Issue Type lookup table. If a JIRA Project uses non-standard issue types, add the issue types to the lookup table.
To configure Issue Type:
- In the CSM Desktop Client, open the Table Management Interface (under Tools in the menu bar).
- In the
Type drop-down list, select
JIRA Issue Type.
A list of default issue types that are mapped to CSM objects shows.
- Double-click an issue type to view the
properties.
Note: Select the JIRA icon to add a new issue type.