Incident Form
Use the Incident and Request forms to create, edit, and track Incidents or Requests.
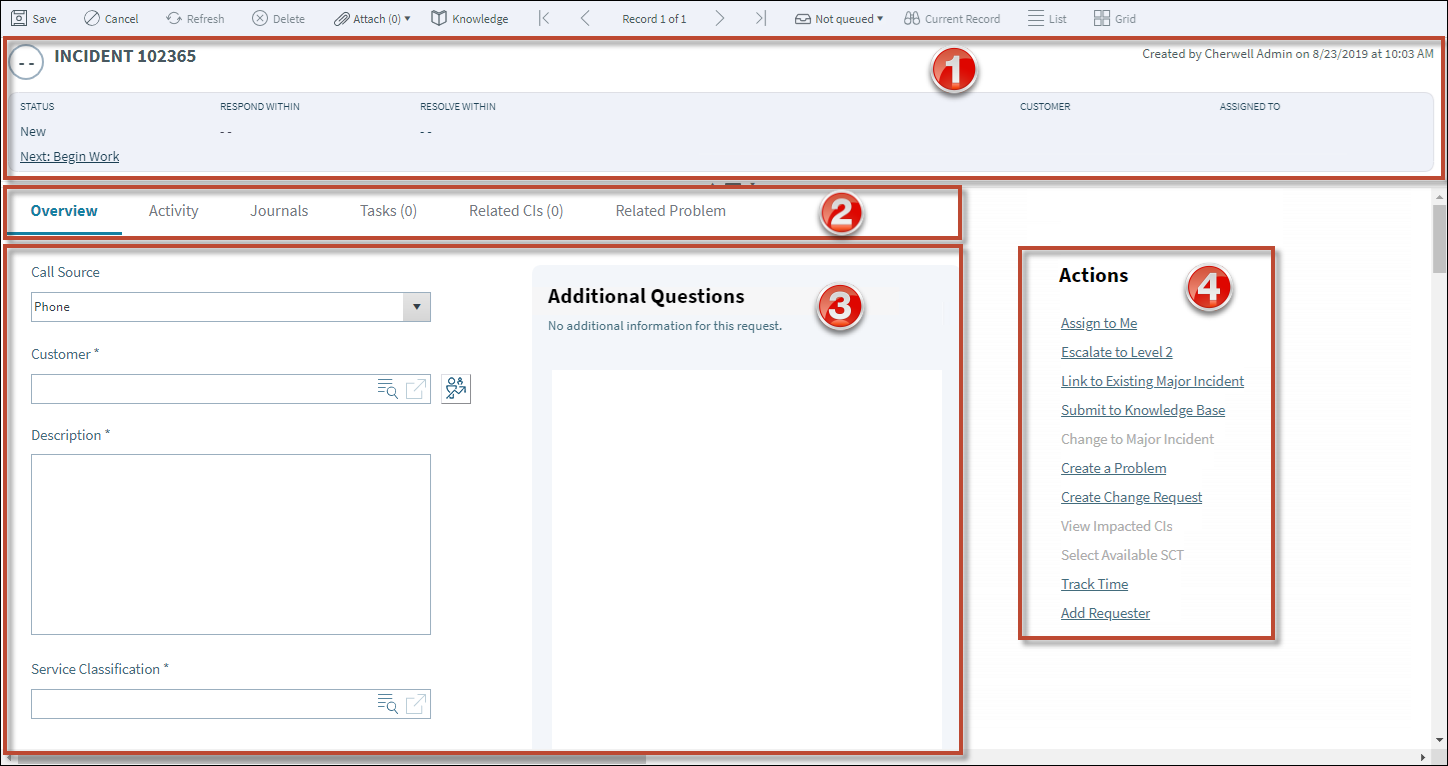
The forms are similar and are made up of four main areas:
- Default Form: Displays important at-a-glance information.
- Form Arrangement: Dynamically displays a tabbed collection of child forms and records that are in a relationship with the Parent Incident form. See Managing Form Arrangements for more information.
- Form Area: Displays the main form fields.
- Actions List: Dynamically displays a list of actions that are available for the current Incident.
The following table describes the fields on the form.
| Field | Description | Comments |
|---|---|---|
| Default Form | Important at-a-glance information, such as Incident ID, response timers, customer contact information, Status bar (current and next Status), and to whom the Incident is assigned. | |
| Priority | A measure of impact and urgency used to establish timescales and effort to respond to and resolve an issue. See Priority for more information. | |
| ID | Unique record identifier (example: 10999). | |
| Status |
Statuses include:
|
|
| Next: Status | Select the
links to move the Incident/Request through
the Incident/Request workflow.
The Next links include the following statuses:
|
For information about One-Step Actions that can be used with the Next: Status field, see Incident One-Step Actions. |
| Response Time | Time remaining to respond to the Incident based on Priority. | |
| Resolve Time | Time remaining to resolve the Incident based on Priority. | |
| Requester | Person who submitted the Incident/Request on behalf of the customer. Select to change or remove requester. | |
| Customer | Person affected by the Incident/Request. Select to change customer. | |
| Assigned to | Name of the team member who is working on the Incident. Select the link to first select a team and then the assigned user. | |
| Main Pane | Displays the main form fields. Specifics forms appear when relevant. See Specifics Forms. | |
| Call Source | Method by which the Incident was
delivered. Options include the following sources:
|
|
| Customer | Person affected by the Incident/Request. If the Incident was submitted by another user on behalf of the customer, select Submit On Behalf Of to set the requester. | |
| Description | Description of the Incident/Request. | |
| Service Classification |
Service affected by Incident/Request:
|
You can classify an Incident form by selecting a Service Classification that matches the Service, Category, and Subcategory. For more information, see Service Categorization. |
| Priority | Indicates the established timescales and effort to respond to and resolve an issue (Incident or Request). Priority is derived from an impact and urgency Priority Matrix. | For more information, see Priority. |
| Primary Configuration Item | Displays the main CI that supports this Incident. | For more information, see About CMDB. |
| Team | Name of the team to which the form is assigned. | |
| Assign To | Select the link to select a user owner for the Incident. The team owner is populated by the selected user owner's default team. | One-Step Action (Assign to ANY Individual): Prompts the user to assign the record to any CSM user (not limited by team). Uses Owned By ID and Owned By Team Fields. |
| Actions List | Dynamic display of the actions available for the current Incident. | |
| Assign to Me | Makes the current user the owner of the Incident. The current user's name appears in Assigned to field. | |
| Escalate to | Assigns next level of severity to the Incident according to the workflow. | |
| Link to Existing Major Incident | Creates association between current Incident and existing Major Incident. | |
| Submit to Knowledge Base | Creates a knowledge article with fields assigned relevant information from Incident form. | |
|
Change to Major Incident Change to Incident |
Transforms a priority 1 incident into a Major Incident or changes a Major Incident back to an Incident. | A Major Incident can have other Incidents associated to it. When the Major Incident is resolved, the linked Incidents are also closed. A Major Incident has a Linked Incidents tab that displays a list of all Incidents associated with it. |
| View Impacted CIs | Opens a list of Configuration Items that are affected by the Incident. | |
| Select Available SCT | Allows you to add tasks from a Service Catalog Template. SCT tasks appear in Tasks tab. | |
|
Add Requester Remove/Change Requester |
Adds a Requester when submitting on behalf of another user or removes or changes the Requester. |
After selecting a Requester, prompts the user to select who should receive email notifications. One-Step Action: Prompts the user to change or remove the Requester. |
| Set to Pending | Stops the progression of Resolve Time. Opens a prompt that requires a reason. |