Define Attachments Properties for a Business Object
Use the Attachments page in the Business Object Properties window to define which types of Attachments Users can attach to a Business Object (ex: Imported files, Attachment Manager Attachments, etc.).
Note: The Business Object Properties window is available in the
Business Object Editor
(accessed from within the
Object Manager in a
Blueprint).
To define Attachment properties for a Business Object:
- Open the Business Object Properties window:
- In the
CSM Administrator main window, click the
Blueprints category, and then click the
Create a
New Blueprint task.
Note: If working on a saved Blueprint, open the existing Blueprint.
The Blueprint Editor opens, showing the Object Manager in its Main Pane. The Object Manager lists the existing Business Objects.
- In the Object Manager, click a
Business Object in the Object tree, and
then click the
Edit Business Object task in the Structure
area.
The Business Object Editor opens.
- Click the Bus Ob Properties button.
- In the
CSM Administrator main window, click the
Blueprints category, and then click the
Create a
New Blueprint task.
- Click the Attachments page.
- Define Attachment options:
- Allow Imported File Attachments: Select this check box to allow Users to import files directly into CSM and attach them to the Business Object. In CSM, Attach a file (import)will be available from the Attachment menu on a record.
- Allow Linked File Attachments: Select this check box to allow Users to link files that are on a network drive directly to CSM and attach them to the Business Object. In CSM, Attach a file (link)will be available from the Attachment menu on a record.
- Allow Linked URLs: Select this check box to allow Users to link websites to CSM and attach them to the Business Object. In CSM, Attach a web pagewill be available from the Attachment menu on a record.
- Allow Attachment Manager Attachments: Select this check box to allow Users to select Attachments from the Attachment Manager and reference them from the Business Object. In CSM, Shortcut to an Attachmentwill be available from the Attachment menu on a record.
- Allow Arbitrary Business Object Attachments: Select this check
box to allow Users to reference other Business Objects as Attachments. In
CSM,
Objectswill be available from the Attachment menu on a record, with a
list of available Business Objects:
- Allow Any Major Business Objects: Select this radio button to allow any Major Business Object to be referenced as an Attachment. In CSM, all Major Business Objects will be listed when Users select Objects from the Attachment menu.
- Allow the Following Business Objects: Select this radio
button to select specific Business Objects that can be referenced as
Attachments. Then, select one or more Business Objects in the list. In
CSM, only the selected Business Objects will be listed when Users select
Objects from the Attachment menu.
Note: An Arbitrary Business Object Attachment can be accessed from the Attachment Bar on its associated record, but it is not related to the Business Object. Since it is not related to the Business Object it is not available for searching or navigation.
- Define options for showing Relationships on the Attachment Bar. This
allows you to display related Business Objects in the Attachment Bar.
- Relationships Shown on Attachment Bar: Select which Relationships to show on the Attachment Bar for the Business Object. This allows Users to reference related Objects as Attachments.
- Attachment Menu Text: Provide
text to display on the Attachment menu,
or leave it blank to use the default menu text (Choose a <child Business
Object name here>).
Note: This is typically used for related items that are either rarely used or are not important enough to warrant creating a tab in the Form Arrangement to show related data. It also allows the User to select a record to display on a tab without exposing the toolbar on the tab. We recommend adding only one-to-one Relationships to the Attachment Bar, unless you expect only a few items from a one-to-many Relationship to be attached.
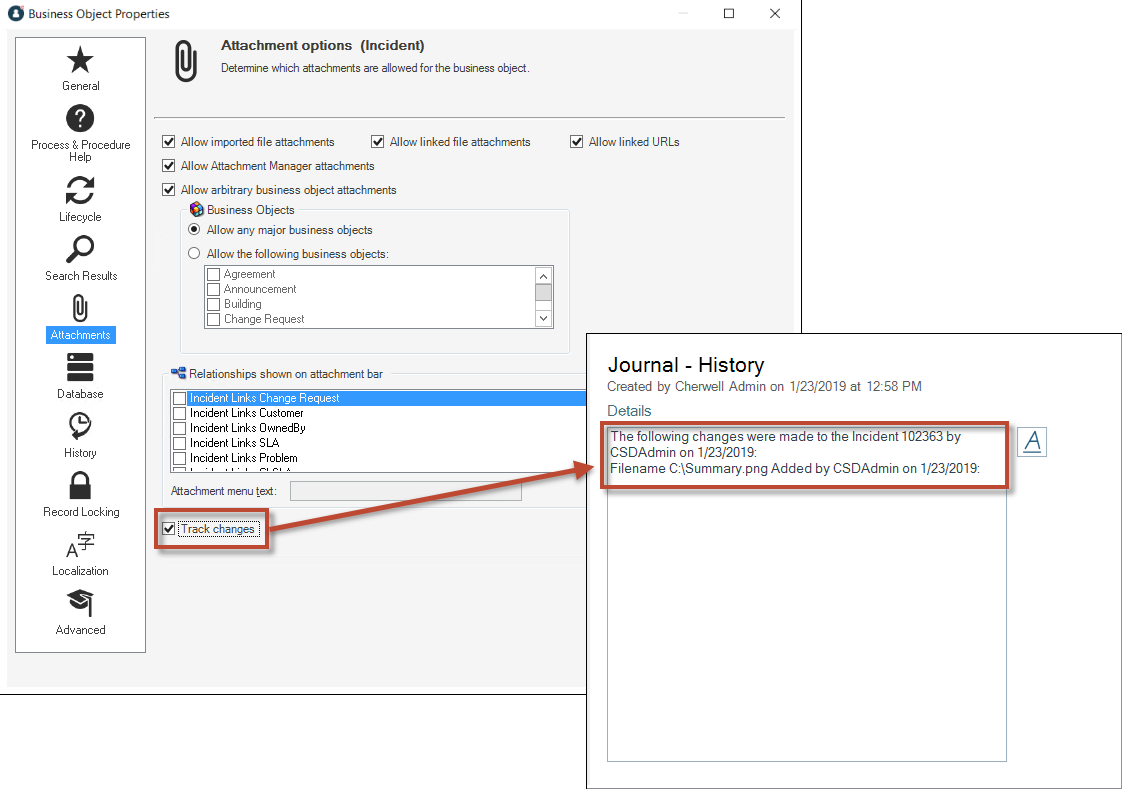
- Track Changes: Select this check box to create an audit log for
Attachments. This creates a Journal-Note in the Form Arrangement to show the
addition, removal, or update/change of Attachments.
-
Select OK.
- Publish
the Blueprint (File>Publish Blueprint) to commit the changes, or
save the
Blueprint (File>Save Blueprint) to continue making other changes.
Note: Before publishing a Blueprint that contains Business Objects, ensure that each Business Object has at least one Form and one Grid defined and that all of the appropriate Fields have been created.