Here is an example to show you how to create part of a big
lifecycle using the Business Object Lifecycle Editor.
Use branches to add divergent routes to your lifecycle. Jumps allow
you to go backwards through your lifecycle (example: if something is rejected
or to reopen a Closed ticket), to visit a status more than once, and to close
off a lifecycle.

To replicate this section of
this lifecycle you need to use the following statuses, stages, branches, jumps
and transitions:
- Open the Lifecycle Editor.
- Drag a status on to the board to form an initial stage (not shown)
and then drag another onto the board to the right of that one.
- With the second stage still selected, go to the
Properties area. Change the
Status Name to
Draft and the
Stage Name to
Classification. Select
Tab or
Enter or click away to see the name changes
reflected on the designer board.
- Drag another status on to the board to the right of
Draft. Change the
Status Name to
Risk Analysis and the
Stage Name to
Assessment.
Note: Select the
New Stage button to name stages.
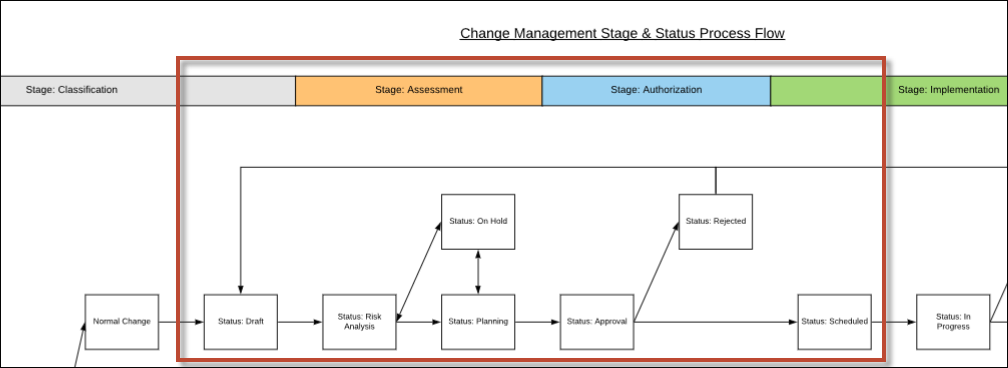
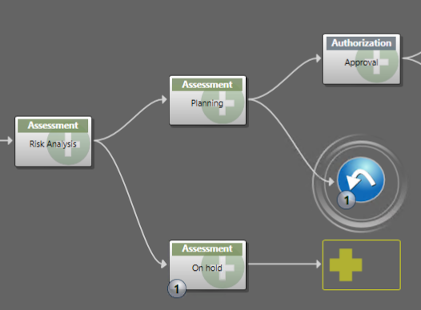
- Now you need to add a branch to replicate the section shown in the
image for the statuses
Planning and
On Hold. Drag a status and add it to the right
of
Risk Analysis. Then drag and drop another on
top of
Risk Analysis.
You see a branch as per step 6 but with default status
names.
- Change the
Status Names to
Planning and
On hold. You don't need to change the stage
name because it was inherited from the previous stage.
Your branch should now look like this:
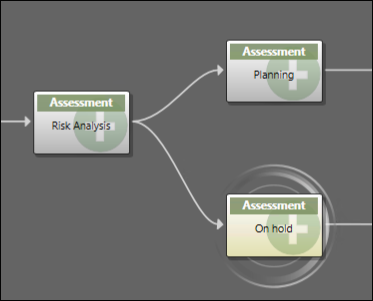
- Now, add the statuses for
Approval,
Scheduled and
Rejected using the same methods. These three
statuses are all part of stage
Authorization.
Your lifecycle should now look like this:
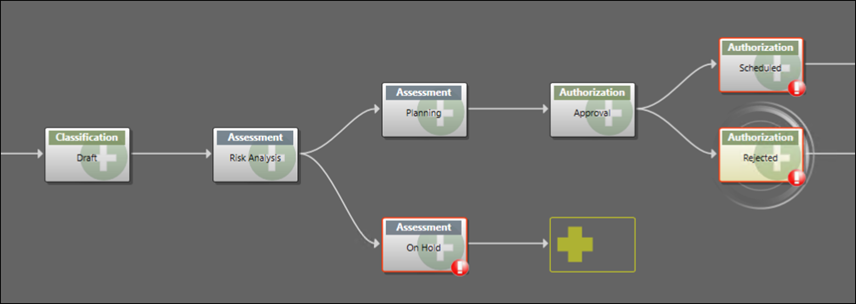
- To clear the red warnings, you need to add a stage and mark it as
final. Drag a status to the right of
Scheduled, select it and then
select Set Final Stage in the
Properties area.
Two of the red warnings disappear. If you hover over
On Hold, you see a tool tip saying
Status has no route to final stage: On
Hold. That warning can be fixed in a minute by adding our jumps.
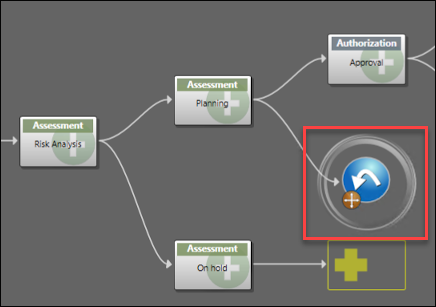
- In the original image of the lifecycle you can see double-headed
arrows and also a route from
Rejected all the way back to
Draft. You need to recreate these in the
Lifecycle Editor using jumps, so the first jump will be between
Planning and
On Hold. Drag a jump onto the board and drop
it on to
Planning.
You see this on your screen:
- Then drag the brown cross onto your destination status, in this
case,
On Hold.
There is now a jump or two-way arrow between the statuses
Planning and
On Hold. You can tell which statuses are
joined by a jump by looking for the matching pairs of jump numbers.
- Add the final two jumps: from
Rejected to
Draft, and from
On Hold to
Risk Analysis.
When you are finished, your lifecycle should look like the
one shown at the top of this page. Take a moment to reflect on the visual
differences and similarities between the two images, in particular how jumps
represent arrows.
- Lastly you need to name the transitions. Think about statuses
being adjectives that describe the current state of a record (example: Closed,
In Progress, Awaiting Approval) and transitions as verbs that act on the record
resulting in the state being changed (example: Close, Begin Work, Approve). For
our example lifecycle above, suggested transition names could be as follows:
| Draft
|
Submit ticket
|
Risk Analysis
|
| Risk Analysis
|
Pass risk check
|
Planning
|
| Fail risk check
|
On Hold
|
| Planning
|
Submit plans for approval
|
Approval
|
| Put on hold
|
On Hold
|
| Approval
|
Pass approval checks
|
Scheduled
|
| Fail approval checks
|
Rejected
|
| On Hold
|
Give go ahead
|
Risk Analysis
|
- Select
Save on the toolbar (or select
Ctrl+S) to save your lifecycle while working.
Select
OK at the end when editing is complete and you
want to save your lifecycle and close the Lifecycle Editor.
If not valid, you are not allowed to save and are asked to
fix the issues. See
Validate a Lifecycle.
- Publish
the Blueprint
() to commit the changes, or
save the
Blueprint () to continue making other changes.