Create an Excel Template
To use the Excel Merge Action, you must first create an Excel template to define what data is retrieved from CSM.
Data can be retrieved from:
- Business Objects (example: Incident)
- Relationships
- Business Object Fields
- Tokens (Counters, Expressions, or Stored Values)
Good to Know
- For best results, use a template from the Attachment Manager as a starting point (example: Incident Scorecard).
- Templates must be saved with an .xls, .xlt, .xlsx, or .xltx extension.
- Many functions can be defined for an Excel template. For several examples of useful functions, see Excel Merge Template Functions.
Creating an Excel Template with a Single Business Object
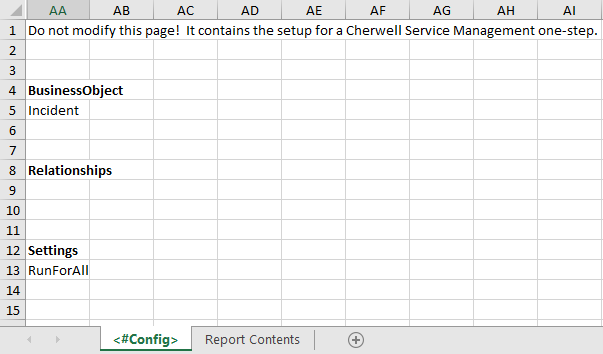
- Name the first tab of the template
<#Config>.
CSM uses this page to retrieve data from a Business Object, Business
Object Relationships, and other settings to properly create the file.
Note: All items must be in the AA column of the worksheet. Use the Excel Hide feature to hide columns A through Z.
- Define the Business Object, Relationships, and settings to use for
retrieving data from
CSM.
- In the AA column of the worksheet, specify BusinessObject on a row, and then provide the name of the Business Object (example: Incident) on the following row.
- Specify Relationships on another row. Leave the rows underneath Relationships blank for a single object template.
- Specify
Settings on another row. If the
One-Step Action is run against a group of records, specify
RunForAll in the following row to have the
file append all of the records together. If this keyword is not present, a file
is generated for each record.
Note: GetField functions do not work against a group of records. Consider using the lookup function instead (see Excel Merge Template Functions).
- Define the contents for the Excel file (on another tab/worksheet of
the Excel template). This is done using functions that pull data from
CSM.
Note: Functions must be in the following format: <#FunctionName(parameters)>. When multiple parameters are passed to these functions, a semicolon is used to separate the values.
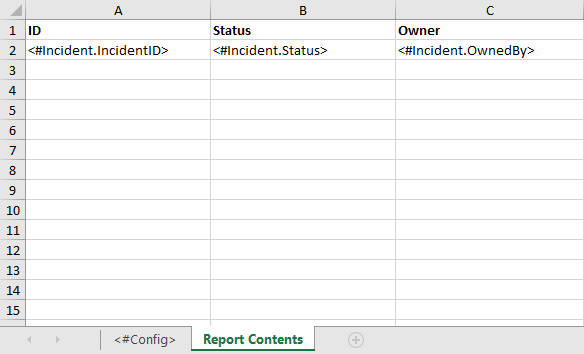
- Define which Fields to pull data from:
- <#BusinessObject.FieldName>: Provide this function to look for the specified Field in the parent Business Object (example: Specify <#Incident.Status> to retrieve values from the Status field in Incident Business Objects).
- <#GetField(BusinessObjectName;fieldname)>: Provide this function to look for a Field in a related Business Object (example: Type <#GetField(Customer;Full Name)> to retrieve a Customer's name from the Customer Business Object related to an Incident).
- <#GetField(RelationshipName;fieldname)>: Provide this
function to use the specified Relationship to find the related Business Object.
Note: It is important to use the Relationship name so the correct Business Object is used, especially if more than one Relationship exists with the same related Business Object (example: CustomerHasContacts, CustomerHasPrimaryContact).Important: Do not use the GetField function if you run an Excel Merge One-Step Action against a group of records and also include data from a related Business Object (example: You want a list of Tasks and also want to include the parent Incident's Service category). See the section below to create an Excel template with multiple Business Objects.
- (Optional) Define which Tokens to pull data from. This is done
using the GetCounter, GetExpression, and GetStoredValue functions, which have
the following options:
- Use the name of the Counter, Expression, or Stored Value:
- <#GetCounter(name)>
- <#GetExpression(name)>
- <#GetStoredValue(name)>
- Use the scope and then the name of the Counter, Expression,
or Stored Value:
- <#GetCounter(scope;name)>
- <#GetExpression(scope;name)>
- <#GetStoredValue(scope;name)>
- Use the name of the Counter, Expression, or Stored Value:
- Define which Fields to pull data from:
- Create a
named range.
CSM
uses the named range to structure the report.
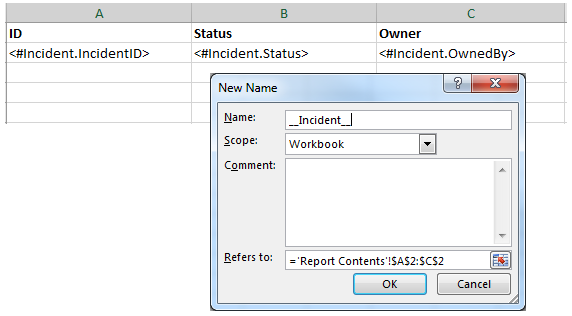
- On the Contents tab, select the series of cells containing the functions. Do not select the column headers.
- Click Formulas>Define Name, or right-click>Define Name.
- Provide the name of the Business Object with two underscores on each side (example: _ _ BusinessObject _ _).
- Save the file in the Attachment Manager or on the computer.
Creating an Excel Template with Multiple Business Objects
- Complete the steps to create an Excel template with a single Business Object.
- Define additional Business Objects and Relationships to use for
retrieving data from
CSM.
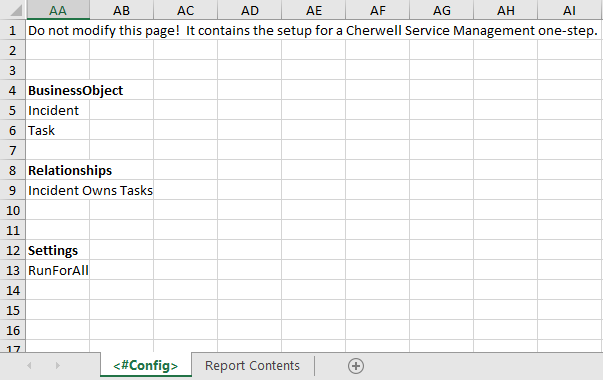
- In the AA column of the <#Config> worksheet, underneath BusinessObject provide the name of each additional Business Object to be used.
- Use the rows underneath
Relationships to provide the Relationships
between the Business Objects.
Note: To include multiple Relationships, provide each one in a separate, consecutive row. Leave the rows underneath Relationships blank to not include any data from related Business Objects.
- On the Contents tab, define additional functions to pull Field data
from
CSM.
Note: The placement of functions will determine the structure of the report. (example: defining the Field <#Incident.IncidentID> in cell A1 and <#Task.TaskID> in cell B2 will generate a report with Incident ID values in column A and associated task ID values in subsequent rows in column B).Important: Do not define Fields for multiple Business Objects on the same row. Each row should handle Fields for a single Business Object.
- Re-configure the existing named range to accommodate multiple
Business Objects, and create additional named ranges.
- Expand the named range for the parent Business Object to
include all cells containing Fields.
- Click Formulas>Name Manager.
- Select the existing named range (example: __Incident__) and click Edit.
- Select and delete the text in Refers To.
- Select all cells containing functions. The named range will automatically populate with the new selection.
- Click OK.
- Create a named range for the child Business Object that includes all cells containing child object Fields.
The following figure shows an example:
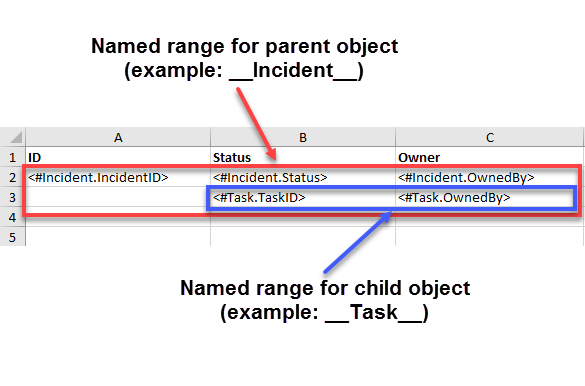
When the Excel Merge One-Step Action retrieves the data from the specified Fields, the parent object data is listed first, and the child object data is listed underneath (example: Incident data followed by data from related Tasks).
- Expand the named range for the parent Business Object to
include all cells containing Fields.
- Save the file in the Attachment Manager or on the computer.