Advanced Configurations for the Cherwell Service Host
Only one Cherwell Message Queue Service (CherwellMQS) node is permitted per CSM environment. Configure complex systems with Cherwell Service Host by adding multiple service host instances, connecting distributed Cherwell Service Host instances to a primary CherwellMQS instance, or connecting distributed Cherwell Service Host instances to a RabbitMQ cluster.
During the Server Installation, CherwellMQS is automatically installed. By default, Cherwell Service Host is connected to the CherwellMQS instance on the machine on which it was installed. If you use multiple instances of the Cherwell Service Host, you must connect those distributed instances to a primary CherwellMQS or connect all RabbitMQ instances into a cluster and leave Cherwell Service Host connected to the CherwellMQS instance on the machine on which it was installed.
Adding Multiple Service Host Instances
Add multiple instances of the Cherwell Service Host and distribute microservices across multiple machines to distribute the queuing workload. Use the Server Installer to add the Service Host and selected microservices to additional machines.
To add Service Host instances:
- Verify that your main instance of the Cherwell Message Queue Service and Cherwell Service Host are configured correctly and running. See Configure the Cherwell Service Host.
- Launch the CSM Server installer, and select normal installation options until you come to the Database Selection page.
- Select the Don't load any data option. Select Next.
- On the Server Selection page, select one or more of these
microservices:
- Automation Process Service
- Scheduling Service
- Email and Event Monitor Service
- Mail Delivery Service
- System Event Processing Service
Note: You can clear the Application Server check box. - Click Next.
- On the Logon Information page, select a user account that has privileges to run and modify services on the machine.
- Click Next, and then finish the installer.
Connect Multiple Cherwell Service Hosts to a Single CherwellMQS
Though a RabbitMQ node is installed along with Server Installation, you can choose to point to an existing node of RabbitMQ. If you have multiple Service Hosts, you can configure them to point to the same RabbitMQ node, or you can set up RabbitMQ clustering and direct the Service Hosts to the cluster.
To connect multiple Cherwell Service Host instances to CherwellMQS:
- On the machines that have distributed instances of Cherwell Service Host, open the Cherwell Service Manager.
- Select
Configure next to Message Queue. The
Message Queue Options dialog box opens.
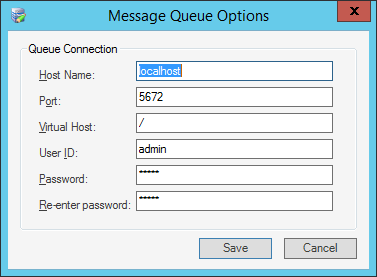
- In the Host Name field, change "localhost" to the server name or IP address of the primary CherwellMQS instance.
- Change the User ID and password to match the credentials for the
primary instance of CherwellMQS.
Note: You should change the default CherwellMQS password as part of your initial configuration of CSM. See Configure CherwellMQS/RabbitMQ.
- Select Save.
- Repeat for each distributed instance of CherwellMQS.
Connect Multiple Cherwell Service Hosts to a RabbitMQ Cluster
Cherwell Service Hosts cannot point to multiple RabbitMQ nodes. However, each machine with Cherwell Service Host installed also has CherwellMQS installed. If each instance of CherwellMQS is part of a single RabbitMQ cluster, the Service Host can remain connected to its local version of CherwellMQS.
RabbitMQ clustering is configured outside of CSM and guidance is not provided by Cherwell Support. See https://www.rabbitmq.com/clustering.html for information about RabbitMQ clustering.