Configure PowerShell for Exchange Orchestration Pack
The below procedure is the second step in configuring the Exchange Orchestration Pack. PowerShell version 3 or later is required for the mApp Solution functionality to work. Executing the Exchange runbooks requires the following PowerShell cmdlets.
These cmdlets are only available in on-premises Exchange
Server 2016.
- Enable-MailUser cmdlet: This command mail-enables existing users by adding the email attributes that are required by Exchange. Mail users have email addresses and accounts in the Exchange organization, but they don't have Exchange mailboxes. Email messages sent to mail users are delivered to the specified external email address.
- Disable-MailUser cmdlet: This command mail-disables existing mail users by removing the email attributes that are required by Exchange. Mail users have email addresses and accounts in the Exchange organization, but they don't have Exchange mailboxes. Disabling a mail user removes the ability of Exchange to deliver messages to the specified external mail address.
To install the cmdlets, the Microsoft Remote Server Administration Tools must be installed. Download links for Windows desktop operating systems are provided below. For Windows Server follow the instructions in the next section.
- Windows 7: http://www.microsoft.com/en-us/download/details.aspx?id=7887
- Windows 8: http://www.microsoft.com/en-us/download/details.aspx?id=28972
- Windows 8.1: http://www.microsoft.com/en-us/download/details.aspx?id=39296
- Windows 10: https://www.microsoft.com/en-us/download/details.aspx?id=45520
To install the Active Directory PowerShell cmdlets on Windows Server:
If the required PowerShell cmdlet library is not
installed, the first time a runbook runs a dialog opens containing links to
Microsoft to download the applicable PowerShell library.
- Open the Server Manager.
- Click
Add roles and features.
The Add Roles and Features Wizard opens.
- Click Next until the Features option is highlighted in the left pane.
- In the features window, go to Remote Server Administration Tools > Roles Administration Tools > AD DS and AD LDS Tools.
- Select the
Active Directory module for Windows PowerShell
checkbox.
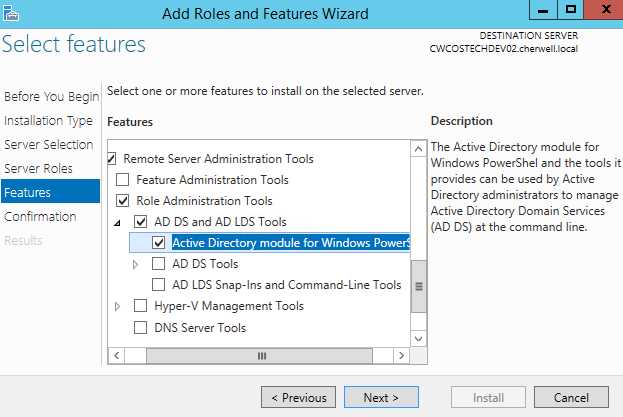
-
Select Next.
Confirmation is highlighted in the left pane.
- Click Install.
-
Select OK.