Using Power BI and the Data Connector
You can connect the Power BI® third-party reporting tool to the Cherwell REST API and retrieve data from CSM using the Power BI Data Connector from Cherwell.
For detailed information on installing and using the Microsoft® Power BI third-party tool, see the Microsoft documentation at https://docs.microsoft.com/en-us/power-bi/ .
Connecting Power BI and the Data Connector
Alternatively, you can obtain and install the Cherwell Power BI Data Connector via either the CSM Desktop Client or CSM Browser Client.
- Open Power BI Desktop.
- Select Security, and then under Data Extensions select the Allow any extension to load without validation or warning option.
- Close Power BI Desktop and perform
one of the following:
From the CSM Desktop Client menu bar, select . This copies the .mez file (the file type for the Power BI Data Connector) into the correct folder so it can be used without further configuration.
- From the
CSM Browser Client
menu bar, select
.
This only downloads the file to the user's machine. You must copy and add this file to the local path ([Documents]\Power BI Desktop\Custom Connectors) before it is recognized by Power BI.
You must restart Power BI after this step.
For more information on connector extensibility, see https://docs.microsoft.com/en-us/power-bi/desktop-connector-extensibility/.
Using Power BI and the Data Connector
- Open Power BI.
- From the main toolbar, select .
- Select the Other category, then select the Cherwell Data Connector.
-
Select Connect.
The Cherwell pop-up dialog is displayed.
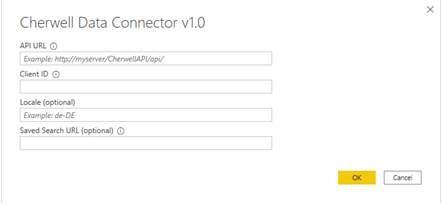
-
Enter the API URL.
You can obtain this from the REST API Base URL setting in CSM Administrator. For more information, see Set the Base URL for the Cherwell REST API.
Only HTTPS API URLs are accepted. Accordingly, you must enable HTTPS for your Cherwell REST API. -
Enter a Client ID. For more information, see Obtaining API Client IDs.
This is the Client Key. For more information, see Configuring the Cherwell REST API.
- (Optional) Enter a Locale. For information on using locales, see Using Locales with Power BI .
-
(Optional) Enter a Saved Search URL. For information on using Saved Searches, see Using Saved Searches with Power BI.
- Select OK.
- (Optional) If prompted to sign in, select Sign in, and enter your CSM username and password. Alternatively, if SAML is enabled, enter your SAML credentials. Select Login.
- Select Connect.
In the Cherwell pop-up dialog, if you:
- Did not enter a Saved Search URL, data is returned and displayed in a Navigation Table. For more information, see Using Navigation Tables in Power BI.
-
Entered a Saved Search URL, data is returned and displayed using the default Grid for the Business Object. You can create tables to view the data.
Sharing Cherwell Reports/Dashboards via Power BI
You can share Cherwell Reports and Dashboards via the Microsoft Power BI cloud service. This lets users access live versions of the Reports and Dashboards containing regularly refreshed and up-to-date information (as opposed to information relevant at the time of publishing).
To share Cherwell Reports and Dashboards via the Power BI cloud service you must:
- Have Power BI Desktop installed (for information, see https://powerbi.microsoft.com/en-us/desktop/).
- Have a Power BI service account (you can create one at https://powerbi.microsoft.com/en-us/).
After completing the above setup steps, you must complete the following tasks in order:
- Install and set up an on-premises data gateway.
- Create and publish a Power BI report.
- Configure the dataset in Power BI.
- Configure the scheduled refresh settings.
For more information, see below.
Step 1: Install and set up an on-premises gateway
For the Power BI service to refresh data from the custom connector, you must install an on-premises data gateway on a machine reachable by the Power BI remote services. For information, see https://powerbi.microsoft.com/en-us/gateway/.
When you have installed the on-premises data gateway, complete the remaining steps below.
Step 2: Create and publish a Power BI report
- Complete the steps in Using Power BI and the Data Connector.
-
Publish the report (for more information, see https://docs.microsoft.com/en-us/power-bi/desktop-upload-desktop-files/).
Step 3: Configure the dataset in Power BI
- Log in to the Power BI online dashboard at https://app.powerbi.com/.
-
Using your workspace, open your datasets. For more information, see https://docs.microsoft.com/en-us/power-bi/service-datasets-across-workspaces/.
Your datasets are displayed.
- Open the settings for the relevant dataset.
- Ensure the gateway connection you previously set up is registered and running. For more information, see https://powerbi.microsoft.com/en-us/gateway/.
-
Check the data source credentials.
If the data source cannot be refreshed owing to invalid credentials, a message is displayed asking you to update your credentials. If necessary, edit your credentials and sign in to begin the OAuth login process with the Cherwell REST API. Log in using your CSM credentials. Alternatively, if SAML is enabled, enter your SAML credentials. -
To ensure the data source is set up correctly, perform a manual refresh of the report (for more information, see https://docs.microsoft.com/en-us/power-bi/refresh-data/).
Step 4: Configure the scheduled refresh settings
In the Power BI online dashboard, set and apply the appropriate scheduled refresh options. For more information, see https://docs.microsoft.com/en-us/power-bi/refresh-scheduled-refresh/.
When a scheduled refresh happens, a message is displayed in the dataset settings. You can view a history of in progress and completed scheduled refreshes.
To avoid authentication issues in Power BI, see Authentication in Power BI .
- Scheduled refreshes are limited to a minimum of 30 minute intervals. For example, you can schedule two refreshes for 4:00pm and 4:30pm, but not 4:15pm.
-
We recommend you configure two daily schedules at different times of day. This means the refresh token will never be more than 1440 mins (24 hours) old before it is replaced.
For security reasons, the maximum scheduled refresh token lifespan for Cherwell REST API client IDs in CSM is 1440 minutes (24 hours). This is also the default setting.
Power BI lets you schedule refreshes either daily or weekly. Consequently, if you configure a weekly scheduled refresh, authentication will fail a week later owing to the refresh token having expired.
Furthermore, Microsoft’s daily scheduled refresh option doesn’t run at an exact time. For example, a daily scheduled refresh for 6:00 AM might run at 6:03 AM one day and 6:05 AM the next. Accordingly, even daily scheduled refreshes might encounter issues if the token expires after exactly 24 hours. Using two daily scheduled refreshes at appropriately different times should prevent this.
Using Locales with Power BI
When configuring the Power BI data connector, you can set locales to translate data into different languages. For example:
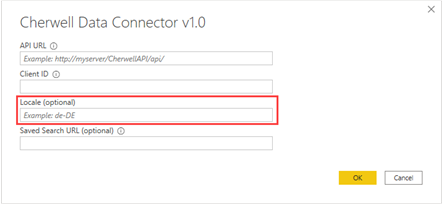
You could set the Locale to "de-DE" to translate data into German, or "fr-FR" to translate data into French, for example.
- The entered locale must relate to a culture enabled within your CSM instance.
-
In Power BI Desktop, you can set a locale. For more information, see https://docs.microsoft.com/en-us/power-bi/supported-languages-countries-regions/.
The locales specified in both the Cherwell pop-up dialog and Power BI Desktop must match. This also applies for any defaults set in Power BI Desktop.
If locales in the Cherwell pop-up dialog and Power BI Desktop do not match, Power BI may interpret dates incorrectly owing to mismatched localized date formatting.
On completing the necessary details in the Cherwell pop-up dialog, select OK.
You may be asked to sign into your organizational account.
Owing to limitations in the Power BI third-party reporting tool, it is not possible to localize the resulting Cherwell Service Management sign in dialog. Consequently, this sign in dialog is always displayed in your CSM instance's default language.
On connecting, any data or tables are loaded and displayed in the language relevant to the locale.
Using Saved Searches with Power BI
When configuring the Power BI data connector, you can quickly access required data in the correct format by using Saved Searches (for more information, see About Saved Searches) and Grids (for more information, see Grids). For example:
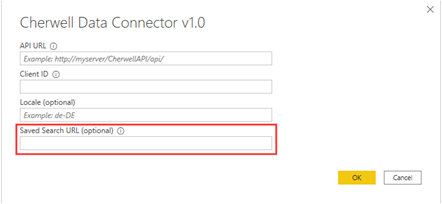
Copy the URL for a Saved Search (for more information, see API URL for a Saved Search). You can then paste the copied URL into the Saved Search URL field in the Cherwell pop-up dialog.
On completing the necessary details in the Cherwell pop-up dialog, select OK.
- Only HTTPS Saved Search URLs are accepted. Accordingly, you must enable HTTPS for your Cherwell REST API.
-
You may be asked to sign into your organizational account.
Owing to limitations in the Power BI third-party reporting tool, it is not possible to localize the resulting Cherwell Service Management sign in dialog. Consequently, this sign in dialog is always displayed in your CSM instance's default language.
On connecting, the Saved Search data is loaded into Power BI and displayed using the default Grid for the Business Object. You can create tables to view the data, and build reports.
A Power BI Navigation Table is not displayed for Saved Searches. Consequently, we recommend only entering an API URL in the Cherwell pop-up dialog and using the Power BI Navigation Table. For more information, see Using Power BI and the Data Connector.
To avoid authentication issues in Power BI, see Using Power BI and the Data Connector.
Using Grids with Power BI
When using the Power BI third-party reporting tool with the Cherwell REST API you can use a Grid to display details returned by a Saved Search. You can modify the Grid to specify column selection. For more information, see Grid Options for Third-Party Reporting Tools.
When using the Power BI Data Connector from Cherwell with a Navigation Table (for more information, see Using Power BI and the Data Connector), you can:
- Create a new Grid (recommended). For more information, see Managing Business Object Grids.
- Personalize an existing Grid (including the default Grid for a Business Object). For more information, see Grid Persistence.
We recommend you create a new Grid to use with Saved Searches when using Navigation Tables in the Power BI third-party reporting tool. This lets you select and order Grid columns in a way that applies across multiple CSM user accounts. This preferred method adheres with our recommended approach for managing authentication. For more information, see Using Power BI and the Data Connector.
You can optionally use Saved Searches with the Power BI Data Connector from Cherwell and modify the default Grid for the relevant Business Object. For more information, see Grid Options for Third-Party Reporting Tools.
Authentication in Power BI
Due to licensing limitations and to avoid unexpected authentication failures, we recommend you use separate and unique CSM user accounts when you:
- Author/publish reports.
- Set credentials within the Power BI Online service.
When the Power BI environment executes a scheduled refresh (for more information, see Sharing Cherwell Reports/Dashboards via Power BI) it makes a request to the Cherwell REST API to refresh the authentication token it previously received when initially setting up the data source credentials within the Power BI online service.
Problems occur if you use the same CSM user account to set up credentials for a data source in the Power BI online service and subsequently log in to the Cherwell REST API from another location (example: creating another report in Power BI).
Under these circumstances, the refresh token state associated with the authentication flow present within the Power BI Service for that CSM user account is invalidated. The scheduled refresh fails with a 400-based network error containing details related to an OAuth failure.