Setting Up GoldMine Link
Before GoldMine Link is ready for use, it must be completely configured so that Outlook can communicate seamlessly with GoldMine.
As a GoldMine administrator, you can configure GoldMine Link using one of the following 2 methods:
Method 1: From Microsoft Outlook. Setting Up GoldMine Link From Microsoft Outlook
■ This enables you to customize the set up of GoldMine Link for individual users on their workstations.
Method 2: From GoldMine Premium Edition Setting Up From GoldMine Premium Edition
■ This enables you to specify configurations for all users in a single location so that users can easily get those configurations when they set up GoldMine Link from their workstations.
■ You can also specify whether users (without Master rights) have the ability to change the GoldMine Link configuration.
IMPORTANT: When using an Exchange account with Microsoft Outlook, Cached Exchange Mode must be turned on in Outlook. See the Microsoft Support article Turn on Cached Exchange Mode for information on how to do this.
Setting Up GoldMine Link From Microsoft Outlook
After GoldMine Link for Microsoft Outlook has been installed, use the following steps to configure the settings:
| 1. | Log into GoldMine Premium Edition as the GoldMine user you want to use with GoldMine Link. |
| 2. | Open Microsoft Outlook. From the toolbar section, select GoldMine to go to the GoldMine toolbar. |
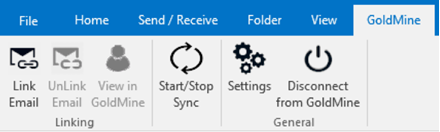
| 3. | From the GoldMine toolbar, select Settings to open the Settings window. |
The window contains settings and configuration options for GoldMine Link.
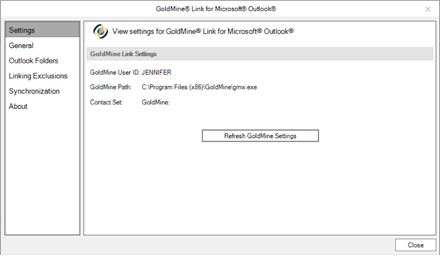
| a. | If you are configuring GoldMine Link for the first time, select Start GoldMine & Read GoldMine Settings. |
| b. | If you are re-configuring GoldMine Link, select Refresh GoldMine Settings. |
This will read the settings for the user that is currently logged into GoldMine Premium Edition.
To Enable or Disable Automatic Linking
Automatic Linking links email messages automatically from your Outlook folders to GoldMine contacts. Automatic Linking is not enabled by default. Use the following steps to set up or to disable Automatic Linking.
| 1. | Select General from the Settings window. |
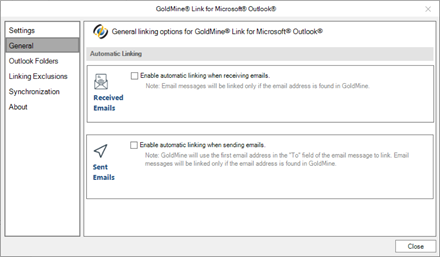
| 2. | Specify if you want to automatically link received emails, sent emails, or both. |
| a. | If Enable automatic linking when receiving emails is selected, GoldMine Link automatically tracks the default Inbox folder. |
If the email address of the sender matches the email address of a GoldMine contact, the message is automatically linked to that contact.
| b. | If Enable automatic linking when sending emails is selected, GoldMine Link automatically tracks the default Sent folder. |
If the email address of the first recipient in the To field of the message matches the email address of a GoldMine contact, the email message is automatically linked to that contact.
Outlook Folders for Automatic Linking
If Automatic Linking is enabled, GoldMine Link monitors the default Inbox and/or Sent folders for email messages to link. You can specify additional folders within Outlook that GoldMine Link should monitor for Automatic Linking.
To specify additional folders for GoldMine Link to monitor:
| 1. | Select Outlook Folders from the Settings window. |
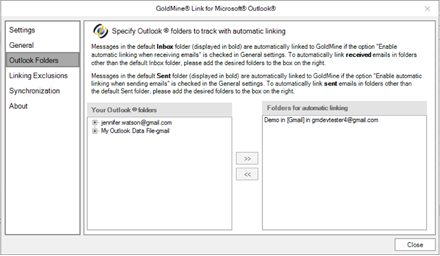
| 2. | To add an Outlook folder for GoldMine Link to monitor. |
| a. | Select a folder from the Your Outlook folders column. |
| b. | Add it to the Folders for automatic linking column using the >> button. |
| c. | If a folder contains sub-folders and you would like GoldMine Link to monitor those also, you must add each sub-folder individually. |
To remove a previously added folder:
| 1. | Select the folder from the Folders for automatic linking column |
| 2. | Remove it using the << button. |
NOTE: Outlook Folders are specific to individual workstations and are set up only for that workstation.
Linking Exclusions for Automatic Linking
When Automatic Linking is enabled, there may be certain email addresses that you would like GoldMine Link to exclude during automatic linking. For example, email addresses from those who work in your company or mailing list email addresses.
These email addresses can be excluded by adding them to the Linking Exclusions list.
NOTE: When GoldMine Link encounters an email address in the list, it will not link the email message even though the email address matches an existing GoldMine contact.
You can still manually link an email message to a GoldMine contact even if the email address is in the Linking Exclusions list.
To Manage Linking Exclusions:
| 1. | Select Linking Exclusions from the Settings window. |
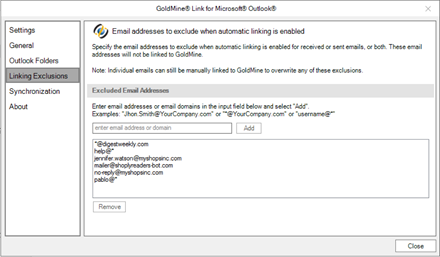
| 2. | In the main input field, enter the email address or domain you wish to exclude during Automatic Linking, then select Add to add it to the list. |
You can use the * (asterisk) as a wild card. For example, *@YourCompany.com or mailer@*.
To Remove Email Addresses or Domains From Being Excluded:
| 1. | Select the email address or domain from the list and click Remove. This removes the selected item from the Linking Exclusions list. |
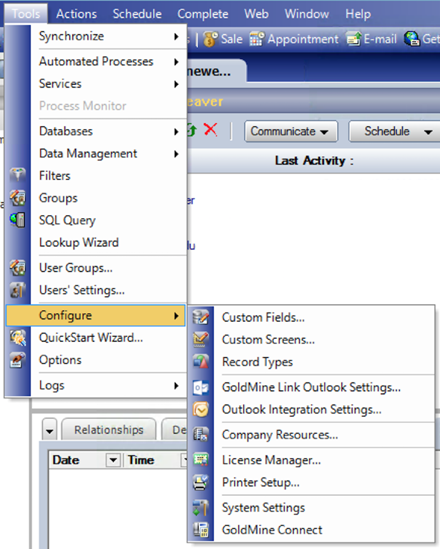
Setting Up From GoldMine Premium Edition
After installing GoldMine Link, log into GoldMine Premium Edition as a user with Master rights.
From the menu, select Tools > Configure > GoldMine Link Outlook Settings. This will open a window containing the configuration options for GoldMine Link.
GoldMine Settings
Select the user for whom you want to configure GoldMine Link.
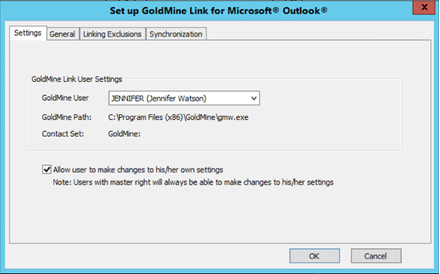
In this tab, ensure that the correct values are populated in the GoldMine User, GoldMine Path, and Contact Set![]() Database consisting of the contact information: Contact1, Contact2, ContSupp, ContHist, ContGrps, ContUdef, Conttlog, and sometimes Lookup. GoldMine allows you to have more than one contact set fields for the user selected.
Database consisting of the contact information: Contact1, Contact2, ContSupp, ContHist, ContGrps, ContUdef, Conttlog, and sometimes Lookup. GoldMine allows you to have more than one contact set fields for the user selected.
If you do not wish the user to make changes to any settings, ensure that the checkbox next to “Allow user to make changes to his/her settings” is unchecked.
Enable/Disable Automatic Linking
Automatic Linking links email messages automatically from your Outlook folders to GoldMine contacts. Automatic Linking is not enabled by default.
To enable or disable Automatic Linking, select the “General” tab.
■ Specify if you wish automatic linking to track received and/or sent emails.

■ If Enable automatic linking when receiving emails is selected, GoldMine Link will automatically track the default Inbox folder.
○ If the email address of the sender matches the email address of a GoldMine contact, the email message will be linked automatically to that contact.
■ If Enable automatic linking when sending emails is selected, GoldMine Link will automatically track the default Sent folder.
○ If the email address of the first recipient in the “To” field of the message matches the email address of a GoldMine contact, the email message will be linked automatically to that contact.
Linking Exclusions for Automatic Linking
When Automatic Linking is enabled, there may be certain email addresses which you would like GoldMine Link to exclude from during automatic linking. For example, email addresses from those who work in your company or mailing list email addresses.
These email addresses can be excluded by adding them to the Linking Exclusions list.
NOTE: When GoldMine Link encounters an email address in the list, it will not link the email message even though the email address might match an existing GoldMine contact.
You can still manually link an email message to a GoldMine contact even if the email address of the message was in the Linking Exclusions list.
To Manage Linking Exclusions:
| 1. | Select Linking Exclusions from the Settings window. |

| 2. | In the input field, enter the email address or domain you wish to exclude during Automatic Linking, then select the + button to add it to the list . |
You can use the * (asterisk) as a wild card. For example, *@YourCompany.com or mailer@*
To Remove Email Addresses or Domains From Being Excluded:
| 1. | Select the email address or domain from the list and click X. This removes the selected item from the Linking Exclusions list. |
Once you have configured the GoldMine Link settings for a user, the user can now open Microsoft Outlook and view these settings by following the steps in Setting Up GoldMine Link From Microsoft Outlook. If you have disabled the user from making changes, the user can only view the settings. The user will not be able to make any changes except for addingor removing Outlook Folders for Automatic Linking.
Adding GoldMine Address Book to Microsoft Outlook
Add the GoldMine Address Book so that you can send messages to GoldMine contacts directly from Microsoft Outlook.
To add the GoldMine Address Book, refer to the Microsoft Support article (Add or Remove an Address book) on how to add an additional address book to Outlook.
NOTE: The GoldMine Address Book added to Outlook will correspond to the contact set that was configured for use with GoldMine Link. This configured contact set can be found in the GoldMine Link settings. See Setting Up GoldMine Link From Microsoft Outlook for more information.
