Editing Field Properties (Security Tab)
NOTE: When using GoldMine Web there is no alert for Required Fields. Instead, the field displays a placeholder message requesting data and is outlined in red. Entering data removes the validation message. If no data is entered for a required field, you will be unable to save the record.
When settings are changed and saved in GoldMine Premium Edition, the changes and any validation messages will appear (or dissapear) the next time the GoldMine Web window is refreshed.
| 1. | Right-click the field label and select Properties. |
| 2. | In the Field Properties dialog box, select the Security tab to configure the Field Data Entry Requirement, configure Field Access, and turn on Field Auditing. |
| 3. | In the Field Data Entry Requirement area, select Required Data Entry to force users to fill in the field. |
○ A required field displays on the contact record with a red box around it.
○ If the Required Data Entry flag is set, but the record was not modified in any way, no alert is displayed when the user navigates to a different contact record.
○ If the record was modified and there is a required field that was left empty, the Required Field(s)s Alert dialog box appears reminding the user to complete the field before navigating to a different record.
Required Fields Alert Dialog Box
The Required Fields Alert dialog box appears when saving or leaving a Contact Record![]() Standard unit of information in GoldMine that incorporates information, such as: name, company, phone, and address. It serves as the basis for all scheduled work, and acts as the central link between GoldMine’s Calendar and History by maintaining all past and pending events, related to the individual contact records in the GoldMine database. with one or more fields requiring data.
Standard unit of information in GoldMine that incorporates information, such as: name, company, phone, and address. It serves as the basis for all scheduled work, and acts as the central link between GoldMine’s Calendar and History by maintaining all past and pending events, related to the individual contact records in the GoldMine database. with one or more fields requiring data.
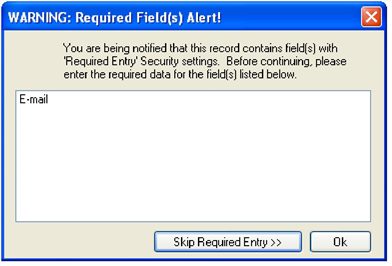
When the Required Fields Alert dialog box appears, select either:
- OK to close the dialog box, allowing you to add data to the fields.
- Skip Required Entry to expand the dialog box allowing you specify the reason and authorize the override.
|
m In the Reason text box, type the reason for not updating the field or select the reason from the F2 Lookup m In the Authorizing user drop-down list, select the user with permission to override the entry. m Type the user's Password and then click Authorized. Save the Contact Record without the required data; an Override activity is added to the History tab of the record. |
After the record modifications are complete and the user navigates to another record, the record is saved.
○ If a required field is overridden, an Override activity is added to the associated History tab with a Result code of OVR. The record is not removed when the field is updated and can only be deleted by a user with Master rights.
| 4. | In the Field Access area, leave the Read Rights as (public) to allow users to view field data. |
○ To limit user access to fields, select a user or user group from the drop-down list.
○ If Required Data Entry is selected, the field must have (public) read and update rights.
NOTE: This setting does not override record ownership and record curtaining. If record ownership is assigned and record curtaining is activated, only the owning user or user group sees the field.
| 5. | To set Update rights, select the user or user group from the drop-down list. |
Only the selected user or user group can update field data. To let users update the field, leave as (public).
NOTE: This setting does not override record ownership. If record ownership as been assigned, only the owning user or user group can update the field.
| 6. | In the Field Audit area, select Log changes in history to record changes made to the field data. |
NOTE: The record is kept on the History tab with an Activity code of Other and a Result code of LOG.
| 7. | Configure the Profile tab, the Color tab, and the Layout tab. |
