Creating Document Templates
GoldMine installs predefined templates but you can create your own templates as well.
A template is a document created in an application, such as Microsoft Word, that links to GoldMine and contains embedded DDE link fields. The DDE fields link contact information to the document; merging to one or more contacts with the template produces a printable document.
There are two ways to create templates:
■ With GoldMine Plus installed
■ Without GoldMine Plus installed
In both cases you can create new templates. The most common options for creating a document are using WordPad and Microsoft Word with GoldMine Plus for Microsoft Office installed.
NOTE: When manually editing or creating a GoldMine field link in Microsoft Word, you must specify only one formatting system, otherwise the formatting will be ignored in the resulting field set. It is recommended instead that you use IIF (inline if, or a ternary operation statement) to accomplish your formatting goals. Refer to the Microsoft Word documentation for more information on IIF statements.
There are two methods you can use to create a document template:
To Create a New Document Template
| 1. | Select Go To > Document Templates. |
| 2. | At the Document Management Center, select the User from the drop-down list. |
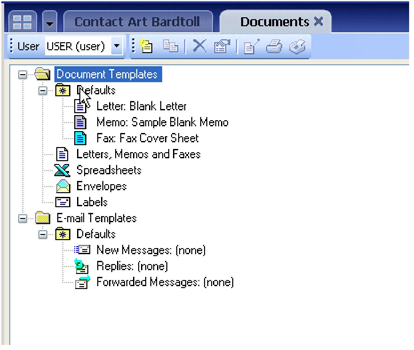
| 3. | Right-click on Document Templates and select New. |
The Document Template Properties dialog box appears.
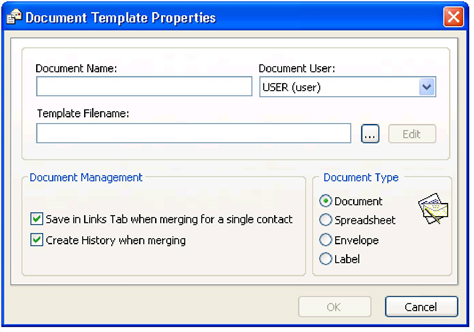
| 4. | At the Document Name field, type in the document name you want to appear in the Document Management Center and in the template drop-down list on the Merge Form dialog box. |
| 5. | At the Document User drop-down box, select the owning user. |
| 6. | At the Template Filename text box, type or browse to the location of the template. |
| 7. | Click Edit to open the document and make changes. |
| 8. | In the Document Management area, click on the appropriate checkbox as needed: |
○ Save in Links Tab when merging for a single contact. Creates a linked document when the document is merged.
○ Create History when merging. Creates a history record when this template is merged.
| 9. | In the Document Type area, select a document type and then click OK. |
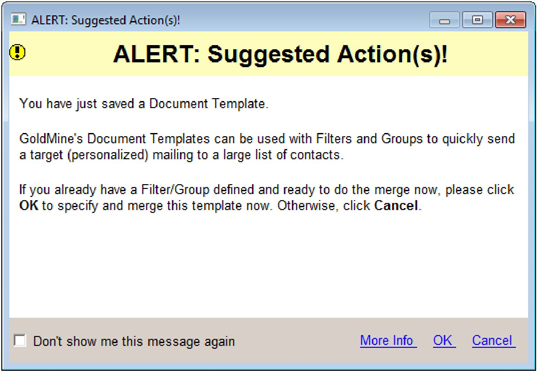
The following Alert Message appears.
The Mail Merge Template dialog box opens.
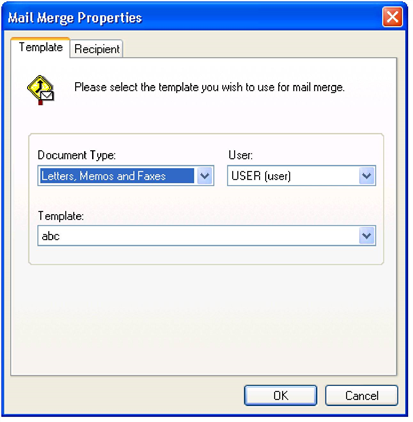
| 11. | At the Document Type field, select a document type for a mail merge. |
At the User field, select and user and, if it does not already appear, at the Template field select the template for the mail merge,
| 12. | Click OK. |
The actual merge occurs after you click OK. The settings of this merge will be defined after filling the information on Recipient tab, where you can select a current contact (filter/group) and delivery method (printer/fax) or queue for day(s).
So, if the default settings are selected, the template will be printed with the current contact information.
To Clone an Existing Document Template
You can create additional templates by first making a copy of an existing template (a public template or another user's template), and saving it as your own. You can then edit the template to suit your needs.
| 1. | Select Go To > Document Templates. |
| 2. | At the Document Management Center, select the User from the drop-down list whose template you are cloning. |
| 3. | Right-click on the template name and select Clone. The Document Template Properties dialog box appears. |
| 4. | Enter and Document Name and select the Document User. |
| 5. | Select the location to save the template. |
| 6. | Click the Edit button to open the associated editor and modify the template. |
NOTE: Be sure to save the file after completing your edits and closing the editor.
| 7. | Select from the options for the Document Management methods and the Document Type (see To Create a New Document Template for options). |
| 8. | Click OK. The Edit E-mail window appears |
