Creating Document Templates with GoldMine Plus Installed
When GoldMine Plus is installed, you can create Document templates by creating a new template, or modifying an existing one, in Word and then saving the file as a GoldMine template. After creating and adding the template to GoldMine, you can change the properties of the template within GoldMine.
To Create a Template with GoldMine Plus Installed
|
1.
|
Open Microsoft Word (with GoldMine Plus installed). |
|
2.
|
Create your template by adding text and GoldMine fields. |
|
3.
|
Select GoldMine and then select Save as GoldMine Template from the menu. |
|
4.
|
In the Summary Info dialog box, enter a Title (required) and any other desired information. |
The Title is the name that will be used for the template name within GoldMine.
|
5.
|
Click OK to open the Save As dialog box. |
|
6.
|
By default, the File name field is auto-filled with the name entered for the Title. |
|
7.
|
Change the Save as type to Word Template and then click Save to save the template. |
|
8.
|
Open GoldMine and select Go To > Document Templates from the menu. |
|
9.
|
Select the User name of currently logged in user. |
|
10.
|
Right-click on the document template folder and select Refresh All from the context menu. |
|
11.
|
Expand the Letters, Memos and Faxes branch. |
The document (template) created in Microsoft Word now appears in the list of templates.
To Change Properties of the Template
|
1.
|
Open the Go To menu and select Document Templates. |
|
2.
|
At the Document Management Center, select the user from the User drop-down list. |
|
3.
|
Locate the desired template and then right-click on the template and select Properties from the menu. |
The Document Template Properties dialog appears.
|
4.
|
At the Document Name field, type in the document name that you want to appear in both the Document Management Center and in the template drop-down list on the Merge Form dialog box. |
|
5.
|
At the Document User drop-down box, select the User under which the template will be listed. |
|
6.
|
In the Document Management area, select the desired options as needed: |
○ Save in Links Tab when merging for a single contact creates a linked document when the document is merged.
○ Create History when merging creates a history record when this template is merged.
|
7.
|
In the Document Type area, select a document type and then click OK. |
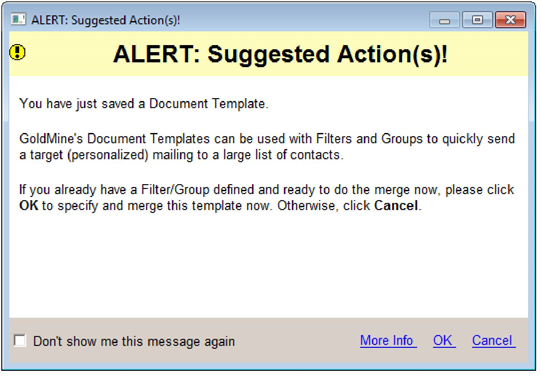
An Alert Message appears.
|
8.
|
Click OK to the mail merge now, or click Cancel to abort the merge. |