macOS Setup
This topic describes how to install Ivanti Device Control on macOS.
For more information, see the Ivanti Community.
Related videos
Part 1: Overview, installing SXS and MQTT (6:02)
Part 2: Configuring the service (14:05)
Part 3: Configuring the MacOS client (26:54)
Part 4: Switching between internal and external MQTT (14:19)
Prerequisites
An MQTT v5 broker using basic authentication is required, such as HiveMQ or Eclipse Mosquitto.
For more information about MQTT, see the MQTT web site.
An HTTP endpoint without authentication is needed to report the health of the MQTT Broker, but is not mandatory for the SXS.Net and Mac agent to communicate.
In production, use TLS with either plain TCP or Web Sockets.
For Apple ARM64 computers, in order to use removable encryption provided through the kernel extension you need to boot the device into recovery mode. Access Security Policy and select Reduced Security. Selecting the tick boxes underneath enables the management of kernel extensions.
Technical details
All ports are configurable for both MQTT and REST.
MQTT is used for:
- agent statuses messages
- refresh settings
- upload logs
- shadow files requests
- device and local user inventory
.Net Core REST APIs are used for:
- policies
- logs
- shadow files (attachments) uploading
MQTT communication
Agents subscribe to the following topics:
- listen to server statuses:
- ivanti/idac/<thumbprint id>/server/+/status
- listen to agent commands:
- ivanti/idac/<thumbprint id>/agent/<agent id>/request
Servers subscribe to the following topics:
- listen to agent statuses:
- ivanti/idac/<thumbprint id>/agent/+/status
- listen to agent responses, requests posted with the response topic and correlation id for the lookup:
- ivanti/idac/<thumbprint id>/server/<server id>/response
- listen to other server-side statuses, with no_local to avoid their own posts:
- ivanti/idac/<thumbprint id>/server/+/status
- ivanti/idac/<thumbprint id>/database/+/status
IDAC SXS
SXS.Net.Host.exe is deployed with SXS (Server setup) and is available under C:\Windows\system32\IDAC.SXS.Net.
The available actions are:
|
Action |
Description |
|---|---|
|
server |
Configure SXS.Net.Host service. |
|
osx-agent |
Generate Osx Agent DaemonConfig.plist file. |
|
help |
Display more information on a specific command. |
|
version |
Display version information. |
Configure: server command
You configure the SXS.Net.Host by providing the license file, setting MQTT connection information, and providing a key path (which is generated if the file is missing) to secure the REST calls.
The configuration can be done in a single command, or can be done in multiple commands if you need to update it later.
The command is of the form:
C:\Windows\SysWOW64\IDAC.SXS.Net\SXS.Net.Host.exe server -l C:\Windows\SysWOW64\MyLicenseFile.lic -m mqtts://broker.corp.com:8883 -u username -p password -k C:\Windows\sxsdata\sxsnet-private.key -e https://0.0.0.0:54321 --Url https://sxsnet.corp.com:54321 --Hostname sxsnet.corp.com -c sxsnet.corp.com
The following parameters are available for the server action (C:\Windows\SysWOW64\IDAC.SXS.Net\sxs.net.host server --help)
|
Parameter |
Description |
|---|---|
|
-l, --License |
License Filename. |
|
-a, --AutoStart |
(Default: -1) SXS starts SXS.Net and monitors it, 0: disabled, 1: enabled. |
|
--SxsServer |
(Default: ) SXS Rpc/Dcom endpoint (localhost, hostname, 192.168.178.123, localhost[12345], ...). |
|
--SxsUsername |
(Default: ) SXS Rpc/Dcom endpoint AD/local user name. |
|
--SxsPassword |
(Default: ) SXS Rpc/Dcom endpoint AD/local password. |
|
--SxsPoliciesFolder |
(Default: ) Save latest Json policies into this folder. |
|
-m, --MqttServer |
(Default: ) MQTT broker (mqtts://hostname:8883, ...). |
|
-u, --MqttUsername |
(Default: ) MQTT broker user name. |
|
-p, --MqttPassword |
(Default: ) MQTT broker password. |
|
--MqttHeartbeat |
(Default: ) MQTT heartbeat URL. |
|
--MqttThumbprints |
(Default: ) Trusted MQTT thumbprints separated by semicolon. |
|
-k, --TokenKeyFile |
(Default: ) ECDSA-256 private key filename. |
|
--TokenFolder |
(Default: ) Save latest JWT token into this folder. |
|
--Swagger |
(Default: -1) Swagger UI for REST API, 0: disabled, 1: enabled. |
|
-e, --Endpoints |
(Default: ) Endpoints with url syntax separated by semicolon. |
|
--Url |
(Default: ) Url accessible by the agents. |
|
--Hostname |
(Default: ) FQDN of the host (as it appears in the public url). |
|
-c, --CertSubject |
(Default: ) Subject of the Certificate. |
|
--CertPath |
(Default: ) Path of the PKCS#12 certificate. |
|
--CertPassword |
(Default: ) Password for the PKCS#12 certificate. |
|
--Thumbprints |
(Default: ) Trusted REST thumbprints separated by semicolon. |
|
--help |
Display this help screen. |
| --version |
Display version information. |
Logging is configured in SXS.Net.Host.NLog.config and by default logs on the console and in hourly rolling files under %LOCALAPPDATA%\Logs\.
This command generates the configuration file appsettings.json
{
    "URLS": "https://0.0.0.0:54321",
    "PUBLIC_URL": "https://sxsnet.corp.com:54321",
    "PUBLIC_HOSTNAME": "sxsnet.corp.com",
    "PUBLIC_THUMBPRINTS": "<optional certificate thumbprint(s)>"
    "Kestrel": {
        "Certificates": {
            "Default": {
                "Subject": "sxsnet.corp.com",
                "Store": "MY",
                "Location": "LocalMachine",
                "AllowInvalid": false
            }
        }
    },
    "Logging": {
        "IncludeScopes": false,
        "LogLevel": {
            "Default": "Trace",
            "Microsoft": "Warning",
            "Microsoft.Hosting.Lifetime": "Information"
        },
        "AllowedHosts": "*"
    },
    "SXS": {
        "Health": {
            "Validity": 60
        },
        "Policies": {
            "Validity": 900,
            "OutputFolder": "C:\\Windows\\sxsdata"
        },
        "License": "<base 64 encoding of the IDAC license>"
    },
    "MQTT": {
        "Connection": {
            "Provider": "MQTT",
            "Version": "5",
            "Url": "mqtts://broker.corp.com:8883",
            "Username": "username",
            "Password": "password",
            "Thumbprints": "<optional certificate thumbprint(s)>"
        },
        "Health": {
            "Validity": 60
        }
    },
    "REST": {
        "Token": {
            "Generation": 900,
            "Validity": 3600,
            "PrivateKeyFile": "C:\\Windows\\sxsdata\\sxsnet-private.key",
            "OutputFolder": "C:\\Windows\\sxsdata"
        },
        "Swagger": true
    }
}
The Refresh policies on the mac agent status bar forces the immediate retrieval of the latest policies from the server. Since the auth token is received using MQTT and by default expires after 1 hour, this pull request might not work if the MQTT communication isn't available for more than 1 hour.
You can specify a different expiration interval for the token in the appsettings.json of SXS Net.
Setting up the macOS agents
When you have configured the server, you can configure your osx agents by providing the license filename, the MQTT server, user and password, the output path for the .plist file (optional, and generated in the current folder if not specified) and the thumbprints for MQTT communication. The first step is to create the configuration file DaemonConfig.plist using the following command on the server:
C:\Windows\SysWOW64\IDAC.SXS.Net\SXS.Net.Host.exe osx-agent -l "license_file.lic" -m mqtt://broker.corp.com:8883 -u user -p password --Thumbprints thumbprint1;thumbprint2 -o .\DaemonConfig.plist
<?xml version="1.0" encoding="UTF-8"?>
<!DOCTYPE plist PUBLIC "-//Apple//DTD PLIST 1.0//EN" "http://www.apple.com/DTDs/PropertyList-1.0.dtd">
<plist version="1.0">
<dict>
    <key>mqttClientStatusPeriod</key>
    <integer>900</integer>
    <key>mqttMaximumPacketSize</key>
    <integer>65536</integer>
    <key>mqttSessionExpInterval</key>
    <integer>3600</integer>
    <key>activityLogsProcessPeriod</key>
    <integer>300</integer>
    <key>activityLogsProcessBatch</key>
    <integer>100</integer>
    <key>activityLogsUploadPeriod</key>
    <integer>900</integer>
    <key>thumbprintId</key>
    <string>256c59ad452eaaca49731aff769d1bac</string>
    <key>idacLicense</key>
    <string>BASE64 encoded license goes here</string>
    <key>mqttBaseURL</key>
    <string>Provider=MQTT;Version=5;Url=mqtts://192.168.100.10:8883;Username=admin-user;Password=admin-password;</string>
    <key>thumbprints</key>
    <string>66fe07772678a03f34b9ce18740b64e9a5e4649d</string>
</dict>
</plist>
Deployment
When you have the .pkg or .dmg file and the DaemonConfig.plist file from above in the download package folder on the Mac endpoint, you can start installing the agent.
If the files have attributes (downloaded, and so on), use sudo xattr -c <filename> to clear them if needed.
If you don't have the DaemonConfig.plist at the time of installation, or if you choose to edit it afterwards, make sure that the permissions for the file allow everyone read access.
If it is copied by the installer, it will have the following permissions:
- system: Read & Write
- wheel: Read only
- everyone: Read only
To install the agent, run the installation or upgrade from the .pkg or .dmg file using the defaults, accepting the EULA, and keeping the default destination.
During a clean install, setup will warn you that you must access some security changes. In this case, open the security preferences and allow entry for Ivanti, ensuring full disk access is granted for the ESE (Endpoint Security Extension).
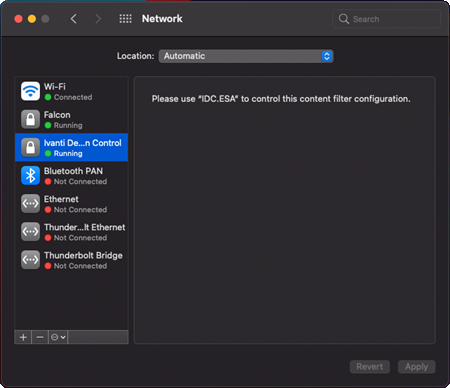
When asked for permission to allow IDC.ESA to filter network content, click Allow. A content filter entry then appears under Network in System Preferences.
At the end of the installation, if needed, you can access and save the Installer Log for reporting issues. In the Installer Log (Show all logs - detail level) and the saved logs, you can also find the computed sha1 hash of the main installed files.
Usage
After installation, network devices appear on the Permission tab of the Status Info window.
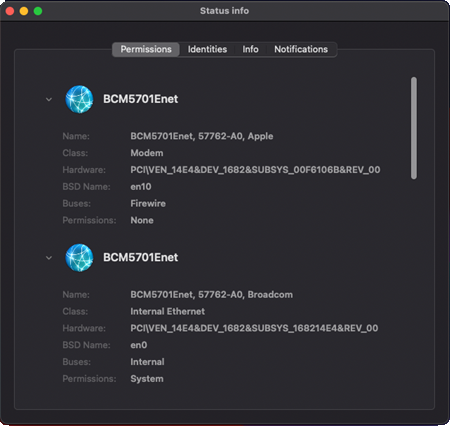
In the image above you can see two wired interfaces on a mac mini M1, the first one is a Thunderbolt to Ethernet adapter (no permissions, it is blocked), and the second one is the built-in Ethernet (not managed by IDAC).
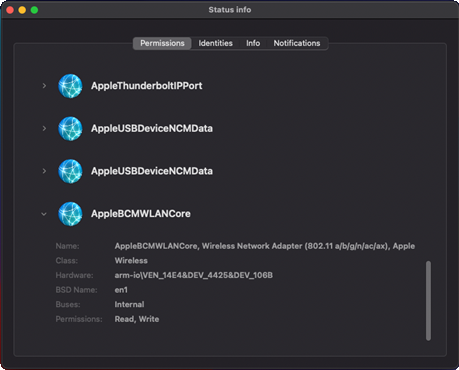
In the image above, the built-in WiFi device is expanded (with permissions, not blocked), and some virtual devices reported by macOS.
Management in the SMC works the same as for Windows devices: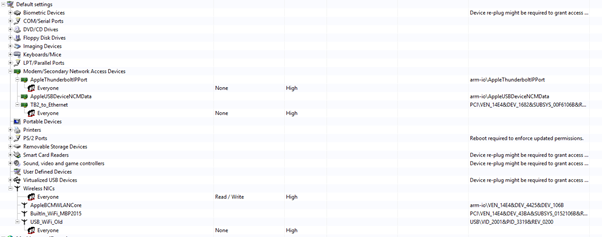
Known issues
- Thunderbolt devices are wrongly classified as Firewire.
- Not all devices shown in IDAC are real devices, some are virtual interfaces created by macOS.
- USB WiFi adapters with custom software or driver have limited support. For example, we identified a D-Link adapter, based on a Realtek chip and driver, that bypasses content filtering in macOS and therefore cannot be managed by IDAC. This is either caused by its own driver design or a bug in macOS or the driver.
Uninstallation
Inside the *.dmg or next to the *.pkg you can find an uninstall.command script, which properly unregisters and uninstalls everything, and deletes all related files and logs.
The uninstall.command script is also distributed inside the IDC.Agent.app. Either go to /Applications in Finder, right click IDC.Agent.app, choose Show Package Contents, then navigate to Contents/Resources where you will find uninstall.command, or directly execute it in a terminal with:
% sh /Applications/IDC.Agent.app/Contents/Resources/uninstall.command
If the files have attributes (downloaded, and so on), use sudo xattr -c <filename> to clear them if needed.
You can double-click the *.command and it will execute in a terminal window, or (using the correct path to the uninstall.command, type:
% sh /Volumes/IDC.Idac/uninstall.command
You are prompted to enter an admin password in the terminal window, and then ESA.app will ask for an admin password to deactivate the system extension. Finally, you are asked to reboot the system.