Configuring Graph API in Microsoft Azure
The Graph API application in Microsoft Azure is used to gather directory information (such as the list of users, company details, and subscription SKU info), as well as usage reports. To retrieve this information via the Graph API, the following details need to be provided from Microsoft Azure:
- Directory (tenant) ID
The identifier for the Microsoft Entra ID from which to retrieve information. - Application (client) ID
The application ID that will connect to Microsoft Entra ID, in this case it is the integration connector. - Application (client) secret
The key that will serve as the secret in the connection to Microsoft Azure. -
Redirect_Uri (required only if we use Delegated Type Graph API permissions)
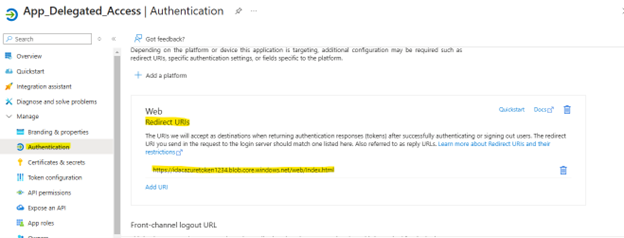
The URIs we will accept as destinations when returning authentication responses (tokens) after successfully authenticating or signing out users. -
Object ID (Administrative Unit)
This object ID is required only if data needs to be synced from administrative units.
Create Microsoft Entra ID application
Follow the steps below to create an Microsoft Entra ID application:
-
Log in to the Microsoft Azure portal.
-
In the main menu, select Microsoft Entra ID and then select App registrations.
-
To create a new application, select New registration.
-
Provide the following information.
-
Enter the Name of the application.
-
Set Supported account types to Accounts in this organizational directory only.
-
Set Redirect URI to Web and in the URI box enter https://idacazuretoken1234.blob.core.windows.net/web/Index.html. (This is a demo URL; please configure your own static website in Azure.)
If you plan to use Delegated Graph API permissions, otherwise, you can leave this field blank.
-
-
To save the new application, select Register.
Add API access to Graph API and grant permissions
Add API access to Graph API and give the Graph API application permissions to read reports for all users in the Entra ID and access directory data (list of users, company, and subscription SKU info).
-
In the Microsoft Azure portal, under the main menu, select Microsoft Entra ID, and then select App Registrations.
-
Select All apps.
-
Find and select the application you created in the Create Microsoft Entra ID application.
-
Select API Permissions.
-
In the API Permissions view, select Add a permission.
-
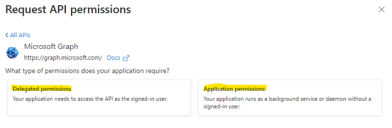
In the Request API permissions section, select Microsoft Graph.
-
IDAC supports both types of Graph API permissions i.e. Delegated and Application-level permissions as shown below.
-
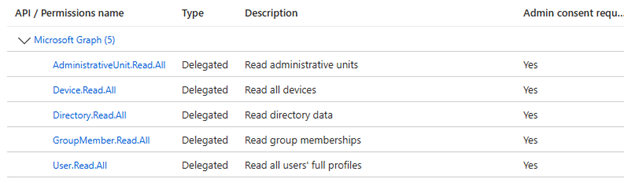
Now configure the below Graph API permissions.
-
Groupmember.Read.All - Allows the app to read memberships and basic group properties for all groups.
-
Device.Read.All - Allows the app to read your organization's devices' configuration information.
-
User.Read.All - Allows the app to read user profiles.
Permissions for below two APIs should only be enabled if a user intends to synchronize IDAC with any Azure administrative unit data; otherwise, they do not need to be enabled.
-
AdministrativeUnit.Read.All- Allows the app to read administrative units and administrative unit membership on behalf of the signed-in user.
-
Directory.Read.All- Allows the app to read data in your organization's directory, such as users, groups and apps.
-
- Select Add permissions.
- Select Grant admin consent for [your company name].

This step must be performed only by an administrator.
An example of the API permissions view after admin consent is granted.
Locate Directory ID
Follow the steps below to locate the Directory ID.
-
In the Microsoft Azure portal, navigate to the application you created.
-
Copy the value in the Directory (tenant) ID.
Locate Application ID
Follow the steps below to locate the Application ID.
-
In the Microsoft Azure portal, navigate to the application you created.
-
Copy the value of the Application (client) ID.
-
Use it as the Application ID when configuring the integration connector.
Locate Application secret
Follow the steps below to locate the application secret.
-
In the Microsoft Azure portal, navigate to the application you created.
-
Select Certificates & secrets.
-
Create a new client secret with the following information:
-
Select New client secret.
-
Set Description to sim_secret_key.
-
Set Expires to Never.
-
- Select Add. The client secret is displayed.
- Use the client secret as the Application secret when configuring the integration connector.
Copy the value of the client secret before you leave this screen.
Locate Redirect URI
Follow the steps below to locate Redirect URI:
-
In the Microsoft Azure portal, navigate to the application you created.
-
Click on Authentication as shown below.

-
Copy the value of Redirect URI.
-
Use it as the Redirect URI when configuring the integration connector.
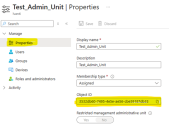
Locate Administrative Unit Object ID
Follow the steps below to locate Administrative Unit Object ID:
-
In the Microsoft Azure portal, navigate to the domain page you created.
-
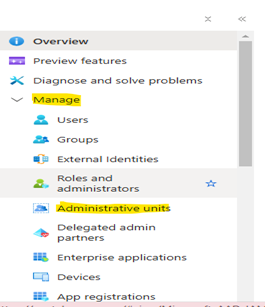
On the left pane, expand manage.
-
Click on Administrative units.
-
Click on administrative unit name which you want to sync.
-
On the left pane, click Properties.
-
We can copy Object ID value as shown below.