About Application Server-Client Proxy Communications
The client communicates with the Application Server using Fully Qualified Domain Name (FQDN) address(es) configured during the client setup. The FQDN addresses may not be reachable when the client initiates communication, particularly when using remote clients via a Virtual Private Network (VPN) connection that does not have a physical connection to the Application Server or a firewall is blocking the required ports when they should not be open for security reasons.
A client may use a proxy configured for the Internet Explorer to reach the Application Server, when the client cannot establish communication using a defined fully qualified domain name (FQDN).
When the Application Server is not reachable for the aforementioned reasons, all communication is accomplished using the Internet through a proxy that acts as a barrier between the internal network and the Internet. Many enterprises use proxy servers to manage a variety of communication protocols and add a higher level of security to their network environment. Data transferred via proxy connections is very resistant to eavesdropping and interception.
Configuring a Static Proxy on Clients
You can manually configure Clients in your LAN to use a proxy server with a secure Hypertext Transfer Protocol Secure (HTTPS) address when communicating with the Application Server.
Prerequisites:
- Ensure the Client is using a supported version of Microsoft Internet Explorer (IE).
- Make note of the fully qualified domain name of the proxy server you want to use.
To configure a static proxy on clients:
- Open Internet Explorer on the Client.
- Select Tools > Internet Options.
- Select the Connections tab.
- Click LAN settings.
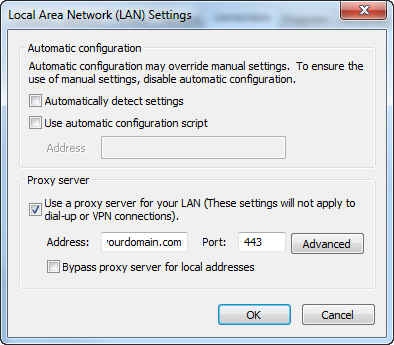
- Clear the default Automatically detect settings option, if selected.
- Select Use a proxy server for your LAN.
- In the Address field, enter the fully qualified domain name of the proxy server you want to use. For example, proxyserver.yourdomain.com.
- In the Port field, enter 443.
This port enables you to enforce SSL connections.
- Click OK and close Internet Options.
The Client is configured to communicate with the Application Server using a static proxy.
Configuring WPAD for Application Server-Client Proxy Communication
You can configure your Clients to automatically find and use a proxy by setting an option on your Dynamic Host Configuration Protocol (DHCP) Web server that points Web browsers to a wpad.dat configuration file.
Prerequisites:
- Install Clients on a supported operating system using the TLS encryption protocol.
- Set the Application Server TLS port registry key value to 443. This port is used for secure web browser communications and should be configured for the client, Application Server, and proxy.
- Install a valid certificate authority.
- Use a supported version of Microsoft Internet Explorer (IE).
- Create a wpad.dat configuration file. Basic example:Copy
function FindProxyForURL(url, host) {
return "PROXY proxyserver.example.com:8080”
}
- Make note of the fully qualified domain name for the Web server where wpad.dat is located, including the port used.
Create a DHCP option that directs it to your WPAD configuration file.
- Log on to the DHCP server as a user with administrative access rights.
- Open the Server Manager.
Using either the start screen or start menu, search for Server Manager, and open it. - Expand the console tree on the left to Roles > DHCP Server > <Computer Name> > IPv4.
- Right-click IPv4 and select Set Predefined Options.
The Predefined Options and Values dialog opens.
- Select DHCP Standard Options from the Option class list.
- Click Add.
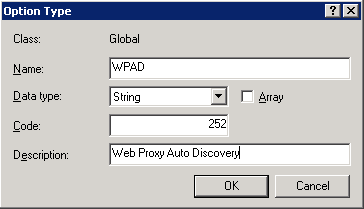
The Option Type dialog opens. - Enter the following information:
- Name: WPAD
- Data type: String
- Code: 252
- Description: Web Proxy Auto Discovery
- Click OK.
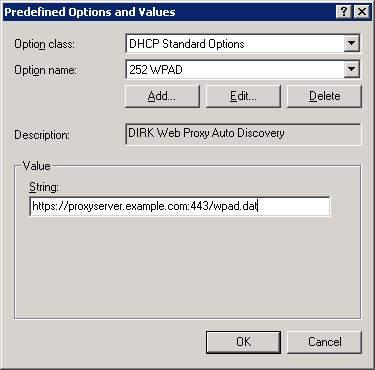
The Option Type dialog closes and you return to the Predefined Options and Values dialog. - Select 252 WPAD from the Option name list.
- Enter http://<computer_FQDN>:<port>/wpad.dat in the String field. The string must be in lowercase.
Use the fully qualified domain name of the Web server where wpad.dat is located. By default, automatic discovery information is published to port 8080.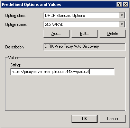
- Click OK.
You have created a DHCP option that directs your server toward your WPAD configuration file. - Expand the Server Manager console tree to Roles > DHCP Server > <Computer Name> > IPv4 > Server Options.
- Right-click on Server Options and select Configuration Options.
- On the General tab, select 252 WPAD in the Server Options window.

You have created a DHCP option (252 WPAD) for your WPAD configuration file and set the DHCP server to use it. Continue to the next section.
Set the DHCP Server to use the DHCP option you just created (252 WPAD).

Configuring Clients to Automatically Detect Your DHCP Server
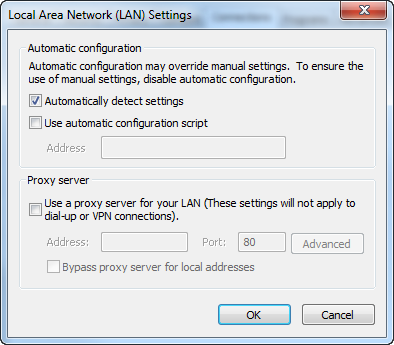
Ensure all Clients are using the default Automatically detect settings option found on the LAN Settings interface in Internet Explorer to enable WPAD Application Server-Client Proxy Communication.
Prerequisites:
Configuring WPAD for Application Server-Client Proxy Communication
- Open Internet Explorer.
- Select Tools > Internet Options.
- Select the Connections tab.
- Click LAN settings.
- Ensure only Automatically detect settings is selected.

- Click OK.
The Client is configured to communicate with the Application Server using WPAD. Repeat this procedure for each Client.