Managing Devices
When Device Control is initially installed, all removable storage devices that belong to standard Microsoft Windows® device classes are identified and added to the database. You can set up and manage user access permission rules for the different models and specific device types using the Device Explorer.
Using the Device Explorer, you can add devices and device types for computers and add computers that are not included in the Active Directory structure. You can define general user access permission policies based on the predefined device classes.
Restriction: You can add specific device models to all base device classes, except the PS/2 ports classes.
Device Permission Default Settings
When Device Control is initially installed, default user access permission rules apply to all supported predefined device classes.
The following table describes default permission settings for the predefined devices classes.
|
Device Class |
Permission |
Shadow |
Copy Limit |
|---|---|---|---|
|
COM/Serial Ports |
No access |
Disable |
Not available |
|
CD/DVD Drives |
No access |
Disable |
Not available |
|
Floppy Disk Drives |
No access |
Disable |
Not available |
|
Keyboards/Mice |
Read/Write (Low Priority) |
Not available |
Not available |
|
LPT/Parallel Ports |
No access |
Disable |
Not available |
|
Modems/Secondary Network Access Devices |
No access |
Disable |
Not available |
|
Portable Devices |
No access |
Disable |
No limit |
|
PS/2 Ports |
Read/Write (Low Priority) |
Not available |
Not available |
|
Removable Storage Devices |
No access |
Disable |
No limit |
|
Wireless Network Interface Cards (NICs) |
Read/Write (Low Priority) |
Not available |
Not available |
Device Types Supported
Device Control supports a wide range of device types that represent key sources of confidential data security breaches. You can define user access permission at the device class level to restrict access to specific device types. Device Control can detect plug-and-play devices.
The device types you can manage using Device Control are described in the following table.
|
Device Type |
Description |
|---|---|
|
Biometric Devices |
Includes Password Managers and FingerPrint readers. |
|
Citrix Network Shares |
Includes any mapped drive, whether a mapped network drive or a locally mapped device, when accessed through either a Citrix– delivered application or the Citrix desktop. |
|
COM/Serial Ports |
Includes serial ports and devices that use COM device drivers, such as modems, null modems and terminal adapters. Some PDA cradles use a virtual serial port, even when connected through the USB port. |
|
DVD/CD Drives |
Includes CD-ROM and DVD access for full device lock and unlock. |
|
Floppy Disk Drives |
Includes disk drive access for complete lock and unlock mode or read-only mode of conventional diskettes and high capacity drives. |
|
Imaging Devices |
Includes USB or SCSI devices, scanners, and webcam. |
|
Keyboards/Mice |
Includes keyboards/mice that use USB, PS/2, and Bluetooth. |
|
LPT/Parallel Ports |
Includes conventional parallel printer ports and variants such as ECB and Dongles. |
|
Modems/Secondary Network Access Devices |
Includes internal and external devices. Secondary network devices do not connect through normal channels. |
|
Palm Handheld Devices |
Includes conventional types of this device. |
|
Portable Devices |
Includes smart storage devices such as MP3 players, digital still cameras, mobile phones, mobile storage devices, and Windows Mobile 6.x OS PDAs. |
|
Printers |
Includes print devices attached directly to a print server or directly to a network through a network adapter card. |
|
PS/2 Ports |
Includes the conventional type of port used to connect keyboards. |
|
Removable Storage Devices |
Includes chip- and disk-based devices that are not floppy or CD-ROM devices, such as Jaz and PCMCIA hard drives and USB memory devices such as memory stick, Disk on Key, AIP, and most USB-connected MP3 players and digital cameras. Non-system hard drives are treated as removable storage devices. |
|
RIM Blackberry Handhelds |
Includes handheld computers and mobile phones from Research in Motion (RIM) BlackBerry connected to a computer through a USB port. |
|
Smart Card Readers |
Includes eToken and fingerprint readers for smart cards. |
|
Tape Drives |
Includes conventional internal and external tape drives of any capacity. |
|
User Defined Devices |
Includes devices that do not fit standard categories, such as some PDAs, non-Compaq iPAQ, USB, non-Palm handheld USB, Qtec, HTC and webcams. |
|
Virtualized USB Devices |
Includes generic redirects to USB devices in virtualized environments (Citrix and VMWare). |
|
Windows CE Handheld Devices |
Includes the HP iPAQ® or XDA, Windows Mobile 5 CE® devices and Windows CE® computers connected through a USB port. |
|
Wireless Network Interface Cards (NICs) |
Includes the device option to configure client permission rules use a wireless LAN adapter. |
Device Explorer window
An administrator uses the Device Explorer hierarchy to create and manage device and computer user groups, as well as, assign permission rules for online, offline, temporary, and scheduled device use. The Device Explorer module is also used to create and manage file shadowing rules.
The main window of the Device Explorer module displays a hierarchical structure of device classes, which is divided into two primary levels:
- Default settings which contain the user access permission rules that apply to every computer.
- Machine-specific settings which contain unique user access permission rules that apply to a specific computer or group of computers.
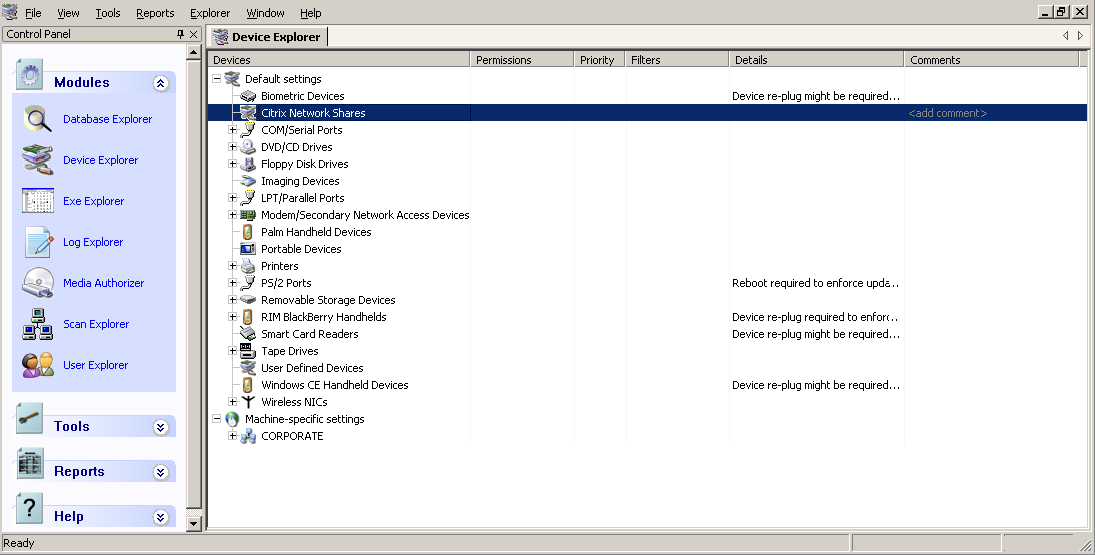
The Device Explorer window is further divided into the following columns:
|
Column |
Description |
|---|---|
|
Devices |
Lists device classes and users or user groups with permission to access devices. |
|
Permissions |
Shows a description of the type of permission provided to users and user groups listed in the Devices column. |
|
Priority |
Shows a priority of High or Low assigned to rules listed in the Permissions column. |
|
Filters |
Shows a description of the file type filtering rules assigned to rules listed in the Permissions column. |
|
Details |
Shows a description of permissions rules details. |
|
Comments |
Ivanti Device and Application Control administrators can select permission rules and enter comments by clicking the Comments column heading. |
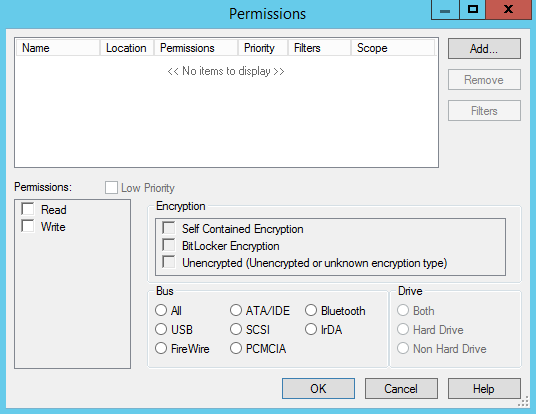
Permissions dialog
An administrator uses the Permissions dialog to create and manage permission rules for devices and associate these rules with user and user group access rights.
The Permissions dialog is the primary tool that an administrator uses to:
- Assign and manage user access permission rules for devices connected to client computers.
- Force encryption of removable storage media that users are permitted to access.
The Permissions dialog is composed of five panels:
- User/Group
- Permissions
- Encryption
- Bus
- Drive
The following tables described the Permissions dialog panels.
User/Group panel:
|
Column |
Description |
|---|---|
|
Name |
Shows the name of the user or user group. |
|
Location |
Shows the user domain or work group name. |
|
Permissions |
Lists the rules defined by the Permissions panel. |
|
Priority |
Shows the permission priority specified as High or Low. |
|
Filters |
Shows the file types that the user or user group can access. |
|
Scope |
Shows the permission defined in the Encryption, Bus, and Drive panels. |
Permissions panel:
|
Option |
Description |
|---|---|
|
Read |
A user or user group has read access. |
|
Write |
A user or user group has write access. |
|
Encrypt |
A user or user group can encrypt devices. |
|
Decrypt |
A user or user group can decrypt an encrypted device. |
|
Export to file |
The passphrases or public keys from user certificates are used to create a symmetric key for device encryption. When the Self Contained Encryption option is selected, the encryption key can be stored in a separate file and password protected. This is the most secure method, because the encryption key and the encrypted data can be transported separately. |
|
Export to media |
The passphrases or public keys from user certificates are used to create the symmetric key used to encrypt a device. When the Self Contained Encryption option is selected, the encryption key can be stored on the same device used for encryption and password protected. The only protection of the data is the password itself. |
|
Import |
When the Self Contained Encryption option is selected, a user can access encrypted media by specifying a separate key file, which is not stored on the encrypted media, and providing the associated password. |
Restriction: Permission to Encrypt, Decrypt, Export to file, Export to media, and Import is available only for the Removable Storage Devices class.
Encryption Panel:
|
Option |
Description |
|---|---|
|
Self Contained Encryption |
The assigned Permissions apply to the device when encrypted with Device Control self- contained encryption technology. |
|
BitLocker Encryption |
The assigned Permissions apply to the device when encrypted with BitLocker Drive Encryption. |
|
Unencrypted (Unencrypted or unknown encryption type) |
The assigned Permissions apply to the device when unencrypted or encrypted with an unsupported technology. |
Bus Panel:
|
Option |
Description |
|---|---|
|
All |
Permissions apply when a device is connected through any bus connection. |
|
USB |
Permissions apply when a device is connected through a USB 1.1 and 2.0 or higher standard interface. |
|
Firewire |
Permissions apply when a device is connected through a Firewire IEEE 1394 standard interface. |
|
ATA/IDE |
Permissions apply when a device is connected through the ATA/IDE, SDATA-1, SATA-2 and eSATA variants interfaces. |
|
SCSI |
Permissions apply when a device is connected through the SCSI narrow, wide and ultra variants interfaces. |
|
PCMCIA |
Permissions apply when a device is connected through the PCMCIA CARDBUS interface, including the Expresscard/34 and /54 variants. |
|
Bluetooth |
Permissions apply when a device is connected through the Bluetooth standard interface. A Bluetooth device must be restarted for a permission change to take effect. |
|
IrDA |
Permissions apply when a device is connected through the IrDA (infrared) standard interface. |
Restriction: Only standard interface types supported by the device class you select are available for defining permissions.
Drive Panel:
|
Options |
Description |
|---|---|
|
Both |
Permission rules apply to the hard drive and non-hard drive for the device class selected. |
|
Hard Drive |
Permission rules apply only to the hard drive for the device class selected. |
|
Non-Hard Drive |
Permission rules apply to the non-hard drive for the device class (including Removable Storage Devices) selected. |
Manage Devices
Within a device class, you can create groups that contain models or unique device IDs. Managing devices in groups reduces the administrative burden for assigning and tracking device permissions.
You can assign device permissions at the following levels:
- Class
- Group
- Model
- Unique Device ID
Restriction: You cannot add specific device model types to the PS/2 Ports class.
- In the Management Console select View > Modules > Device Explorer.
- In the hierarchical device structure shown in the Device Explorer window, right-click Default settings.
- Select Manage Devices from the right-mouse menu.
The Manage Devices dialog opens.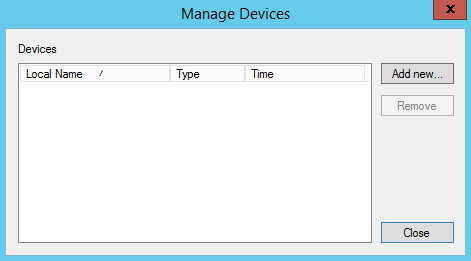
- Click Add new.
The Devices dialog opens.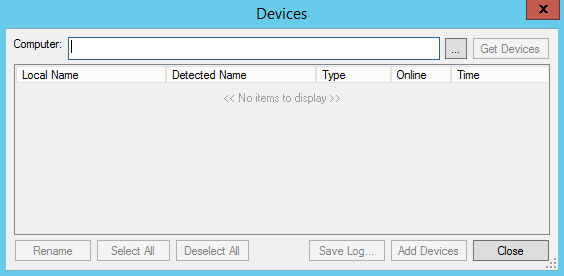
- Click the ellipses
 to show a list of computer names registered in the Active Directory, synchronized to the database, and/or logged in to the network.
 - Select a computer from the Select Computer dialog and click OK.
- Click Get Devices.
The Devices dialog refreshes to show a list of devices detected for the computer you selected. Information available: - Select device(s) using the check box adjacent to the device name.
- Click Add Devices.
The Devices dialog refreshes showing the devices you added as grayed selections. - Click Close.
The new device(s) are shown in the Device Explorer window.
|
Column |
Description |
|---|---|
|
Local Name |
Customizable name associated with the device in the Management Console. |
|
Detected Name |
Device name as detected by the agent. |
|
Type |
Functional capability of the device. For example, Removable Storage Device or Printer. |
|
Online |
Indicates the connection status of the device to the endpoint (Yes or No). Unknown displays when a device on a pre-4.6 endpoint is queried by the Management Console. |
|
Time |
Time and date the device was last detected. |
|
Unique ID |
Unique identifier for the device. |
Tip: You can save a log entry for all the devices connected to the selected computer by clicking Save Log.
Add Computers
You can add computers to a domain group or computer workgroup in the Machine-specific settings structure of the Device Explorer.
When Device Control is used for computers in a workgroup, rather than a domain, then there is no domain controller list of users. You must add the computers individually to a workgroup.
- In the Management Console select View > Modules > Device Explorer.
- Right-click the Machine-specific settings level in the hierarchical device structure.
- From the right-mouse menu, select Insert Computer.
- From the Select Computer dialog, click Search.
- Select one or more computers from the list shown.
- To add a computer that is not listed, click Add.
- Type the name of the computer to be added in the corresponding field.
- Click OK.
The computers you selected are added to the domain group.
Tip: You can drag-and-drop computers from one group to another, or you can right-click a computer and use Cut and Paste from the right-mouse menu.
Assign Permissions by Devices
You can assign permission rules for users to access devices and device classes with any computer the user selects.
Permission rules can be assigned in the Device Explorer to the:
- Root node of the Default settings hierarchy.
- Device class node of the Default settings hierarchy.
- Device group within a device class node shown in the Default settings hierarchy.
- Device by make and/or model.
- Device by unique serial number.
Root node permissions are assigned to the root of the Device Explorer hierarchy and apply to all devices for specific users or user groups.
- In the Management Console select View > Modules > Device Explorer.
- Right-click a node from the Default settings division of the Device Explorer hierarchical structure.
- Select Add/Modify Permissions from the right-mouse menu.
The Permissions dialog opens. - Click Add.
The Select Group, User, Local Group, Local User dialog opens. - Click Search or Browse.
- Select a user or user group.
- Click OK.
- In the Permissions dialog, select the user or user group to assign user access permission rules.
- Select the permission options.
- To limit user access to certain file types, click Filter.
- Select one of the following options:
- In the Permissions panel, select one or both of the following options:
- Click OK.
- In the Permissions dialog, click OK.
The Permissions, Priority, and Filters you assign to the device or device class are shown in the Device Explorer hierarchical structure.
Important: Only the permissions options available for the device or device class selected are shown.
Restriction: File filtering is available only for the Removable Storage Devices, Floppy Disk Drives, Portable Devices, and CD/DVD Drives device classes.
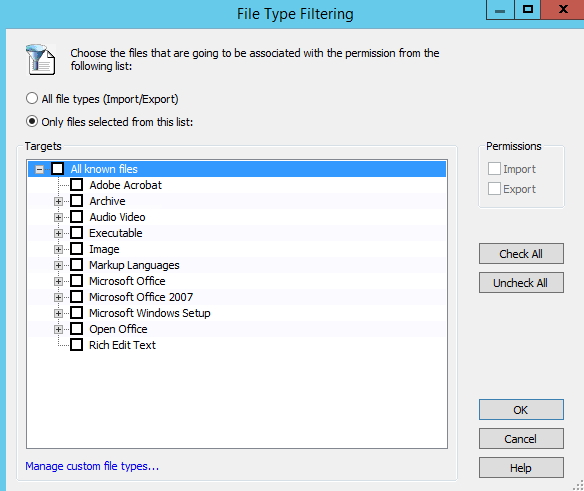
The File Type Filtering dialog opens.
|
Option |
Description |
|---|---|
|
All file types (Import/ Export) |
Permission rules apply to all file types that are imported and exported by the user or user group for the specified device or device class. |
|
Only files selected from this list: |
Permission rules apply to only to selected file types that are imported and/or exported by the user or user group for the specified device or device class. |
A complete list of the file filter types supported by Device Control is shown in the Targets panel. Select file types using the check boxes adjacent to the file type name. You can also select Manage custom file types... to add, edit or remove custom file types.
|
Option |
Description |
|---|---|
|
Export |
Allows a user to copy files from the Ivanti Device and Application Control client computer to an external device. |
|
Import |
Allows a user to copy files from an external device to the Ivanti Device and Application Control client computer. |
Important: You must select Import or Export at a minimum, to enforce file filtering rules.
After Completing This Task:
You should send new or updated permissions immediately to Ivanti Device and Application Control client computers using the Control Panel > Tools > Send Updates option. If you do not send updates to protected clients immediately, they automatically receive updates when they restart or at next user log in.
Assign Temporary Permissions to Users
You can assign time-limited, once-per-occurrence permission rules on a computer-specific basis for user access to a device.
An administrator can allow access to a device for a limited period without having to subsequently delete the permission. This provides some reduction in administrative burden.
- In the Management Console select View > Modules > Device Explorer.
- From the Machine-specific settings division of the Device Explorer hierarchical structure, select computer or computer group.
- Right-click a device or device class.
- Select Add Temporary Permissions from the right-mouse menu.
The Choose User on (per selected device) dialog opens. - Click Add.
The Select Group, User, Local Group, Local User dialog opens. - Click Search or Browse to select a user or user group.
- Select a user or user group and click OK.
The Choose Permission dialog opens. - Click Next.
- Select the Read and/or Write permissions that you want to apply.
- Click Next.
The Choose Period dialog opens. - Select one of the following options:
- Click Next.
- Click Finish.
The temporary permission access rules appear in the Details column of the Device Explorer window.
|
Options |
Action |
|---|---|
|
Immediately |
Permission rules apply immediately (within 5 minutes). |
|
From |
Permission rules apply for the period you specify. |
Assign Scheduled Permissions to Users
You can schedule user access permissions rules to limit the use of devices to hourly and daily periods of the week.
You can assign global or computer-specific scheduled device permissions for users and user groups.
- In the Management Console select View > Modules > Device Explorer.
- In the Default settings division of the Device Explorer hierarchical structure, right-click a device or device class.
- Select Add Schedule from the right-mouse menu.
The Choose User on Default Settings dialog opens, per selected device. - Click Add.
The Select Group, User, Local Group, Local User dialog opens. - Click Search or Browse to select a user or user group.
- Select a user or user group and click OK.
The Choose User on Default Settings (per selected device) dialog opens. - Select the user or user group and click Next.
- Select from the listed user access options.
- Click Next.
The Choose Timeframe dialog opens. - Specify hourly time ranges using the To and From field drop-down lists.
- Select one or more weekdays from the Weekdays panel.
- Click Next.
- Click Finish.
The scheduled permission access rule appears in the Details column of the Device Explorer window.
Restriction: Only user access options for the device class selected are shown.
Add Shadowing
An administrator can establish visibility for the file content read from and written to devices connected to clients. This type of visibility is referred to as file shadowing.
File shadowing can be applied to the following device classes:
- COM/Serial Ports
- DVD/CD Drives
- LPT/Parallel Ports
- Floppy Disk Drives
- Modem/Secondary Network Access Devices
- Printers
- You can only assign shadowing to the main printer class under default settings or to a special PC under Machine-specific settings.
- Only print jobs sent to printers that use the Microsoft Windows Print Spooler service are shadowed.
- Removable Storage Devices
When burning to a CD/DVD/BD, files burned only during a single/first session are shadowed.
Note:
You can also apply file shadowing to:
- Device groups
- Computer-specific devices or device model types
- In the Management Console select View > Modules > Device Explorer.
- From the Default settings division of the Device Explorer hierarchy, right-click a device, device class, or device type.
- Select Add Shadow from the right-mouse menu.
- Click Add.
The Select Group, User, Local Group, Local User dialog opens. - Select the user or user group and click Next.
The Choose Bus dialog opens.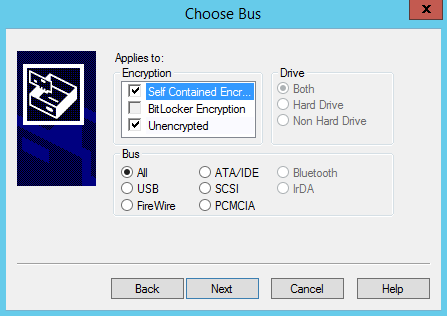
- Select All or individual bus types.
- Select a Drive option.
- Click Next.
The Choose Permissions dialog opens. - In the Read and/or Write panels, choose one of the following options:
- Click Next.
- From the Finish dialog, click Finish.
The shadow rule permission details are shown in the Permissions column of the Device Explorer hierarchical structure. The shadow permission details are displayed in the Permissions column of the Device Explorer module. A value of R means that shadowing is enabled for files read to and from the device, W means that it is on when files are written to and from the device; no letter means that shadowing is enabled for both reading and writing files. You can review shadowed files using the Log Explorer module.
Important: The available bus types shown are dependent upon the device class you select. The Encryption panel is only active, with all options selected by default, for the Removable Storage Devices and DVD/CD Drives device classes.

|
Option |
Description |
|---|---|
|
Disabled |
File content copying is not active. |
|
FileName |
File content copying is not active; only the file name for a file copied to or from a device is saved in the Ivanti Device and Application Control database. |
|
Enabled |
File content copying is active. |
Restriction: Only the Write panel is active for the COM/Serial Ports, LPT/Parallel Ports and Printers device classes.
View Shadow Files
To view shadow files, you can use predefined templates. When a predefined template does not contain the type of data that you want to review, you can create your own template query to view shadow files.
Prerequisites:
To view shadow files, Ivanti recommends that you show only log entries that display attachments by filtering templates.
The file name, date, and administrator name are logged for every instance a shadowed file is accessed.
- In the Management Console select View > Modules > Log Explorer > Templates.
The Select and edit template dialog opens. - Select a predefined shadow template from the list shown.
- Click Select.
- Click Query.
- To view shadow files using a custom query:
- Click Settings.
- Select Attachment.
- Click Criteria.
- Select With.
- Click OK.
- Click Execute Query.
The Select and edit template dialog closes and the query runs.
Caution: Avoid opening files exceeding 350 MB unless sufficient resources are available.
When the Shadow rule is enforced, the entries listed show attached files that are exact copies of the shadowed files:
- Copied to or from authorized devices
- Read by users
Depending on the selected fields, the date shown for shadow files are:
- Traced On - when files were copied or read, to or from, the device
- Transferred On - when a file was uploaded to the database
Device Control tracks the:
- User name for the copied file
- Computer name used for the copy action
- Filename
- Content
- Device name
After Completing This Task:
Once you list the files, right-click any attachment showing the True value, which indicates that the full content is shadowed, and select one of the following options:
|
Option |
Description |
|---|---|
|
View |
Allows you to view the contents of the file in an internal binary viewer administered by Device Control. |
|
Open |
Opens the file with the associated application as defined in Windows Explorer®. If there is no association, this command is equivalent to Open With. Restriction: Available only for full shadowing and when selecting one log registry. |
|
Open with |
Allows you choose the application that opens the file. Restriction: Aavailable only for full shadowing and when selecting one log registry. |
|
Save as |
Allows you to save the file to a local or network drive and use an external utility or program to open the file. |
Filtering Templates
You can create subsets of the templates listed in the Select and Edit Templates dialog.
You can select multiple filtering criteria to narrow the focus of template sets shown, thereby reducing the number of templates that are listed.
- From the Management Console, select View > Modules > Log Explorer > Templates.
The Select and Edit Templates dialog opens. - Click Filter.
The Filter dialog opens.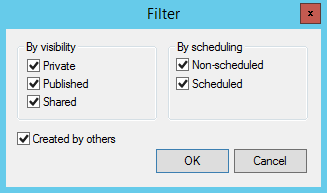
- Select one or more of the following options:
- accessed and used by any user,
- edited, and saved by the owner and Enterprise Administrators,
- edited but not saved by Administrators.
- Click OK.
A subset of all available templates is shown.
|
Option |
Description |
|---|---|
|
Private |
Shows templates visible only to the template owner and Enterprise Administrator. |
|
Published |
Shows templates visible to all Management Console users within your system that can be: |
|
Shared |
Shows templates viewed and changed by any Management Console users within your system. |
|
Non-scheduled |
Shows templates used to generate specific reports. |
|
Scheduled |
Shows templates automatically run periodically to generate regular reports. These are saved in a shared folder on your network or e-mailed to specified recipients. |
|
Created by others |
Shows templates created by users other than the Enterprise Administrator. |
Sending Updates to All Computers
After you define or update device permissions or file permissions, you can send the information to all client computers immediately. Otherwise, updated information will automatically upload the next time a user logs in or the computers are restarted.
- From the Management Console, select Tools > Send Updates to All Computers.
The Send updates to all computers dialog opens. - Select one of the following options from the Send updates to all computers dialog.
|
Option |
Description |
|---|---|
|
Yes |
Immediately updates connected computers. Ivanti Device and Application Control can take a long time to send updates depending on the number of computer connections. The Management Console dialog remains open until the Application Server finishes sending the updates. |
|
No |
Asynchronously updates connected computers. The Management Console dialog closes while the Application Server finishes sending the updates. You can continue working with the console while the update is done in the background. |
|
Cancel |
Closes the Send updates to all computers dialog and halts the update process. |
Updates are distributed to all computers running the Ivanti Device and Application Control clients that are registered in the Application Server (s) online table(s). A message appears in the Output window when the updates are complete.
Remember: Any computer that is switched off, locked, or disconnected from the network receives the updates at the next network connection.