Installing the Client
The Ivanti Device and Application Control client manages permissions for device access and user access to software applications for endpoint computers.
Prerequisites:
Before you can successfully install the Ivanti Device and Application Control client, you must:
- Verify that you satisfy the minimum hardware and software system requirements.
- Copy the sx-public.key file for the Ivanti Device and Application Control client to the Client folder located where you downloaded the Ivanti Device and Application Control software. The Ivanti Device and Application Control client installer detects the public key during installation and copies the key to the target directory (%windir%\sxdata).
- Install the Application Server.
- Install the Management Console.
- When installing Application Control, you must ensure that the Execution blocking default option is set to Non-blocking mode; otherwise the Ivanti Device and Application Control client computer will not restart after Ivanti Device and Application Control client installation because executable system files cannot run until they are centrally authorized from the Management Console.
- Verify that the domain information in the Ivanti Device and Application Control database is synchronized as follows:
- From the Management Console, select Tools > Synchronize Domain Members.
The Synchronize Domain dialog opens.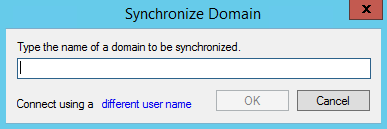
- Enter the name of the domain that you want to synchronize.
- Click OK.
When you enter a computer name that is a domain controller, the domain controller is used for synchronization. This is useful when replication between domain controllers is slow.
- From the Management Console, select Tools > Synchronize Domain Members.
- Log in as an administrative user to the computer where you are deploying the Ivanti Device and Application Control client.
- Close all programs running on the computer.
- From the location where you saved the Ivanti Device and Application Control application software, run \client\Client.exe file.
The Installation Wizard Welcome page opens. - Click Next.
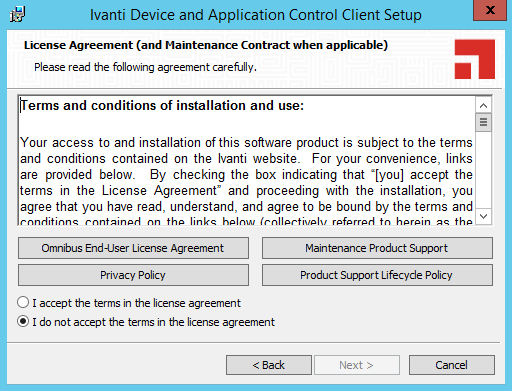
The License Agreement page opens.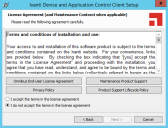
- Review the license agreement, and, if you agree, select I accept the terms in the license agreement.
- Click Next.
The Encrypted Communication page opens.
- Select one of the following options that matches the option you selected when installing the Application Server:
- To manually generate a certificate during setup, specify the computer certificate location and parameters from the following options.
- Click Next.
The Ivanti Device and Application Control Application Servers page opens.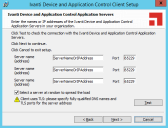
- Specify up to three server names using fully qualified domain names (FQDN) or IP addresses that are managed from the Management Console.
- Verify that the Ivanti Device and Application Control client connects to the Application Server by clicking Test.
- If you are specifying more than one server, select or deselect the Select a server at random to spread the load option.
- Click Next.
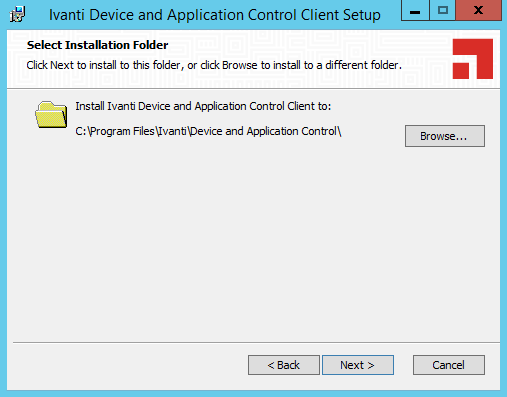
The Destination Folder page opens.
- You may choose an installation destination folder other than the Ivanti Device and Application Control default folder C:\Program Files\Ivanti\Device and Application Control\, by clicking Change.
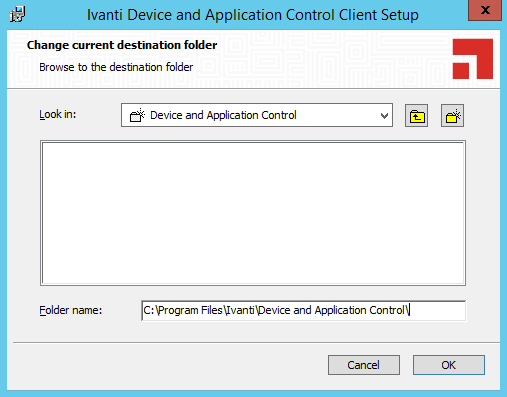
The Change Current Destination Folder page opens.
- Select a folder from the Look in field.
- Click OK.
The Change Current Destination Folder closes, and the Destination Folder page changes to reflect the new location. - Click Next.
The “Add or Remove Programs” list page opens.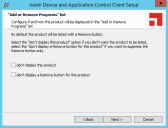
- You may select one of the following options, which are not required to proceed with installation:
- Click Next.
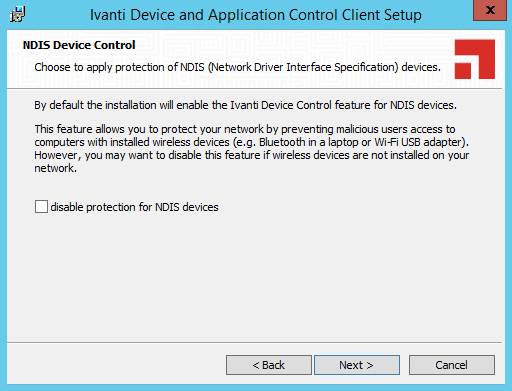
The NDIS Device Control page opens. - Select the disable protection for NDIS devices check box to allow the use of wireless devices.
- Click Next.
The Ready to Install the Program page opens. - Click Install.
A progress bar runs on the page, showing installation progress. - Select one of the following options.
- Click Finish.
The Ivanti Device and Application Control client is installed and connects to the Application Server.
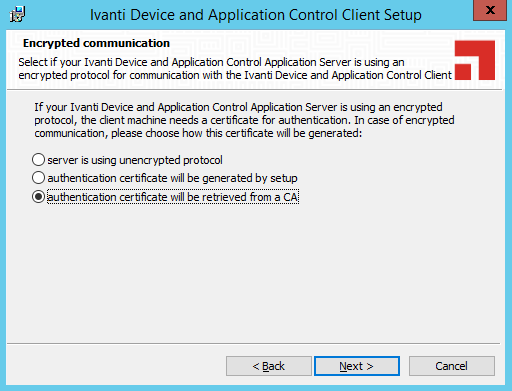
Important: Do not select Apply encryption via TLS - setup will generate a TLS certificate as it is no longer supported.
|
Option |
Description |
|---|---|
|
Server is using unencrypted protocol |
Communication between the Application Server and Ivanti Device and Application Control client is not using the TLS communication protocol. Communication is not encrypted but is signed using the private key. |
|
Authentication certificate will be retrieved from a CA |
Communication between the Application Server and Ivanti Device and Application Control client uses the TLS communication protocol. Communication is encrypted and the digital certificate is retrieved automatically during installation. |
Tip: Ivanti recommends that you use the automatic TLS retrieval option to deploy Certificate Authority infrastructure for issuing valid digital certificates.
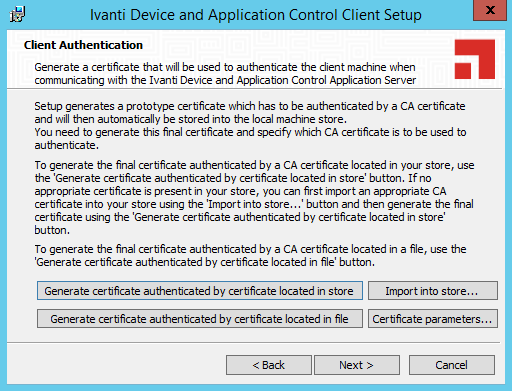
If you opt to manually generate a certificate during setup, the Client Authentication dialog opens.
|
Option |
Description |
|---|---|
|
Generate certificate signed by certificate located in store |
Generates a digital certificate during installation by using a signature certificate located in the local user store. |
|
Generate certificate signed by certificate located in file |
Generates a digital certificate during installation by using a signature certificate located in a specified file. |
|
Import into store |
Imports a signature certificate into the local user store. |
|
Certificate parameters |
Specifies the certificate parameters for the Cryptographic service provider, Key length, Validity, and Signature. |

Caution: Do not use IP address(es) when using the TLS communication protocol for encryption. You can only use FQDNs for when using the TLS communication protocol.
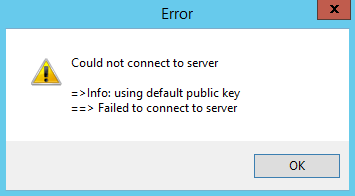
Caution: You can proceed with client installation if the Application Server is unavailable, by clicking OK in the following dialog. The client can establish a connection with the server later, when the server is available.
By default, Ivanti Device and Application Control connects with the first available server and retrieves default policy settings from the server.

|
Option |
Description |
|---|---|
|
Don’t display this product |
Does not display the Ivanti Device and Application Control component names in the Add or Remove Programs list in the Windows Control Panel. |
|
Don’t display the Remove button for this product |
Displays the Ivanti Device and Application Control component names in the Add or Remove Programs list in the Windows Control Panel without the Remove option. |
NDIS enables Device Control to control 802.1x wireless adapters. If you do not need this protection, you may disable it here.
Attention: The Setup dialog warning opens when there is an invalid, non-reachable server address and no policy file exists.
|
Option |
Description |
|---|---|
|
Abort |
Does not retrieve the policy file and cancels the installation process. |
|
Retry |
Attempts to retrieve the policy file and continue setup. |
|
Ignore |
Skips policy file retrieval and continues setup, creating the risk of blocking the computer from all device and executable file access. |
Danger: If you select Ignore, the Ivanti Device and Application Control suite installs with the most restrictive default file execution policy that denies use of all devices and/or executable files. This type of installation will deny you access to devices and software that you use on your computer, which can make the computer inaccessible. When you install a client offline for use with Application Control you must provide a policy settings file. Refer the Ivanti Application Control User Guide for more information about creating and exporting policy settings files.
The Completed page opens.
After Completing This Task:
You must restart your computer system for the Ivanti Device and Application Control client configuration changes to become effective and enable the use of the Ivanti Device and Application Control client.