Completing Installation (Part III)
The Ivanti Endpoint Security administrator performs this portion of the install procedure, which completes installation of the Ivanti Endpoint Security.
If you have any questions and/or require additional assistance, contact Ivanti support at https://forums.ivanti.com/s/contactsupport.
The final portion of the installation procedure is performed by the Ivanti Endpoint Security (Ivanti Endpoint Security) administrator on your target Ivanti Endpoint Security server.
- Ensure Windows Authentication is selected.
- Click Next.
A new page opens.Page
Steps
If the Destination Location page opens:
Click Next and proceed to the next step. If the SQL Server Configuration Requirements page opens:
The pre-installed instance of SQL Server is not configured to work with Ivanti Endpoint Security. If you only receive SQL Server configuration requirement informationals or warnings,click Next to continue (the Ivanti Endpoint Security installation will automatically reconfigure SQL Server). Proceed to the next step.
If you receive any SQL Server configuration requirement failures, you must cancel the installation, resolve the failures, and then proceed with the installation.
Click View Configuration Detail for detailed information about SQL Server configuration status requirements.
- [Optional] Change the Ivanti Endpoint Security installation location.
- Click Browse.
- Define the desired file path using either the Look in lists or the Folder name field.
- Click OK.
The Installation Folder field reflects your changes.
- [Optional] Change the Ivanti Endpoint Security content storage location.
The content storage location is the location where patches and other content items are downloaded. Ivanti recommends allocating at least 32 GB of storage space to content (plus an additional 10 GB if managing non-Windows endpoints).- Click Browse.
- Define the desired file path using either the Look in lists or the Folder name field.
- Click OK.
The Content Storage Location field reflects your changes.
- Click Next.
The Proxy Settings page opens.Refer to the Ivanti Endpoint Security: Requirements Guide for a complete list of proxy types that Ivanti Endpoint Security supports.
If one or both of the storage directories defined on the Destination Location page does not contain the recommended available disk space, the Proxy Settings page does not immediately open. Rather, a dialog that lets you redefine the storage directories opens. Then after redefining the storage directories, the Proxy Settings page opens.
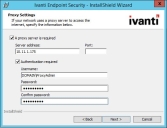
- If your network uses a proxy server to access the Internet, select the A proxy server is required check box and type the applicable information in the following fields.
Field
Type
Server Address
The IP address of the applicable proxy server.
Port
The port number used for communication.
You can also configure Ivanti Endpoint Security to use a proxy following installation. Refer to The Service Tab section in the Ivanti Endpoint Security Help for additional information on proxy communication.
- If your network uses a proxy server to access the Internet, and that proxy requires authentication, select the Authentication required check box and type the applicable information in the following fields.
Field
Type
Username
A user name that authenticates with the proxy.
Password
The password associated with the user name.
Confirm Password
The password retyped.
- Click Next
.
The Agent to Server Communication page opens.
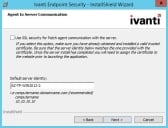
- If you are using SSL for server and agent communication, select the Use SSL security for Patch agent communication with the server check box.
You must possess an SSL certificate to implement SSL communication. Implementation of SSL communication during installation is optional. This feature can be implemented following installation.
- In the Default server identity field, type the name of your server in one of the following formats:
- DNS name (computername.domainname.com)
- Computer name (computername)
- IP address (10.10.10.10)
- Click Next.
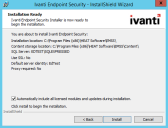
- [Optional] If you want to install only core components, clear the Automatically include all licensed modules and updates during installation check box.
- Review the installation information and click Install to begin the installation of Ivanti Endpoint Security. This process may take several minutes.
Important: During installation, do not attempt to access the Ivanti Endpoint Security Web site. Accessing the Web site during installation can cause installation errors.
- After installation completes, click Finish.
During agent registration, the Ivanti Endpoint Security agents use this name to identify the server.
If you are using SSL, the server name that you type in the field must match the server named on your certificate.
You may use the Ivanti Installation Manager after the initial installation of Ivanti Endpoint Security to install additional components. For additional information, refer to Using Ivanti Installation Manager in the Ivanti Endpoint Security Help.
Ivanti Endpoint Security is installed and can now be accessed.
After Completing This Task:
Proceed to one of the following procedures based on selections made during installation.
- If your server will use SSL, finish Appendix B: Configuring Your Server to use SSL.
- If your server will not use SSL, proceed to Logging In to Ivanti Endpoint Security.

