Types of Fingerprints
The Fingerprint Properties page allows you to choose from among seven types of fingerprints. Depending on the fingerprint type you select, the Fingerprint Properties page fields change accordingly.
The following table describes the types of fingerprints you can select in the Fingerprint Properties page.
|
Type |
Description |
Target Operating System (OS) |
|---|---|---|
|
File |
Determine the presence and properties of files and directories. See Using the File Fingerprint. |
Windows |
|
Registry |
Extract data from the Windows Registry. See Using the Registry Fingerprint. |
Windows |
|
WMI |
Detect information about a system’s operating system, name, distribution, or version. See Using the WMI Fingerprint. |
UNIX/Linux/Mac |
|
SystemInfo |
Retrieve information about a device including the OS Name, version, and architecture. See Using the SystemInfo Fingerprint. |
UNIX/Linux/Mac |
|
Expression |
Compute logical operations based on the presence or absence of other fingerprints. See Using the Expression Fingerprint. |
UNIX/Linux/Mac |
|
Patch |
Determine the presence of special components such as patches. See Using the Patch Fingerprint. |
UNIX/Linux/Mac |
|
Script |
Allow custom XML script creation of fingerprints. See Using the Script Fingerprint. |
Windows |
Using the File Fingerprint
The File fingerprint determines the presence and properties of files and directories within Windows.
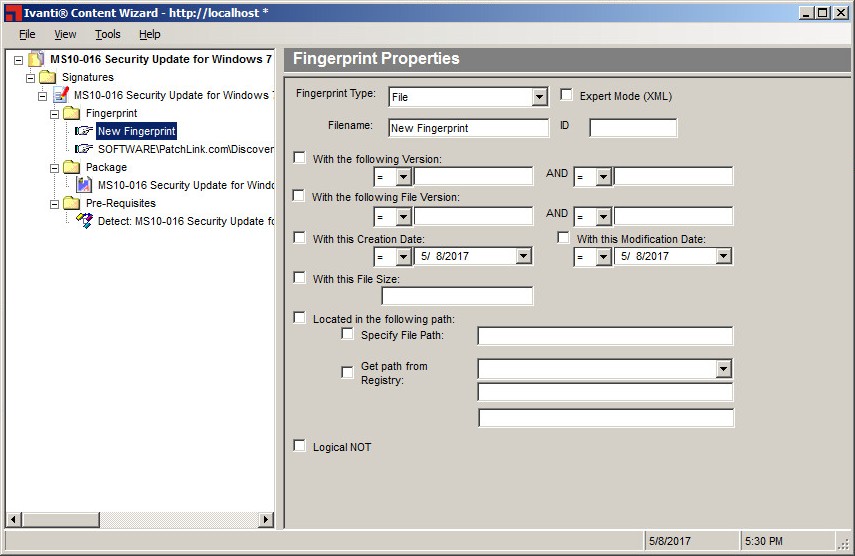
The following table describes the properties, how to use them, and their equivalent XML tag used for expert mode. Not all properties are required.
|
Properties |
Description |
Usage Suggestions |
XML Tag |
|---|---|---|---|
|
Fingerprint Type (drop-down list) |
Identifies the type of fingerprint. |
Select the fingerprint needed for the signature. |
N/A |
|
Expert Mode (XML) (check box) |
Allows for entering fingerprint data in XML. |
Toggle between the fingerprint property fields and a text field, allowing you to add and view the properties using XML. |
N/A |
|
Filename (field) |
Type a specific filename. |
|
<name> |
|
ID (field) |
Patch identifier that can be customized by company. |
The number can be specific to a company or department. Use this field for integrating with the Expression fingerprint. |
N/A |
|
With the following Version (check box, drop- down list, and field) |
Search for a minimum version or a range of versions. |
|
<version> |
|
AND (drop-down list and field) |
Allows for additional qualifiers. |
Add additional parameters. Both values must be true. |
N/A |
|
With the following File Version (check box, drop- down list and field) |
Search for a minimum file version, or a range of file versions. |
|
<fileversion> |
|
AND (drop-down list and field) |
Allows for additional qualifiers. |
Add additional parameters. Both values must be true. |
N/A |
|
With this Creation Date (check box and drop-down list) |
Allows you to search based upon a creation date. |
|
<created> |
|
With this Modification Date (check box and drop-down list) |
Allows for locating a patch with a specific modification date range. |
|
<modified> |
|
With this File Size (check box and field) |
Searches for a file based upon an exact file size (in bytes.) |
Can only be used to search for a specific size. |
<size> |
|
Located in the following path:- Specify File Path (check box and field) |
Allows you to specify a relative path to be used when looking for a file. |
Specify an environment variable containing a path or a path/filename.
Specify a relative path. Will search all local drives and look for a path that ends with the selected parameter. Leave blank for a broad search for the file (not recommended since this will search every drive.) Enter an absolute path such as C:\winnt\system32 (not recommended because of the ability to customize the installation path of an application.) |
<path> |
|
Located in the following path - Get path from Registry (check box, drop- down list, and field) |
Retrieves the path from the registry. |
The root for the entry is selected from the drop-down list. Type the KEY and VALUE into the respective fields. The available ROOT values are:
Manually type the KEY. For the VALUE field, you can:
|
<root> <key> <value> |
|
LogicalNOT (check box) |
Changes search from checking if a file exists to checking if it does not exist. |
Use for confirming if a file or directory was previously created. |
<not> |
Example:
The following example represents an XML script that includes all the possible XML parameters.
<File>
    <name>outlook.exe</name>
    <version> > 4.01.2345b </version>
    <version> < 5.00.2789 </version>
    <fileversion> > 5.01.2345 </fileversion>
    <Created> > 5/30/2001 12:01:04 PM </Created>
    <modified> > 5/30/2001 12:01:04 PM </modified>
    <size>4252</size>
    <root>HKEY_LOCAL_MACHINE</root>
    <key>SOFTWARE\Classes\Software\Microsoft\Exe</key>
    <value>(Default)</value>
</File>
Example:
The following example represents a script using the LogicalNOT option.
<File>
    <name>temptest.txt</name>
    <path>%WINDIR%\temp\</path>
    <not>1</not>
</File>
Using the Registry Fingerprint
The Registry fingerprint extracts data from the windows registry. It only works on Windows operating systems.
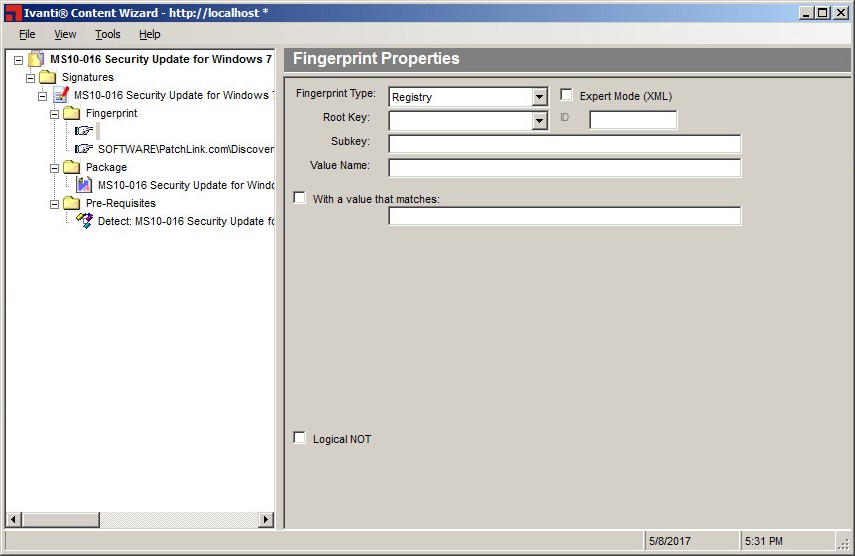
The following table describes the properties, how to use them, and their equivalent XML tag used for expert mode. Not all properties are required.
|
Properties |
Description |
Usage Suggestions |
XML Tag |
|---|---|---|---|
|
Fingerprint Type |
Identifies the type of fingerprint. |
Select the fingerprint needed for the report. |
N/A |
|
Expert Mode (XML) |
Allows for entering fingerprint data in XML. |
Toggle between the fingerprint property fields and a text field, allowing you to add and view the properties using XML. |
N/A |
|
Root Key |
Registry root key. |
Searches for the root key. You must also specify the Subkey and Value Name. The following are possible values for Root Key:
|
<root> |
|
Subkey |
Registry subkey. |
Searches for a registry subkey. When using the registry fingerprint type you must specify a subkey. |
<key> |
|
Value Name |
Value of attribute. |
Defines the registry value within the specified key that will be searched for. You can either type a specific value or use the default key by typing (Default). |
<value> |
|
With a value that matches |
Allows for a search of a matching value. |
Type a specific value and add additional parameters. |
N/A |
|
LogicalNOT |
Changes search from checking if a registry exists to checking if it does not exist. |
Use for confirming if a registry was previously created. |
<not> |
Example:
The following example represents an XML script that includes all the possible XML parameters.
<Registry>
    <root>HKEY_LOCAL_MACHINE</root>
    <key>SOFTWARE\Classes\Software\Adobe\Exe</key>
    <value>(Default)</value>
</Registry>
Example:
The following example represents a script using the LogicalNOT option.
<Registry>
    <name>temptest.txt</name>
    <path>%WINDIR%\temp\</path>
    <not>1</not>
</Registry>
Using the WMI Fingerprint
The WMI fingerprint detects information about a system such as operating system name, distribution, or version. It works on UNIX/Linux operating systems.
The following table describes the properties, how to use them, and their equivalent XML tag used for expert mode. Not all properties are required.
|
Properties |
Description |
Usage Suggestions |
XML Tag |
|---|---|---|---|
|
Fingerprint Type (drop-down list) |
Identifies the type of fingerprint. |
Select the fingerprint needed for the report. |
N/A |
|
Expert Mode (XML) (check box) |
Allows for entering fingerprint data in XML. |
Toggle between the fingerprint property fields and a text field, allowing you to add and view the properties using XML. |
N/A |
|
Name (field) |
The name of the script. |
Contains the name of the script. |
<name> |
|
ExpressionID (field) |
Expression ID. |
Used to give this fingerprint an expression ID so that it can be used in a more complicated expression (UNIX/Linux patches only.) |
<eid> |
|
Content (text box) |
The content of the script. |
Contains the content of the script to be run. |
<content> |
Example
The following example represents an XML script that includes all the possible XML parameters.
<WMI>
<name>LPRng requirements script</name>
<content>#!/bin/sh
if [ -f myfile.txt ]; then
echo "Detected"
else
echo "Not Detected"
exit 0
</content>
<eid>c7</eid>
</WMI>
Example:
Perl Example
<name>DetectNTPPerl</name>
<content>#!/usr/bin/perl my $detected = 0;
if (`grep 6001 /etc/ntp.conf`){
$detected = 1;
}
if ($detected)
{ print "detected";
} else {
print "Anything else";
}
</content>
Example:
Bash Example
<name>DetectNTP</name>
<content>#!/bin/sh
detected=`grep -c 6001 /etc/ntp.conf`
if [ "$detected" -ge 1 ]
then
echo DETECTED
else
echo NOT DETECTED
fi
</content>
Using the Shell Script Fingerprint
The Shell Script fingerprint detects information about a system such as operating system name, distribution, or version. It works on UNIX/Linux operating systems.
The following table describes the properties, how to use them, and their equivalent XML tag used for expert mode. Not all properties are required.
|
Properties |
Description |
Usage Suggestions |
XML Tag |
|---|---|---|---|
|
Fingerprint Type (drop-down list) |
Identifies the type of fingerprint. |
Select the fingerprint needed for the report. |
N/A |
|
Expert Mode (XML) (check box) |
Allows for entering fingerprint data in XML. |
Toggle between the fingerprint property fields and a text field, allowing you to add and view the properties using XML. |
N/A |
|
Name (field) |
The name of the script. |
Contains the name of the script. |
<name> |
|
ExpressionID (field) |
Expression ID. |
Used to give this fingerprint an expression ID so that it can be used in a more complicated expression (UNIX/Linux patches only.) |
<eid> |
|
Content (text box) |
The content of the script. |
Contains the content of the script to be run. |
<content> |
Example:
The following example represents an XML script that includes all the possible XML parameters.
<WMI>
<name>LPRng requirements script</name>
<content>#!/bin/sh
if [ -f myfile.txt ]; then
echo "Detected"
else
echo "Not Detected"
exit 0
</content>
<eid>c7</eid>
</WMI>
Example:
Perl Example
<name>DetectNTPPerl</name>
<content>#!/usr/bin/perl
my $detected = 0;
if (`grep 6001 /etc/ntp.conf`){
$detected = 1;
}
if ($detected) {
print "detected";
} else {
print "Anything else";
}
</content>
Example:
Bash Example
<name>DetectNTP</name>
<content>#!/bin/sh
detected=`grep -c 6001 /etc/ntp.conf`
if [ "$detected" -ge 1 ]
then
echo DETECTED
else
echo NOT DETECTED
fi
</content>
Using the SystemInfo Fingerprint
The SystemInfo fingerprint retrieves information about an endpoint such as operating system name, architecture, and operating system version. It works on UNIX/Linux operating systems.
The following table describes the properties, how to use them, and their equivalent XML tag used for expert mode. Not all properties are required.
|
Properties |
Description |
Usage Suggestions |
XML Tag |
|---|---|---|---|
|
Fingerprint Type (drop-down list) |
Identifies the type of fingerprint. |
Select the fingerprint needed for the report. |
N/A |
|
Expert Mode (XML) (check box) |
Allows for entering fingerprint data in XML. |
Toggle between the fingerprint property fields and a text field, allowing you to add and view the properties using XML. |
N/A |
|
Attribute (field) |
The name of the script. |
This field allows you to specify which system attribute is being determined. The attributes are:
|
<systemattribute> |
|
ID (field) |
Expression ID. |
Used to give this fingerprint an expression ID so that it can be used in a more complicated expression (UNIX/Linux patches only.) |
<eid> |
|
Value (field) |
The value of the attribute. |
Allows you to specify which value the attribute will be compared against. |
<value> |
Example:
The following example represents an XML script that includes all the possible XML parameters.
This example determines whether the architecture of the client machine is an iX86 greater than or equal to i386. The result is put in the variable c0, which can then be used in a logical expression to determine if a signature is present.
<SystemInfo>
    <systemattribute>Architecture</systemattribute>
    <value>_GE_ i386</value>
    <eid>c0</eid>
</SystemInfo>
Using the Expression Fingerprint
The Expression fingerprint computes logical operations based on the presence or absence of other fingerprints. It works on UNIX/Linux operating systems.
The following table describes the properties, how to use them, and their equivalent XML tag used for expert mode. Not all properties are required.
|
Properties |
Description |
Usage Suggestions |
XML Tag |
|---|---|---|---|
|
Fingerprint Type (drop-down list) |
Identifies the type of fingerprint. |
Select the fingerprint needed for the report. |
N/A |
|
Expert Mode (XML) (check box) |
Allows for entering fingerprint data in XML. |
Toggle between the fingerprint property fields and a text field, allowing you to add and view the properties using XML. |
N/A |
|
Name (field) |
The name of the script. |
Contains the name of the script. |
<name> |
|
Content (field) |
The content of the script. |
Contains the content of the script to be evaluated. |
<content> |
Prior to using a term in an expression it must be already defined by setting the ID (or Entity ID) of the other components.
Example:
The following example represents an XML script that includes all the possible XML parameters. This example determines whether the client machine has:
- Any version of the application called KDE.
- A new agent.
- An ix86 architecture of at least i386.
This was accomplished by associating other fingerprint types to the cX variables that are in the logical expression. In this example:
- c0 is the result of attempting to detect a new agent.
- c1 is the result of attempting to detect an ix86 architecture >= to i386.
- c2 through c5 are used to detect the presence of the KDE application (c0 and c1 must be present.)
- c2 through c4 are the result of attempting to detect components, any one of which must be present in the KDE application. (i.e. either c2 or c3 or c4 must be present.)
- c5 is the result of attempting to detect components, each of which must be present in the KDE application.
<Expression>
<name>Any kde with new agent and -GE- i386 </name>
<content>c0 AND c1 AND (c2 | c3 | c4 ) AND c5 </content>
</Expression>
Using the Patch Fingerprint
The Patch fingerprint determines the presence of special packages such as patches. It works on UNIX/ Linux operating systems.
The following table describes the properties, how to use them, and their equivalent XML tag used for expert mode. Not all properties are required.
|
Properties |
Description |
Usage Suggestions |
XML Tag |
|---|---|---|---|
|
Fingerprint Type (drop-down list) |
Identifies the type of fingerprint. |
Select the fingerprint needed for the report. |
N/A |
|
Expert Mode (XML) (check box) |
Allows for entering fingerprint data in XML. |
Toggle between the fingerprint property fields and a text field, allowing you to add and view the properties using XML. |
N/A |
|
Name (field) |
Indicates the name of the package. |
Contains the name of the package. |
<name> |
|
ID (field) |
Indicates the Expression ID. |
Used to give this fingerprint an expression ID so that it can be used in a more complicated expression (UNIX/Linux patches only.) |
<eid> |
|
Version (field) |
Indicates the package version. |
The version against which the package will be compared. |
<version> |
|
Release (field) |
Indicates the release version. |
The release against which the package will be compared. |
<release> |
Example:
The following example represents an XML script that includes all the possible XML parameters. This example determines whether a patch with the Solaris Patch ID of 106468-05 exists on an endpoint hosting a Solaris operating system.
<name>106468-05</name>
<version>106468</version>
<release>_GE_ 05</release>
<eid>c0</eid>
Using the Script Fingerprint
The Script fingerprint retrieves information about an endpoint such as operating system name, version, services, and other values using queries similar to those used in SQL. It works on Windows operating systems.
The following table describes the properties, how to use them, and their equivalent XML tag used for expert mode. Not all properties are required.
|
Properties |
Description |
Usage Suggestions |
XML Tag |
|---|---|---|---|
|
Fingerprint Type (drop-down list) |
Identifies the type of fingerprint. |
Select the fingerprint needed for the report. |
N/A |
|
Expert Mode (XML) (check box) |
Allows for entering fingerprint data in XML. |
Toggle between the fingerprint property fields and a text field, allowing you to add and view the properties using XML. |
N/A |
|
Name (field) |
Indicates the name of the script. |
Contains the name of the script. |
<name> |
|
Script Type (field) |
Indicates the type of script. |
Contains the type of script to be executed. VBScript scripts are supported for Windows and Schell scripts are supported for Linux and Unix. |
<type> |
|
Validate (button) |
Validates the fingerprint script. script. |
Use to validate the script within the text box. VBScript scripts are supported for Windows and Schell scripts are supported for Linux and Unix. |
N/A |
|
Content (text box) |
Indicates the content of the script. |
Type the actual script to be used. The VBScript must reference the SetReturnCode subroutine and return a value either 1 (True) or 0 (False). |
<content> |
When developing a script fingerprint, it is highly recommended that you use a Visual Basic compatible editor so that capitalization and language syntax are validated properly before you try running your script. Visual Basic can be used to quickly prototype and test functionality, if desired. All fingerprint
scripts should be tested thoroughly in isolation, using the Windows Scripting Host CSCRIPT.EXE to run the script stand alone on a test machine.
Any errors in your script will cause the script fingerprint to fail and return a Not-Patched value. For this reason it is recommended that the On Error Resume Next directive is used to ensure that your script will run to completion.
Example:
The following example represents an XML script that includes all the possible XML parameters.
<name>Check Myfile</name>
<type>VBScript</type>
<contents>
    On Error Resume Next
    Dim RetCode
    Dim szTempFileName
    Dim FileObject
    RetCode = 0
    ' Create the File System Object
    Set FileObject = CreateObject("Scripting.FileSystemObject")
    ' Detect if the specified file exists
    szTempFileName="C:\testfile.txt"
    If FileObject.FileExists(szTempFileName) Then
        RetCode = 1
    Else
        RetCode = 0 End If
    ' MsgBox RetCode
    WScript.Quit RetCode
</contents>
No error messages will be seen in the Detection Log if your script fails.