Working With Content
There are several tasks designed to assist with management and deployment of content items. These are available from buttons located within the toolbar on the Review pages for the individual content types.
These tasks include:
- Creating Custom Patch Lists
- Copying Custom Patch Lists
- Deleting Custom Patch Lists
- Disabling Content
- Updating the Cache
- Disabling Content for Groups/Endpoints
- Enabling Patches for Groups/Endpoints
- Adding Content to a Custom Patch List
- Removing Content from a Custom Patch List
- Deploying from the Patch Content Page
- Scanning Endpoints for Vulnerabilities
- Exporting Content Data
Creating Custom Patch Lists
When you need to research, recall, deploy, or report on a set of patch content that you use regularly in your enterprise, you should create a Custom Patch List, which is static list of patch content items that you select from Patch Content page. The content in this list will not change based on applicability or changes in content type.
Create new custom patch lists using the Create Custom Patch List dialog, which can be opened using the navigation menu or the Patch Content browser.
- From the Navigation Menu, select Review > Custom Patch Lists > Create Custom Patch List.
- Type a new List name and click OK.
The Patch Content page opens, and your new Custom Patch List is added to the Patch Content Browser within the Custom Patch Lists hierarchy.
Copying Custom Patch Lists
You can copy existing Custom Patch Lists and use them as templates for other Custom Patch Lists. Copy Custom Patch Lists from the Patch Content page.
- From the Navigation Menu, select Review > My Default Patch View.
- From the Patch Content Browser, expand Custom Patch Lists and select the list you want to copy.
- Click
 .
. - [Optional] Type a new name for the copied list and press ENTER.
A new Custom Patch List is added to Patch Content Browser. Edit the new list so that it fills a new enterprise role.
Deleting Custom Patch Lists
When you no longer need a Custom Patch List, delete it from the Patch Content Browser. Delete Custom Patch Lists from the Patch Content page.
- From the Navigation Menu, select Review > My Default Patch View.
- From the Patch Content Browser, expand Custom Patch Lists and select the list you want to delete.
- Click
 . Click OK to confirm.
Disabling Content
All content downloaded from the Global Subscription Service can be toggled between disabled and enabled states. You can disable content either globally or per endpoint.
Disabling Content Globally
Disable content globally when you don't want it to be installed on any endpoint in your network. Globally disabling content prevents it from being deployed mistakenly. Globally disabled content can be re-enabled at any time.
Disabling Content by Groups or Endpoints (also known as Do Not Patch)
Using the Do Not Patch feature, you can disable content for groups or endpoints that you choose. Use Do Not Patch when a particular patch is causing problems, or would cause known problems, for a group or endpoint. Content disabled by endpoint/group can also be re-enabled at any time.
You should know a few things about Do Not Patch:
- Do Not Patch is considered a special patch state.
- The Do Not Patch state takes precedence over all other patch states, such as patched, not patched, and not applicable.
- Content marked Do Not Patch is considered a special state different from disabled since it can still be deployed to most of your endpoints.
If you need find content marked Do Not Patch when filtering list pages or reports, clear all page filters and sort by the Do Not Patch column (
 ).
). - Patches marked Do Not Patch exclude selected endpoints from its patch compliance score.
- If you mark content as Do Not Patch after it has already been installed on the endpoints you select:
- The endpoints still enters a Do Not Patch state although the patch is installed.
- You must uninstall the patch manually from those endpoints (because patches cannot be retroactively uninstalled). The Do Not Patch feature does not uninstall patches from endpoints.
- If you mark content as Do Not Patch for a group, that group's child hierarchy is also considered Do Not Patch.
- If you mark content included in a mandatory baseline as Do Not Patch, the endpoints or groups marked Do Not Patch are exempt from that patch.
Do Not Patch use example:
Say your organization has mission-critical servers that require an older version of Java to operate. Although you should patch most of your endpoints with the latest version to secure them, these mission-critical servers need to remain on the older version to continue operations. In this case, mark the mission-critical servers as Do Not Patch to exempt them from a more recent version of Java.
Disabled/Enable Comments
When disabling/enabling content, you have the option of entering a reason for completing the action.
- A disable comment is useful for tracking why a content item is disabled. The default reasons include:
- OS / System conflict
- Application conflict
- High incidence of installation failures
- Not approved
- Typically, content is re-enabled when the reason for originally disabling it is resolved. Use re-enable comments to track why content has been reintroduced. The default enable reasons are:
- Resolved OS / System conflict
- Resolved application conflict
- Resolved installation failures
- Approved
Disable/enable comments also appear in related reports.
Disable/Enable Tips and Behaviors
- After a patch is disabled/re-enabled, you can edit the reason by expanding the patch's metadata from the Patch Content page list and clicking the Enable/Disable reason Edit link.
- If you disable a patch that's cached, it isn't updated if a new version of the patch is released.
- You can't retroactively remove a patch from a deployment that's scheduled or in-progress by disabling the patch. If you schedule a deployment but then globally disable a patch that's included, that patch is still deployed. If you need to stop the patch from being deployed, abort the deployment instead of disabling the patch.
Disabling Content Globally
Disabling a patch prevents it from being deployed.
- From the Navigation Menu, select Review > My Default Patch View.
- Filter the page to show content that's enabled.
- If necessary, click Show Filters to toggle the page filters.
- Select page filters. Make sure the State filter has Enabled selected.
- Click Update View.
- Find and select the content you want to disable.
- Click Disable.
If you disable a content item that's already been cached, the package will not be updated if a new version of the content item is released.
- [Optional] Choose a reason for disabling the content.
- To enter a new reason, type it in the field.
- To choose a reason that's already been used, select it from the drop-down menu.
- Click Disable.
You can't retroactively remove a patch from a deployment that's scheduled or in-progress by disabling the patch. If you schedule a deployment but then globally disable a patch that's included, that patch is still deployed. If you need to stop the patch from being deployed, abort the deployment instead of disabling the patch.
The content is disabled. To confirm, filter the page to display disabled content and confirm it's listed.
Enabling Content Globally
Enabling a previously disabled content item allows you to deploy the content item to your endpoints.
- From the Navigation Menu, select Review > My Default Patch View.
- Filter the page to show content that's disabled.
- If necessary, click Show Filters to toggle the page filters.
- Select page filters. Make sure the State filter has Disabled selected. Select the Content type filter All value to make sure all disabled content is displayed.
- Click Update View.
- Find and select the content you want to enable.
- Click Enable.
- [Optional] Choose a reason for disabling the content.
- To enter a new reason, type it in the field.
- To choose a reason that's already been used, select it from the drop-down menu.
- Click Enable.
The content is re-enabled.
Disabling Content for Groups/Endpoints
You can disable patches for specific groups and endpoints, placing them in a do not patch state for that patch.
- Open a page that list patches Patch Content page.
- Select Review > My Default Patch View, or any other Review menu item to open the Patch Content page.
- Select Manage > Endpoints, click an endpoint link, and then select the Vulnerabilities/Patch Content tab.
- Select Manage > Groups and select the Vulnerabilities/Patch Content view.
- [Optional] Use the Patch Content page filters and click Update View to find patches that you want to disable for a group/endpoint.
If the filters are not displayed, click Show Filters.
- Select the patch you want to disable, and then click Do Not Patch.
- Complete the Do Not Patch Groups and Endpoints wizard.
The Do Not Patch Groups and Endpoints Wizard
Use this wizard to mark the patch you've selected as "do not patch" for groups and endpoints that you choose. This wizard includes two to three pages, depending on the actions you choose while using it:
- Select Groups and Endpoints to Mark as 'Do Not Patch': Use this page to exclude specific groups and endpoints from receiving the patch.
- Do Not Patch Reason: Use this page to record a reason why you're marking the patch as 'Do Not Patch'. You can see this record later to remind yourself why the patch is excluded.
- OK to Patch Reason: If you're removing the patch exclusion for particular groups or endpoints later, you can also provide a reason on why you're marking it 'OK to Patch'.
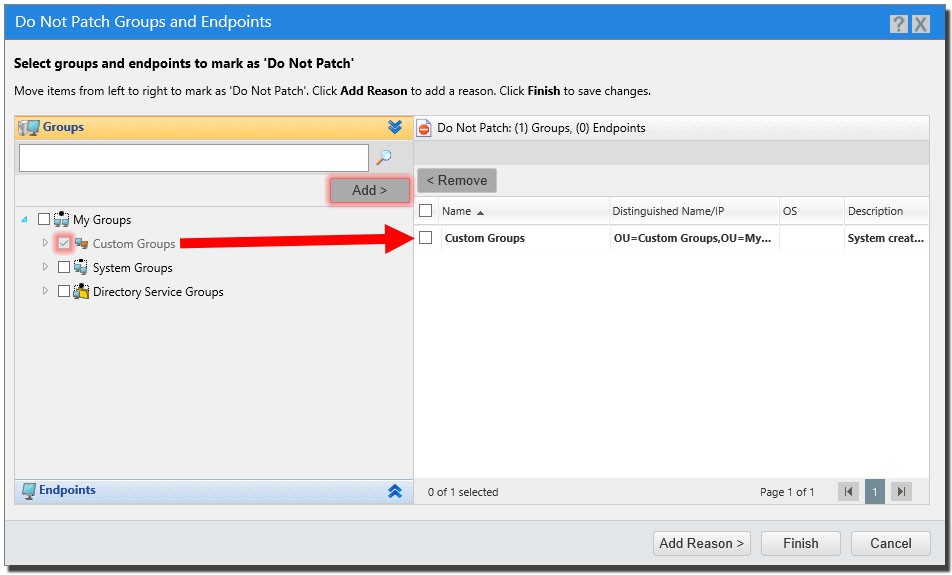
Select Groups and Endpoints to Mark as 'Do Not Patch'
After opening the Do Not Patch Groups and Endpoints wizard, select groups, endpoints, or a combination of both. These endpoints (and groups) won't allow the patch that you selected to be applied to them when the wizard is completed.
From this page, you can either:
- Create a patch exception for groups, endpoints, or a combination of both by adding them to the Do Not Patch list.
- Remove existing patch exceptions for groups or endpoints (after resolving the reason that an exception was created).
When you're done modifying the Do Not Patch list, click Add Reason to proceed.
Adding Groups and Endpoints to the 'Do Not Patch' List
Add groups or endpoints to the Do Not Patch list when:
- You're creating a brand new patch exception.
- You're adding more groups/endpoints to the Do Not Patch list when exceptions for the patch already exist.
Toggle between groups and endpoints by clicking the Groups and Endpoints headers.

Groups Panel
Use this panel to create a patch exception for a group.
- Expand the tree to find the groups you want to select.
- You can also type specific group names into the search field.
Endpoints Panel
Use this panel to search for specific endpoints that you want to select.
Removing Groups and Endpoints from the 'Do Not Patch' List
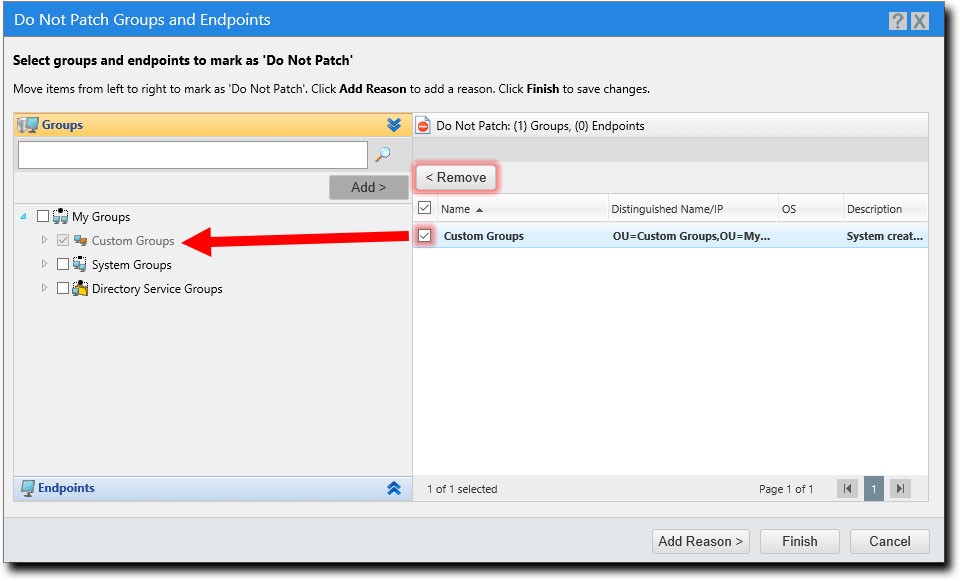
Remove groups or endpoints from the Do Not Patch list when you've resolved the reason that you created an exception in the first place.
You may never want to remove groups/endpoints from the Do Not Patch list.
When you add groups/endpoints to the Do Not Patch list for a patch, you should select a Do Not Patch reason. These optional reasons are available for tracking and reporting purposes.
For example, while reviewing reports about networking patching, you can reference this reason for info on why an endpoint wasn't patched.
A Do Not Patch Reason drop-down is available for each group/endpoint on the Do Not Patch list.
- To select from a list of pre-created system reasons, select one from a group/endpoint drop-down.
- To create your own custom reason, type a reason instead.
If you aren't adding groups/endpoints to the Do Not Patch list, this page won't appear.
When you remove groups and endpoints from the Do Not Patch list for a patch, you should select an OK to Patch reason. These optional reasons are available for tracking and reporting purposes.
For example, if your manager asks why a patch that was marked as Do Not Patch is later changed to OK to Patch, you can reference this reason to find out why the patch was approved.

An OK to Patch Reason drop-down is available for each group/endpoint removed from the Do Not Patch list.
- To select from a list of pre-created system reasons, select one from a group/endpoint drop-down.
- To create your own custom reason, type a reason instead.
If you aren't removing groups/endpoints from the Do Not Patch list, this screen won't appear.
Enabling Patches for Groups/Endpoints
After you've resolved the reason that you've marked a group or endpoint as "Do Not Patch," you can go back and re-enable it.
- Open a page that list patches Patch Content page.
- Select Review > My Default Patch View, or any other Review menu item to open the Patch Content page.
- Select Manage > Endpoints, click an endpoint link, and then select the Vulnerabilities/Patch Content tab.
- Select Manage > Groups and select the Vulnerabilities/Patch Content view.
- [Optional] Use the Patch Content page filters and click Update View to find patches that you want to enable for a group/endpoint.
If the filters are not displayed, click Show Filters.
- Select the patch you want to enable, and then click Do Not Patch.
- Complete the Do Not Patch Groups and Endpoints wizard. From the Select Group and Endpoints to Mark as 'Do Not Patch' page, remove the groups/endpoints that you want to patch again from the Do Not Patch list.
Updating the Cache
Updating the cache initiates a process that gathers the packages associated with the selected vulnerability and copies those packages to your Ivanti Patch and Remediation server.
Within Review pages, the Update Cache feature is designed to assist with the management and deployment of content items.
For optimum installation order, Ivanti recommends caching content prior to deployment. Failure to cache content prior to deployment may result in repeated endpoint reboots that interrupt workflow on those endpoints.
- From the Navigation Menu, select Review > My Default Patch View.
- If necessary, select filter criteria for to find content you're looking for and click Update View.
- Select the check boxes associated with the content to cache.
- Click Update Cache.
The Warning dialog box opens, informing you that the update request and this action may take an extended period of time.The cache will not be updated for disabled content items that have had a new version released.
- Click OK.
The selected content begins caching.
Adding Content to a Custom Patch List
After you have created a Custom Patch List, you need to add patch content to it, which you then use for deployments and record keeping.
You can begin adding content to a Custom Patch List from the Patch Content page.
You can also create a new Custom Patch List after selecting content.
- From the Navigation Menu, select Review > My Default Patch View.
- Open the Patch Content page.
- Select Review > My default patch view, or any other Review menu item that opens the Patch Content page.
- Select Manage > Groups and select the Vulnerabilities/Patch Content view.
You can also initiate this task from the Navigation Menu by selecting Review > Custom Patch Lists > Target Patch List or Manage > Custom Patch Lists > Target Patch List.
- [Optional] Use the Patch Content page filters and click Update View to find specific content you want to add to the list.
If the filters are not displayed, click Show Filters.
- Select the content items you want, and then click Add to List.
If you select the Select All check box, all content visible on the page is selected. However, you can select all available content by clicking the Select All link.
- Add the selected content items to a Custom Patch List.
- To add the patch content to an existing Custom Patch List, select an existing List name.
- To add the patch content to a new Custom Patch List, type a new List name.
- Click Add.
- The Add to List dialog closes.
- If you typed a new List name, a new Custom Patch List is added to the Patch Content Browser.
- The content you selected is added to the Custom Patch List.


The Add to List dialog opens.
Removing Content from a Custom Patch List
If you have mistakenly added a patch content item to one of your Custom Patch Lists, remove it. Remove patch content from a Custom Patch List using the Patch Content page toolbar.
- From the Navigation Menu, select the Custom Patch List you want to remove content from.
Example: Select Review > Custom Patch Lists > Custom Patch List Name.If you have more than five Custom Patch Lists, select Review > All Lists and use the Patch Content Browser to select a Custom Patch List.
- Select the content items you want, and then click Remove.
- If prompted, click OK to confirm the removal.
The content you selected is removed from the Custom Patch List.
Deploying from the Patch Content Page
Within Ivanti Endpoint Security, content can be deployed from a number of pages, including any Content page. When deploying from these pages, the Deployment Wizard is pre-configured according to the content you select.
For additional information, refer to About Deployments.
- From the Navigation Menu, select Tools > Subscription Updates.
- From the list, select the content you want to deploy.
If you select the Select All check box, all content visible on the page is selected. However, you can select all available content by clicking the Select All link. - Click Deploy.
The Deployment Wizard opens, pre-configured to deploy the selected content.
After Completing This Task:
Review Using the Deployment Wizard and complete subsequent tasks.
Scanning Endpoints for Vulnerabilities
You can initiate a Discover Applicable Updates (DAU) task at any time. When you initiate this task, the agent scans its host endpoint for vulnerabilities and inventory. Scan results are then uploaded to Ivanti Endpoint Security, which you can view.
From the Content pages, you can schedule a DAU tasks for all managed endpoints in your network.
Note: With the AntiVirus module installed, you can launch two types of scans. The toolbar Scan Now... menu contains commands for the following scan types:
- A Discover Applicable Updates (DAU) task. This scan takes an endpoint hardware and vulnerability inventory. For additional information, refer to
- A virus and malware scan. This targets selected endpoints with an immediate ( on-demand ) virus scan. For additional information, refer to Using the Virus and Malware Scan Wizard .
- From the Navigation Menu, select Tools > Subscription Updates.
- Click Scan Now.
The Scan Now dialog opens. - Select the Yes, scan all endpoints.
- Click Schedule.
A notification displays, informing you that the scan has been scheduled. The notification contains a link to view the scheduled deployment.Although the DAU task is scheduled for immediate execution, it does not execute until the next agent check in.
- Click Close.
The dialog closes.
Exporting Content Data
From the various content pages, you can export all information listed on the page to a comma separated value (.csv) file. The exported information can be used for reporting and analytical purposes.
For additional information, refer to Exporting Data.