Manually Installing the Agent for Windows
Endpoints running Windows communicate with the Ivanti Endpoint Security server using the Ivanti Endpoint Security Agent.
Prerequisites:
- Ivanti Endpoint Security is installed and initial replication has been completed. For details regarding installing Ivanti Endpoint Security, refer to the Ivanti Endpoint Security: Server Installation Guide.
- Ensure that your endpoint meets the minimum requirements for agent installation. For additional information, refer to Agent Requirements.
- Ensure any antivirus software installed on the computer is disabled.
- Download the appropriate installer for your operating system. See Downloading the Installer for more information.
- Ensure you are logged on with an administrative user account.
After downloading the agent installer for Windows, you can begin an install using the Agent Setup Wizard.
- From the download location, open the Agent Setup Wizard.
- On 32-bit endpoints, double-click lmsetup.exe.
- On 64-bit endpoints, double-click lmsetupx64.exe.
- Review the License agreement and select the I accept the terms in the License agreement option.
Click Print to perform the following actions:- Open a text file of the license agreement.
- Open a Print dialog.
- Click Next.
The Destination folder page opens. - [Optional] Change the Ivanti Endpoint Security agent installation location.
Tip: Only ASCII characters are allowed in the folder name.
- Click Browse.
The Browse for Folder dialog opens. - Define the desired file path using either the Look in lists or the Folder name field.
- Click OK.
The Browse for Folder dialog closes and the Destination folder page reflects the new location. - Click Next.
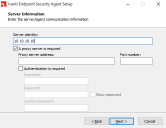
The Server Information page opens. - Type the appropriate server address information in the Server identity field.
- To define the server with an IP address, type xxx.xxx.xxx.xxx.
- To define the server with a server name, type ServerName.
- To define the server using a fully qualified domain name, type ServerName.DomainName.com.
- [Optional] If the agent will communicate with the Ivanti Endpoint Security server through a proxy server, select the A proxy server is required check box and complete the following steps.
In many network environments, although a proxy is used for Internet access, a proxy bypass is used for all access within the corporate network. Therefore, only enter proxy information if your agents will be required to use a proxy to access your Ivanti Endpoint Security server. Proxy information is not validated. A Squid proxy server will only properly resolve using a fully qualified domain name.
Refer to Ivanti Community article An Endpoint Shows Offline When Using a Squid Proxy Server for additional information on a Squid proxy server configuration. - Type the proxy IP address or host name in the Proxy server address field.
- Type the port number that the proxy uses in the Port number field.
- [Optional] If the proxy server requires authentication, complete the following steps:
- Select the Authentication is required check box.
- Type the user name in the Username field.
- Type a new password for the proxy in the Password field.
- Re-type the proxy password for the proxy in the Confirm Password field.
- Click Next.
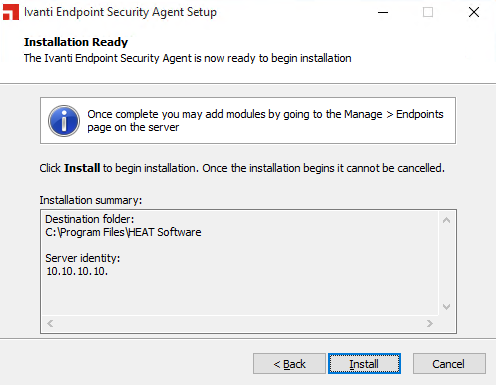
The Installation Ready page opens.
- Review the installation information and click Install to install the agent.
Once installation begins it cannot be canceled.
- Click Close to exit the wizard.
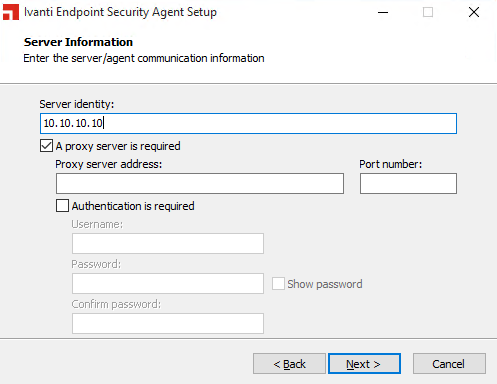
Tip: Select the Show password check box to display the password text.
The agent is installed and the Installation Complete page displays.
Tip: Click Open setup log to open lmsetup.log in your text editor.