The Group Membership View
This view lets you view the selected group's direct child groups. If the selected group is a custom group, you can also create new custom child groups that you can populate with the desired endpoints. Custom groups also let you edit or delete any listed preexisting child groups.
This view only lists direct child groups; you cannot manage grandchild groups or further descendants.
The Group Membership View Toolbar
This toolbar contains buttons related to the creation and management of groups.
The following table describes the toolbar functions. Some functions are common to all the Groups page views.
|
Button |
Function |
|---|---|
|
Create |
Creates a new group. For additional information, refer to Creating a Group. |
|
Delete |
Deletes a group. For additional information, refer to Deleting Groups. |
|
Move... |
Assigns a group to a new parent group. For additional information, refer to Moving a Group. |
|
Export |
Exports the page data to a comma-separated value (.csv) file. For additional information, refer to Exporting Data. Important: The Enhanced Security Configuration feature for Internet Explorer suppresses export functionality and must be disabled to export data successfully. Pop-up blockers in Internet Explorer or other supported browsers may also suppress export functionality and should be disabled. |
|
Options (menu) |
Opens the Options menu. For additional information, refer to The Options MenuThe Options Menu. |
The Group Membership View List
This list displays the selected group's direct child groups. Each listing contains group identification information and icons used to edit identification information or delete the group altogether.
The following table displays the Group Membership view list details.
|
Column |
Icon |
Description |
|---|---|---|
|
Action |
N/A |
Contains Edit and Delete icons. Use these icons to edit or delete the associated group. |
|
Groups |
|
Contains an icon that indicates the type of the group:
|
|
Name |
N/A |
Indicates the name of the child group. |
|
Description |
N/A |
Indicates the description of the group. |
|
Distinguished Name |
N/A |
Indicates the system-created name based upon the group’s parent hierarchy. |
|
Endpoints |
N/A |
Indicates the number of endpoints assigned to the group. |
System and Directory Service groups cannot have their child group or endpoint memberships edited. However, their assigned agent policy sets can be edited.
Creating a Group
Ivanti Endpoint Security provides preconfigured groups. However, you can also create custom groups. Populate custom groups with desired endpoints. You can only create custom groups within the Browser custom group hierarchy.
Create groups from the Group Membership view.
- From the Navigation Menu, select Manage > Groups.
- From the View list, select Group Membership.
- Select the Custom Group from the directory tree that you want to create a child group for.
- ClickCreate.
A new row appears on the page. - In the Name field, type a name for the group.
- [Optional] Type a brief description about the group in the Description field.
- Click the Save icon associated with the new group.
The group is saved to the list and is added to the directory tree. A Distinguished Name is generated for the group.
After Completing This Task:
Add endpoints to the group. For additional information, refer to Adding Endpoints to a Group.
Editing Groups
You can edit the names and descriptions for custom groups.
You may edit the name and description for groups within the Custom Groups hierarchy. Edit groups from the Group Membership view.
For System Groups and Directory Service Groups only the Description field can be edited, not the Name field.
- From the Navigation Menu, select Manage > Groups.
- From the View list, select Group Membership.
-
From the Group Browser, select a group within the Custom Groups hierarchy you want to edit.
- Click the Edit icon (
 ).
).
The Name and Description field displays. - [Optional] Edit the Name field associated with the group.
- [Optional] Edit the Description field associated with the group.
- Click the Save icon associated with the new group.
The group changes are saved.Within the Group Membership view, you can only edit the group name and description. To edit group behavior, use the Groups page views.
Deleting Groups
Delete a group when you no longer need to manage its endpoints collectively. Only custom groups can be deleted. After deleting a group, you cannot recover it; you must recreate the group.
Delete custom groups from the Groups Membership view.
Deleting a group does not prevent an endpoint within that group from rebooting or scanning; these tasks occur at the endpoint level.
- From the Navigation Menu, select Manage > Groups.
- From the View list, select Group Membership.
- From the directory tree, select the parent group of the group(s) you want to delete.
Only groups within the Custom Groups hierarchy can be deleted.
- Delete the desired group(s).
Use one of the following methods.If the group you want to delete has a child hierarchy, the group cannot be deleted until the child groups have been deleted or moved.
- Select the check boxes associated with the groups you want to delete.
- From the toolbar, click Delete.
- Click OK.
The selected group(s) are deleted.
|
Method |
Steps |
|---|---|
|
To delete a single group: |
Click the Delete icon associated with the group you want to delete. |
|
To delete multiple groups: |
|
A dialog appears asking you to acknowledge the deletion.
Moving a Group
After creating a group, you can change its position within the Browser tree. Move groups from the Group Membership view on the Groups page.
When moving a group, if the group is configured to inherit agent policies, roles, or any other settings, the group inherits those values from its new parent.
- From the Navigation Menu, select Manage > Groups.
- From the View list, select Group Membership.
- From the Browser, select the parent group of the group you want to move.
- Select the group you want to move.
- Click Move.
You cannot move groups in System Groups or Directory Service Groups.
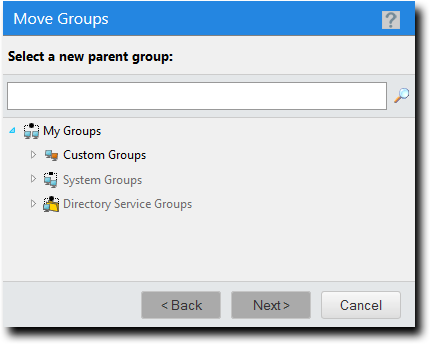
- Select a new parent group.
- Click Next.
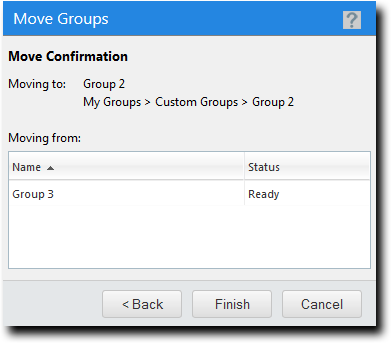
The group is moved to the new parent group.If the group you are moving contains a child hierarchy, those groups are moved as well.
- Click Finish.
- Click Close.
The select group is moved to its new place in the group hierarchy.
The Move Groups dialog opens.
Exporting Group Membership View Data
To export information displayed in the Group Membership view list to a comma separated value (.csv) file, click the toolbar Export button. Exporting data lets you work with that data in other programs for reporting and analytical purposes.
For additional information, refer to Exporting Data.