Service Manager powered by HEAT
Using Lists
•Sorting the Layout of Columns in a List
•Grouping Records by Column Header
•Filtering Data and Records in Lists
•Exporting the Contents of a List
About Lists
Lists appear in table fields throughout Ivanti Service Manager. Double-click any record in a list to view its details. You can also sort, group, and filter the records in the list to assist in locating the exact records you need and run quick actions against some or all of the records directly from the list. You can export the entire contents of a list as a .XLS file for use in Microsoft Excel or any other spreadsheet application that supports the .XLS file type.
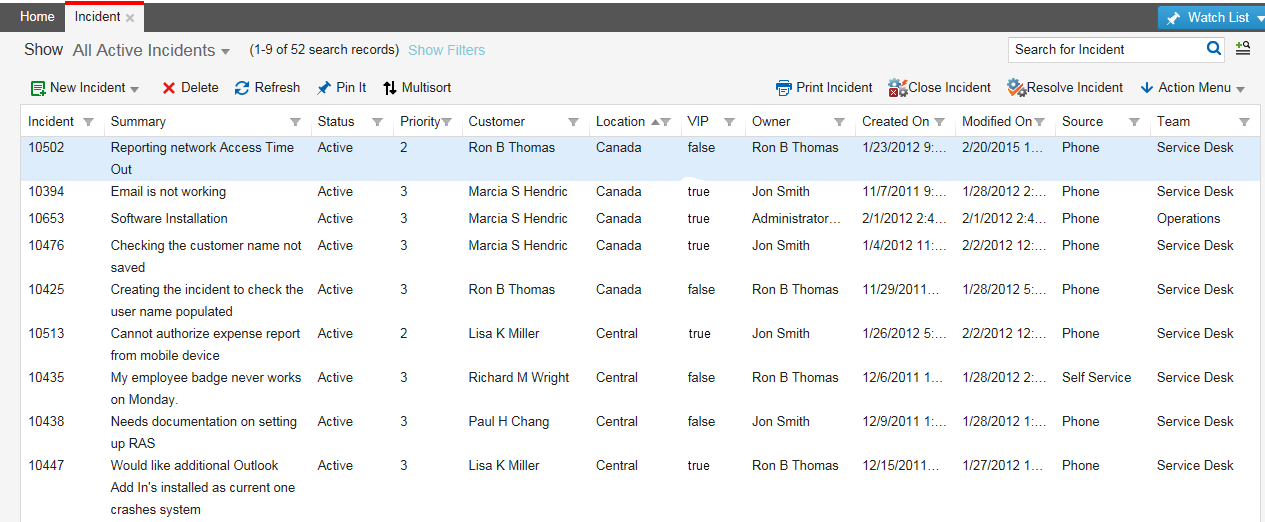
When you open the workspace of any major business object, you see a list. The number of records for that object appear at the top of the list.
Example of a Workspace List
Sorting Columns in a List
You can sort a column on the list by clicking the column header.
You cannot sort columns that have text fields with an unlimited number of characters allowed.
When you click the column header, a sort icon appears as a small arrow to the right of the column heading. The arrow direction indicates the current sort direction:
|
|
ascending |
Successively higher values (numeric or alphabetic) as you move down the table. |
|
|
descending |
Successively lower values (numeric or alphabetic) as you move down the table. |


By default, the records that display in the lists are sorted in ascending order by the data in the first column.
1.Locate the list to sort.
2.Click the column header.
After sorting, the up/down arrow in the column header is enabled and indicates the current sort order (either ascending or descending).
3.To toggle between the sort orders, click the column header again.
Sorting the Layout of Columns in a List
You can rearrange the order in which the columns display. By default, the record ID is always the first column. To make the status be the first column, for example, you can drag the column and drop it so that it appears as the first column.
1.Locate the list to sort.
2.Click a column header and without releasing your mouse, drag it to a new location.
Using the Multisort Feature
•Resetting the Multisort Feature
•Adding a Multisort Button to the List Toolbar
•Using the Multisort Feature with a Keyboard Shortcut
About the Multisort Feature
In addition to simple sorting (that is, sorting by one column), Ivanti Service Manager also includes a multisort feature that is available by default in all lists. You can access the multisort feature in lists by using either of the following:
•A keyboard shortcut. This feature is a fallback for lists that do not contain a toolbar, such as dashboards. See Using the Multisort Feature with a Keyboard Shortcut.
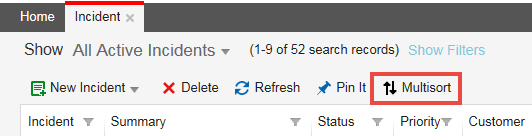
• A Multisort button in the toolbar that opens a dialog box.
Multisort Button
In the out-of -the-box Ivanti Service Manager application you can use the Multisort button with the following business objects:
•Incident
•Service request
•Problem
•Change
•Release
•Configuration item
•Knowledge
•Task assignment
For other business objects, you need to add the Multisort button to the list toolbar. For more information, see Adding a Multisort Button to the List Toolbar.
Multisort also works on hidden columns. Even if you hide certain columns, you can still use multisort on them although you cannot see the column in the list.
Using the Multisort Feature
1.Log in to the Service Manager Application.
2.Open the workspace for which to group records. For example, open the Incident workspace.
3.Click Multisort to display the Multisort Column Picker dialog box.
Using the Multisort Feature
Multisort Column Picker

4.In the Sort by field, select a sort choice from the drop-down list.
5.Change the arrow icon to either up or down by clicking on it to specify the sort type (either ascending or descending).
6.Add additional sort choices by clicking the plus  icon.
icon.
7.Remove any sort choices by clicking the delete  icon.
icon.
8.Click Sort to complete your action.
9.Click Close to close the Multisort Column Picker.
Resetting the Multisort Feature
To reset the multisort feature, do one of the following:
•Click Reset in the Multisort Column Picker dialog box.
•Click on any column header.
•Click the Reset List Personalization icon in the footer of the list.
Resetting the Multisort Feature

This does the following:
•Clears the controls (such as drop-down lists and sort order buttons) in the dialog box.
•Resets the sorting in the list behind the dialog box.
Adding a Multisort Button to the List Toolbar
Follow these steps to add the Multisort button to the list toolbar. This example uses the Incident workspace:
1.From the Configuration Console, click Build > Business Objects to open the Business Objects workspace.
2.Click on the name of a business object. This example uses Incident business object.
3.Click the Layouts tab.
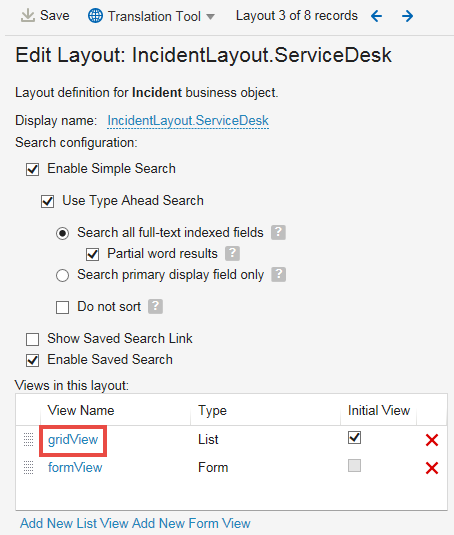
4.Open a layout associated with your business object. This example uses Incident Layout.Service Desk.
5.Click gridView.
Grid View
6.Click Edit on the right-hand side of the toolbar area.
Edit Button

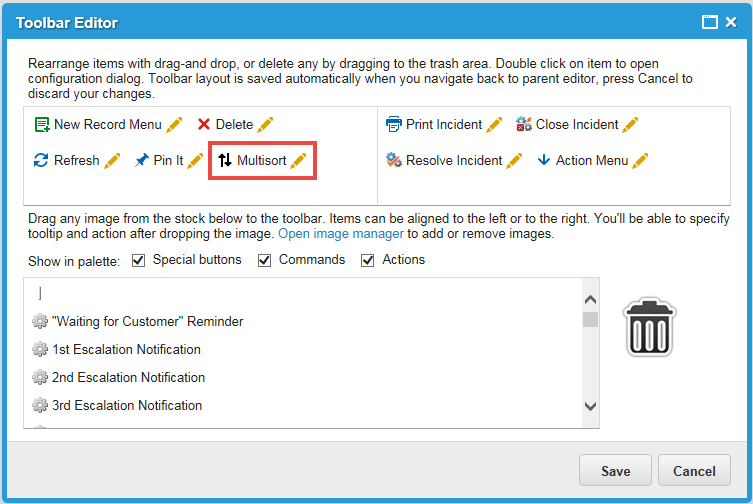
7.In the Toolbar Editor, scroll down to the Multisort icon. Drag it onto the toolbar.
Drag Multisort
8.In the Toolbar Editor, click Save.
9.To verify that the workspace for your business object (this example uses the Incident business object) displays the Multisort icon, do the following:
| a. | Return to the Service Desk Console. |
| b. | Open the Incident workspace and verify that the Multisort icon displays.You may need to refresh the browser. |
Using the Multisort Feature with a Keyboard Shortcut
You can use a keyboard shortcut to invoke the multisort feature by doing the following:
1.Log in to the Service Desk Console.
2.Open the workspace for which to group records.
3.Click the first column header to sort. This sets the first column to be sorted.
4.Press the Control key and click the second column header to sort. This sets the second column to be sorted.
5.Set additional columns for sorting by repeatedly pressing the Control key and clicking on headers.
You can click the first column header with or without pressing the Control key. It always results in a single column sort. However, you must press the Control key to perform a second level sort criteria; otherwise, it performs a single column sort again.
Grouping Records by Column Header
You cannot group records in columns that have text fields with an unlimited number of characters allowed.
You can group records by their column header and then drill down to view the count of records within the selected group.
1.Log in to the Service Desk Console.
2.Open a workspace.
3.Click the down arrow next to the column header of the group to sort on. For example, click the gray arrow next to the Customer column.
4.Select Group By This Field.
Group By This Field

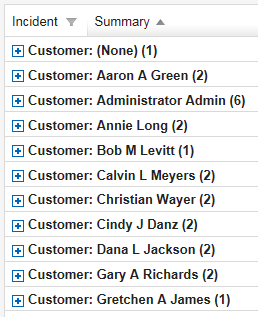
In this example, all the records are grouped by customer and a count indicates the number of records for each state.
Customer Records
5.Click any of the status rows to view details of each record in that state.
6.To ungroup records, deselect Show in Groups.
Filtering Data and Records in Lists
Filtering data allows you to display records that meet your filter criteria and hide the records that you do not want to view.
•Filtering List Records for a Non-Validated List
•Filtering List Records for a Validated List
•Filtering List Records by Date
Filtering List Records for a Non-Validated List
A non-validated list is a list that is not prepopulated. For example, a column that holds text (such as the Summary field) is not a validated list because you can enter anything, and do not select from a list of items.
1.Log in to the Service Desk Console.
2.Open a workspace.
3.From the list to filter, click the options icon  on the column header.
4.Hover over Filters. The system displays a text field. By default, the system does not filter any of the records until you enter a value.
Filtering a Non-Validated List

5.Enter text in the filter box to filter by that text string. The system compares the text against the contents of the corresponding fields for each record in the list.
Filtering List Records for a Validated List
A validated list is a list that is prepopulated and that you select options from. For example, the Priority column holds priority values of 1, 2, 3, 4, 5, and 6. You can only select a priority from the list and you cannot enter a different value.
1.Log in to the Service Desk Console.
2.Open a workspace.
3.From the list to filter, click the options icon on the column header.
4.Hover over Filters. If there are fewer than 500 values, the system displays a checkbox for each value. If there are more than 500 values, you must manually enter in the values to check. By default, the system does not filter any of the records until you check an item or enter a value.
Filtering a Validated List

5.Check the values to filter on.
For example, to filter the status to show only resolved and closed items, click the options icon in the Status column, click Filters, then check resolved and closed.
Filtering List Records by Date
You can show only those items that were created or modified on a certain date or within a date range. This feature works only on date fields.
1.Log in to the Service Desk Console.
2.Open a workspace.
3.From the list to filter, click the options icon on the column header.
4.Hover over Filters and the date options appear.
Date Options
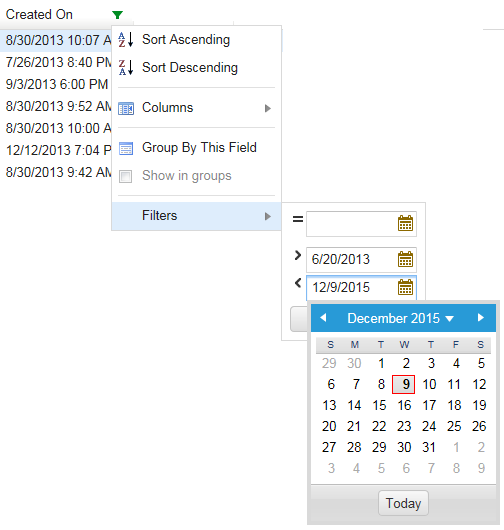
5.Click the calendar icon next to the appropriate search criteria.
•To find records matching an exact date, use the equals (=) box.
•To find records after a specific date, use the greater than (>) box.
•To find records before a specific date, use the less than (<) box.
•To find records within a date range, enter a start date in the greater than (>) box and an end date in the less than (<) box.
The records defined by the filter appear and there is a green filter indicator arrow in the column heading.
Filter Indicator

6.Click anywhere on the screen to dismiss the window.
7.To remove the date filter, click Reset at the bottom of the filter box.
Hiding Columns in a List
In most cases, all columns appear on a list by default. To focus on the information you need, you can hide any columns that show information you do not need. Columns remain hidden until you unhide them.
List information is provided by saved searches. The search always gathers and reports the full information, even though one or more columns are hidden.
In the list where you want to hide a column, do the following:
1.Click Filter icon  on any column header in the list.
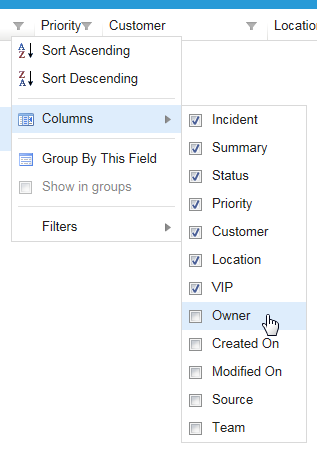
2.From the drop-down menu, choose Columns.
3.Uncheck the box by the column headeryou want to hide.
Unchecking Boxes to Hide Columns
See also Working with Lists.
Exporting the Contents of a List
You can export the contents of a list and save the contents as in the these file formats:
•Microsoft Excel 2007 and later (.xlsx)
•Microsoft Excel 2003 and earlier (.xls)
•Comma Separated Values (.csv)
•XML (.xml)
The Export to Excel quick action performs the export function. To obtain the desired results, you must choose the file format before you export a list.
For any field name that contains a space, the quick action removes the space when you export to XML.
Choosing the Export File Format
To choose export file format, do the following:
1.From the Service Desk Console, click Action Menu > Edit Actions to open the Actions Manager workspace. The list of business objects that have quick actions appears.
2.Under the Your Actions tab, expand the Form Actions menu and choose Export.
The system displays the Export to Microsoft Excel quick action.
3.Click Edit to start editing the quick action.
4.From the Export Format drop-down menu, select the export file format to use.
5.Click Save.
For each column header, you can export a field or a value expression, but not both.
Exporting to an External Connection
By default, the system exports data to your browser. However, if you have an external data connection, for example to a remote host, you can export to that connection.
To export to a remote host:
1.From the Service Desk Console, click Action Menu > Edit Actions to open the Actions Manager workspace. The list of business objects that have quick actions appears.
2.Under the Your Actions tab, expand the Form Actions menu and choose Export. The system opens the Export to Microsoft Excel quick action.
3.Click Edit to edit the quick action.
4.In the Advanced Option section, from the Export To drop-down list, select the remote host connection to use.
5.Click Save.
Exporting the List Contents
Before you export, choose the file format you want. See Choosing the Export File Format.
1.Within the workspace with the records to export, from the Action Menu choose Form Actions > Export.
2.In the Confirm dialog box, click Yes to export all the records or click No to export a single selected record.
3.In the File Download dialog box, click Save to save the exported file and then navigate to a download location. If you click Open, the .xlsx, .xls, and .csv files open in Microsoft Excel. The .xml files open in your default XML editor.
The file name indicates the date and time the file was exported. For example, Export2015_29_8_14_05_37.xml means that the file was exported at 2:05 PM, plus 37 seconds, on August 29, 2015.
About List Settings
•Resetting Personalizations in a List
Maintaining List Settings
If you change any of the list settings they remain constant even when you log out and log back in again.
These settings include:
•Column width (the pixel width of the column). The default is 100.
•Sort order for columns, either ascending or descending.
•Column order.
•Hidden or visible columns. Note that hidden columns are included in searches.
•Page size (the number of rows per page.)
•Grouping.
Resetting Personalizations in a List
You can click the reset icon at the bottom of the workspace to reset your changes. For example, if you made some changes to the column width and click the reset icon, the workspace returns to your original settings. Resetting personalizations includes changes to column width, column order, hidden columns, sorting, grouping, and rows per pages.
List Setting Priorities
Sorting settings set by users have a higher priority than the sort order set in a saved search. The multisort setting persists, even if you run a saved search. However, you can return to the sort order contained in the saved search.
1.Click Reset All User Personalization in the footer of the list to return to the sort order contained in the saved search. This feature also removes all personalization for the list.
Reset All User Personalization Button

2.Click Multisort in the toolbar above the list to open the multisort column picker.
3.Select a choice from the Sort by drop-down list.
4.Click Sort to run your sort.
Multisort Column Picker
Was this article useful?
The topic was:
Inaccurate
Incomplete
Not what I expected
Other
Copyright © 2017, Ivanti. All rights reserved.