Service Manager powered by HEAT
Using the ISM Development Project
•About Using the ISM Development Project
•Cautions About the ISM Development Project
•About the ISM Development Project
•Using the ISM Development Project to Create a Data Package
•Example: Migrating Request Offering Changes
About Using the ISM Development Project
Prior to Ivanti Service Manager HEAT Release 2014, the only way that you could migrate data from one instance of a tenant to another was by using the Ivanti Service Manager HEAT Operations Console. Starting in 2014, you can use the HEAT/Ivanti Service Manager development project to easily migrate data.
Use the Ivanti Service Manager development project feature to create packages to migrate data from one instance of a tenant (such as staging) to another instance of a tenant (such as UAT). You can also migrate data from one system to another. Using packages, you can pick and choose which data to migrate instead of migrating the entire system.
This feature allows Ivanti Service Manager to maintain a history of changes in metadata, validation data, configuration settings, and a few specific master data business objects. It also allows you to package a unit of integral changes into a package for migration to another tenant instance. If you have the Ivanti Service Manager Operations Console deployed in your environment, we highly recommend that you perform the migration there, between staging, UAT, and production, instead of using the package import feature described later in this topic.
Refer to the Operations Console Guide for Ivanti Service Manager for additional information on this feature.
Cautions About the ISM Development Project
This feature gives you the ability to update the production instance of your tenant with configuration changes made in the staging instance of the tenant. If these changes conflict in some way with your system, they cannot be undone.
Occasionally, migrating data using the Ivanti Service Manager development project can take a long time and cause the system to time out. The amount of time it takes to push a package depends on the number of transactions in the package, the amount of data in the tables, the number of indexes that are rebuilt, and more. In general, a package under 5 MB takes less than 5 minutes to complete and a 20 MB package may take around 20 minutes. If your package is larger than 20 MB, we recommend that you split it up into smaller packages to ensure that each smaller package completes the migration process and does not cause the system to time out.
We recommend that you plan and prepare for moving a package as described in this section. We strongly encourage you to make a complete backup of the target tenant instance and to create a procedure for restoring the backup if need be:
•If there is a problem with the UAT instance of your tenant, you can restore it from the production instance of your tenant using the Ivanti Service Manager Operations Console, by refreshing the UAT instance of your tenant.
•If there is a problem with the production instance of your tenant, you need to restore the production instance of the tenant from the backup as quickly as possible using Microsoft SQL tools, as any transactions that are created in the production instance of the tenant after a backup and before a restore will be lost.
Before you enable and use the Ivanti Service Manager development project, check with Ivanti Support at: https://www.ivanti.com/support/contact.
About the ISM Development Project
•About Using Your Named Account to Log In
•About the Metadata Read Only Mode Message
Limitations
•The Ivanti Service Manager development project has not yet provided a way to validate package dependency. You need to ensure that if you make a change that depends on another change, you migrate both changes.
•Before handing out a package for migration, determine whether the package is complete and self-contained. The package should contain all dependent changes. Not having all the required changes in the package may cause the system to fail when you migrate the package and you may have to restore the target system from the back-up system.
•You cannot use the Ivanti Service Manager development project and Simple Mode at the same time. To use Simple Mode, you must disable the Ivanti Service Manager development project.
•You cannot use the Ivanti Service Manager development project to migrate certain types of data. For a list of the data that cannot be migrated, see the Operations Console Guide for Ivanti Service Manager for additional information on this feature.
Terminology
The Ivanti Service Manager development project feature uses the following terms:
•Transaction: An individual change to the database.
•Transaction set: A group of transactions.
•Project: A group of transaction sets.
•Package: Contains the transaction sets from multiple projects.
•Aspect: Information about a feature, a component, a patch, or even a configuration. An aspect presence indicates the presence of the feature.
About Using Your Named Account to Log In
The first time that you log into the Ivanti Service Manager system as an administrator, the system displays a message stating that you are logging in as an administrator. This is not suitable for making configuration changes. If you make configuration changes while logged in as an administrator, you may not be able to package the changes properly.
We recommend that you no longer use a generic administrator account when you are in the Configuration Console. With the Ivanti Service Manager development project, the system tracks all the changes made and attributes them to the user who made the changes. If all users log in using the generic administrator account, there is no way to know who made the changes.
If you log into the system using the generic administrator account, the system displays a warning message. If you see this message, click OK and then log out as an administrator and log back in using your named account.
About the Metadata Read Only Mode Message
When you use the Ivanti Service Manager Operations Console to migrate data, the production and UAT instances of the tenant are always in metadata read-only mode, which is equivalent to being locked, and the system displays a message stating that the Configuration Console is in production metadata read-only mode. When the system is locked, you cannot make changes to most types of metadata in the Configuration Console. (You can only make changes to the following four items: saved searches, reports, quick actions, and dashboards.) While migrating data, the system temporarily unlocks the metadata on the target system.
For Ivanti Service Manager Cloud customers: To unlock the system, create a service request with HEAT Software, who can unlock the data temporarily.
For Ivanti Service Manager on-premise customers: To unlock the system, use the Ivanti Service Manager Operations Console. See the Operations Console Guide for Ivanti Service Manager for information on doing this.
About Data Validation
When you export and import packages between tenant instances or different systems, it is possible that the target environment may not match the source environment. For example, if the source environment includes a form called "Incident 1" and the target environment also has a form called "Incident 1", the migration process overwrites the source form with the target form. This could cause problems if the forms were used for different purposes.
In earlier releases, Ivanti Service Manager implemented basic metadata validation before importing projects, such as checking the database schema and some business objects. In Ivanti Service Manager Release 2015.2, we extend the validation to include additional business objects such as forms, lists, layouts, quick actions, business rules, searches, indexes, counters, and pick lists.
In this release, in addition to checking metadata, we also check configuration data (also known as settings, which include things such as roles, workflows, and dashboards definitions) and some constraints.
This internal validation is done in memory. The system applies the package to the target environment, but does not apply the changes to the database. The changes are kept in memory and the system reviews the output. The system displays warnings and errors so that you can see potential problems before importing the package. You can only import the package if the validation returns no errors, although you can still import the package with warnings. Note that when you apply the package, there could still be validation errors even if the system does not show them. These errors could come from the actual data in the database, from database connectivity, from database size, and so on.
About Logs
The frs_ops_change_log business object stores historical changes in XML format for all metadata and settings, and for some data such as request offerings and authentication provider data. You can view the list of changes in the Transaction Details workspace.
The frs_ops_metadata_history business object has been deprecated, but remains a part of Ivanti Service Manager, as its data is still used in some workspaces. It stores historical metadata changes in JSON format. However, it does not contain the complete historical changes for all metadata.
You can archive the frs_ops_metadata_history business object and delete the data. Once you do that, you will not see the change history of the deleted data.
You can also archive and delete the frs_ops_change_log business object, but only if you will not use these changes in the packages. Once you do that, you cannot package or export the changes of the deleted table.
See Archiving and Deleting Log Data from the Ivanti Service Manager Databases for more information about archiving data.
Using the ISM Development Project to Create a Data Package
Follow these steps to use the Ivanti Service Manager development project:
•Create a project. See Creating a Project.
•Optional. View the project. See Viewing a Project.
•Make changes to the system. See Creating a Transaction Set.
•Optional. View the transaction sets. See Viewing Transaction Sets.
•Create a package. See Creating a Package.
•Optional. View the package. See Viewing a Package.
•Assign transaction sets to a package. See Assigning Transaction Sets to a Package.
•Add an aspect to a package. See Adding an Aspect to a Package.
•Map a package. See Adding Packages to a Master Package (Mapping).
•Close the package. See Closing a Package.
•Optional. Export a package to another system. See About Exporting a Package.
•Optional. Import a package from another system. See Importing a Package. If you get errors, see Troubleshooting Package Import Errors.
•Optional. Save the package as a file. See Saving a Package as a File.
•Optional. Delete a package. See Deleting a Package.
After performing all of these steps, you can migrate the data to the target system.
For information about the packages that have been migrated, see the Viewing the Patch Log.
Creating a Project
You must create a project before you make any configuration changes. If you do not make any projects, all changes are logged to the default project. Use projects to organize the changes made to Ivanti Service Manager . After you create a project and before you make any configuration changes, always select your project from the Project drop-down list on the top right.
Follow these steps, on the system (such as staging) on which to make changes, to create a project:
1.Log in to Ivanti Service Manager using your named account and not as an administrator. See About Using Your Named Account to Log In.
2.Click Configure Application to go to the Configuration Console.
3.Click Build > HEAT Development Project > Projects to display the Projects workspace.
4.Click New Record. The system displays a blank project page.
5.Enter a name and description for the project and click Save.
6.Click Refresh. You can now see the new project name under the Project drop-down menu in the top right section of the toolbar (next to the Help link).
Viewing a Project
1.From the Configuration Console, click Build > HEAT Development Project > Projects to display the Projects workspace. The system displays a list of all the projects.
2.Double click a project name to see details of the project.
3.Click the Transaction Set tab to see a list of the transaction sets in this project. See Viewing Transaction Sets.
4.Click the Transaction Detail tab to see the details of each transaction set. See Viewing Transaction Sets.
5.View the activity history by clicking the Activity History tab, any attachments by clicking the Attachment tab, or the audit history by clicking the Audit History tab.
Creating a Transaction Set
Every time you add, delete, or modify the Ivanti Service Manager configuration, the system records the changes. These recorded changes are called a transaction set. For example, every time that you save changes for a business object, the system records the changes in a transaction set. The system tracks every change and assigns each change a sequential number.
1.From the Configuration Console, click Build > HEAT Development Project > Projects to display the Projects workspace. The system displays a list of all the projects.
2.From the Project drop-down menu in the toolbar, select the project to which the changes you are going to make will belong.
3.Make changes to Ivanti Service Manager as normal. For example, you can create a new business object, form, or list.
In certain cases, when you make changes to Ivanti Service Manager, you must enter your user name and password. When you create and later export the transaction set as part of a package, the package file exposes the user name and password.
To avoid exposing this potentially sensitive information, we recommend that when setting the user name and password for an integration connection, instead of entering a value, you use a global constant. See Using Global Constants to Hide Login ID and Password Information for information. See Viewing, Editing, Cloning, and Deleting Incoming Web Service Connections for an example of using a global constant in this situation.
If you do not use a global constant for the user name and password, the system removes that information from the transaction set.
Viewing Transaction Sets
From the Transaction Sets page, you can view the relevant changes that are linked to a transaction set. You can search by transaction set ID. Use the transaction set ID when creating a package.
1.From the Configuration Console, click Build > HEAT Development Project > Transaction Sets to open the Transaction Sets workspace. The system displays a list of all the transaction sets.
The system displays the following information:
| Field | Description |
|---|---|
| ID | The ID for this transaction set. |
| Created On | The date when the transaction set was created. |
| User ID | The ID of the user who created the transaction set. |
| Session ID | The ID of the session when the transaction set was created. |
| DB Revision | The database revision. |
| Source | Specifies where the transaction was made. AdminUI means that the change was made in the Configuration Console, and a tenant URL means that the change was made from a package migration. |
| Project Name | The name of the Ivanti Service Manager development project to which this transaction set is attached. |
2.Double click a transaction set and click the Transaction Detail tab to see the following information:
| Field | Description |
|---|---|
| Project Name | The name of the Ivanti Service Manager development project to which this transaction set is attached. |
| Transaction Set ID | A sequential number linked to the change. A transaction set may contain zero or more changes. (A zero change indicates the change was aborted, and was not recorded.) |
| Detail ID | A sequential number linked to the change. A detail may contain zero or more changes. (A zero change indicates the change was aborted, and was not recorded.) |
| User ID | The ID of the user who created the transaction set. |
| Operation Date Time | The date and time when the change was recorded. |
| Operation Type | The type of operation. Can be C for new record, U for modification, or D for deleted. |
| Object Type | The type for which the change applies. The values can be BusinessObject for a business object change, Form for a form change, or a business object name such as AccountStatus# for change in its data, etc. |
| Business Object | The name of the business object to which the change is linked, if any. |
| Entity Name | The key for the business object record itself. In some cases, it is the GUID and in other case, it is a name, such as a business object name, a form name, or a role name. |
| Source ID | The key for the business object record itself. In some cases, it is the GUID and in other case, it is a name, such as a business object name, a form name, or a role name. |
| To Publish |
Specifies if this transaction set can be published: Y: The change is packaged. N: This change is a side effect of another change that is published. |
Creating a Package
Follow these steps, on the system (such as staging) on which you have made changes, to create a package:
1.From the Configuration Console, click Build > HEAT Development Package > Packages to open the Packages workspace.
2.Click New Record. The system displays a blank package page.
3.Enter a descriptive name for the package. The name must be unique across the system.
4.From the Type drop-down list, select if this is an incremental or master package. You cannot edit the type after you save create the package.
•An incremental package is a single change. It can contain a set of metadata changes and can be imported and exported. There are two types of incremental packages: the first type is exported from the tracked changes in the data and metadata. Every data and metadata change is tracked with a sequence number, which specified the import order. The second type is a result of comparing the full metadata from two tenant instances (such as UAT and staging). There is no sequence associated with these changes. This content comes from the traditional Ivanti Service Manager Operations Console migration.
•A master package contains one or more incremental, master, or file packages. The packages in the master package are called sub-packages. For example, you may want to create a master package with several incremental packages (sub-packages) in it.
5.In Ivanti Service Manager Release 2016.x, the Predicate field is for internal use only. Do not enter anything here.
6.Enter a description.
7.Click Save.
8.Click Refresh to see the Close Package, Save As File, and Export Package icons on the top and the tabs at the bottom.
Viewing a Package
1.From the Configuration Console, click Build > HEAT Development Package > Packages to open the Packages workspace. The system lists the Ivanti Service Manager development packages.
2.Double click a package to view its details.
The system displays the following tabs:
•Transaction Set tab (for incremental packages only). See Viewing Transaction Sets.
•Transaction Detail tab (for incremental packages only). See Viewing Transaction Sets.
•Package Mapping tab (for master packages only). See Adding Packages to a Master Package (Mapping).
•Package Aspect tab. See Adding an Aspect to a Package.
•Activity History tab. See About Activity History.
•Attachment tab. See Adding an Attachment.
•Audit History tab. See About Accessing the Audit History.
Assigning Transaction Sets to a Package
You must create an incremental type package before you can assign transaction sets to it. See Creating a Package.
Follow these steps, on the system (such as staging) on which you have made changes, to assign transaction sets to a package:
1.From the Configuration Console, click Build > HEAT Development Project > Transaction Sets to open the Transaction Sets workspace.
2.Select the transaction sets to include in the package.
3.Click Assign To Package.
4.Use the drop-down menu to select the name of the package to which to assign the transaction sets and click OK.
You can also assign a transaction set to a package by clicking Build > HEAT Development Package > Packages to open the Packages workspace, clicking the Transaction Set tab, and clicking Add Change Set.
5.To check that the transaction sets are in the package, do the following:
| a. | Click Build > HEAT Development Package > Packages. The system displays the Packages workspace. |
| b. | Open the package. (If you do not see it, click Refresh.) The system opens the package. |
| c. | Click the Transaction Set tab to view all of the transaction sets. |
6.To remove a transaction set from a package, do the following:
| a. | Click Build > HEAT Development Package > Packages. The system displays the Packages workspace. |
| b. | Open the package. (If you do not see it, click Refresh.) The system opens the package. |
| c. | Click the Transaction Set tab to view all of the transaction sets. |
| d. | Highlight the transaction set. |
| e. | Click Remove From Package. |
7.To add a transaction set to another package, do the following:
| a. | Click Build > HEAT Development Package > Packages. The system displays the Packages workspace. |
| b. | Open the package. (If you do not see it, click Refresh.) The system opens the package. |
| c. | Click the Transaction Set tab to view all of the transaction sets. |
| d. | Highlight the transaction set to add to the package. |
| e. | Click Assign To Package. |
| f. | Select a package name from the drop-down list and click OK. |
Adding an Aspect to a Package
You can only add aspects to a package if it is open. When you created the package, the system copied the aspects from the original package. You can remove the original aspects and add new ones.
1.From the Configuration Console, click Build > HEAT Development Project > Transaction Sets to open the Transaction Sets workspace.
2.Assign one or more transaction sets to a package.
3.Click the Package Aspect tab.
A package can have zero or more aspects. When the package is imported into target tenant instance, these aspects are entered into or removed from the target tenant instance to flag the aspect presence.
4.View the following information on the Package Aspect tab:
| Field | Description |
|---|---|
| To Uninstall | Specifies if the aspect should be removed. |
| Version | Numeric whole number for this aspect version. The version number for an aspect grows in its development life. |
| ID | A unique name for the aspect. |
| Vendor Name | The name of the vendor who provides the aspect. An example is Ivanti. |
| Vendor ID | A unique ID that identifies the aspect provider. Currently, the system uses "HEATsoftware" for aspects provided by Ivanti. In future releases, other providers will have a unique vendor ID. |
| Created By | The ID of the administrator who added the aspect. |
| Created On | The date and time when the aspect was created. |
| Modified By | The ID of the administrator who modified the aspect. |
| Modified On | The date and time when the aspect was modified. |
5.Click New Package Aspect. The system displays the New Package Aspect dialog box.
6.Check Is Uninstalled if this package aspect is uninstalled.
7.Enter the following information:
•Version number: Any number.
•ID: Any text.
•Vendor ID: Any text.
8.Click Save.
Adding Packages to a Master Package (Mapping)
If you have a master package, you can add incremental or other master packages to it. In this way, the master package contains many changes. This eliminates the need to export incremental packages one at a time.
1.From the Configuration Console, click Build > HEAT Development Package > Packages to open the Packages workspace.
2.Open a master package.
3.Click the Package Mapping tab.
4.Click Assign Package. The system displays the New Master Package Mapping form.
5.In the Sub Package field, click the search icon to display a list of packages that can be mapped.
6.Select a sub-package and click Use Selected HEAT Release Package.
7.Enter a value into the Relative Order field. This determines the relative order of this sub-package compared to other sub-packages in the master package. The system applies the sub-packages to the tenant in this order (when you export and import the package).
8.Click Save.
9.Repeat steps 4 through 8 to add additional sub-packages to the master package.
Closing a Package
You must close a package before you can use the Ivanti Service Manager Operations Console to migrate it from staging to production. Closing a package means that you cannot do any more work on it, such as adding or removing packages, adding or removing predicates, changing aspects, and so on. You do not have to close a package to export it.
We recommend that you only close a package after you have completed testing on it and you are ready to migrate it from either staging or UAT to production. After you close a package, you cannot reopen it.
When a package is closed, the system does not display the Add Change Set and Remove From Package buttons on the Transaction Set tab, nor does it display the New Package Aspect and Delete buttons on the Package Aspect tab.
Follow these steps to close a package.
1.From the Configuration Console, click Build > HEAT Development Package > Packages to open the Packages workspace.
2.Highlight the name of the package to close.
3.Click Close Package.
4.At the confirmation prompt, click OK.
About Exporting a Package
You can export a package of any type as an XML file and send it to another system, even if the package is empty. You can export any open or closed package. You can use any text editor to view the exported package.
About Compacting Export Data
Compacting export data is a beta feature. Use it with caution.
Starting in Ivanti Service Manager Release 2016.1, you can compact the transaction sets for a package when you export it. If you make multiple changes to one business object consecutively, compacting combines the individual changes into one compact change. When you import the package, the system only implements the one compacted change instead of the individual changes, which speeds up the process of importing a package.
For example, if you changed a quick action 12 times consecutively, then without compacting, the package would have 12 transaction sets. With compacting, there is only one transaction set.
There are a few caveats to this:
•The system only compacts changes to metadata.
•The system does not combine creating a business object and changing a business object into one compact package. The system only compacts changes to a business object and in this instance, changing a business object does not include creating it.
•The system only compacts changes to the same business object of the same metadata type. If you change two business objects, the system does not compact these two changes together.
Exporting a Package
1.From the Configuration Console, click Build > HEAT Development Package > Packages to open the Packages workspace.
2.Highlight the name of the package to export.
3.Click Export Package. The system gives you the option of compacting the transaction sets. This is a beta feature.
4.Click Yes to compact the export data or No to not compact the export data. The system exports the package.
Importing a Package
You should never import a package into the production environment from the Configuration Console when you have the Ivanti Service Manager Operations Console in place, as doing so could cause system instability.
We highly recommend that you always back up your database before importing a package.
Importing a package is an irreversible operation and cannot be undone.
You can import a package that has been previously exported. For master packages, the system imports the subpackages in the given relative order. The system imports the package if its predicate evaluates to true. If the predicate evaluates to false or an error, the system does not import the package or its subpackages. After importing the package, the system uses the package aspects to update the tenant.
Starting in Ivanti Service Manager Release 2016.1, the system scans the import package and assigns one of three impact levels (high, medium, and low) to each package.
| Impact Level | Definition |
|---|---|
| High |
Contains a database schema change. Deletes a business object. Updates a stored property for a field of a business object. Updates the IsLocalized property for a field of a business object. Updates the data type, length, or precision for a field of a business object. Updates a unique property for a field of a business object. Updates a nullable property for a field of a business object. Changes the index. Changes the full-text search index. Adds or deletes an audit field. |
| Medium |
Contains changes to the metadata for a business object. Adds a business object. Changes the metadata of a business object, other than the changes described above. Changes or overrides a business rule. Changes or deletes a form, list, layout, quick action, pick list definition, dashboard, chart part, list part, or special part. Changes or deletes a role. Changes or deletes branding. Changes a workflow, counter, view part, global constant, request offering, or report. Changes the email configuration. Changes integration settings. Changes the LDAP configuration or authentication provider. Changes the password policy. Changes an escalation schedule. |
| Low |
Does not contain a database schema change or changes to the metadata for a business object, or anything listed above. Adds a form, list, layout, quick action, pick list definition, dashboard, chart part, list part, special part. Add a role. Adds branding. |
Unlike in previous releases, starting in Ivanti Service Manager Release 2016.1, you can sometimes import a package even when the system is in metadata read-only mode.
When the system is in metadata read-only mode, note the following:
•For high impact packages, you can only validate the import package. You cannot import the package.
•For medium impact packages, you can validate and import the package, but there may be risks with importing the package. We highly recommend that you back up the database first.
•For low impact packages, you can validate and import the package. We highly recommend that you back up the database first.
Follow these steps to import a package:
1.From the Configuration Console, click Build > HEAT Development Package > Packages to open the Packages workspace.
2.Click Import Package.
3.Click Browse... to navigate to the import package.
4.Highlight the file and click Open. The system displays a dialog box that lists the file name of the import package.
5.Check Show Detail to see the details of the changes in the import package and then click Preview Impact to scan the complexity of the import package. Depending on the impact of the import package, the system displays a screen that lists the details of the import package impact.
If you do not check Show Detail, the system only displays the first high or medium level change in the package.
6.Click Close. The system displays the Import Package dialog box stating that you should back up the database before importing the package, and that this action is irreversible.
7.Do one of the following:
•Select Validate to check the integrity of the package without applying it. If there are any errors, you can go back and fix them before importing the package.
•Select Validate and apply if no errors to import the package only if there are no errors. Note that the system may import the package even if there are errors on the application side. The system displays a message stating if there are any errors and where they are, either on the application side or on the validation side.
•Select Apply without validation. We do not recommend this option. With this option, you assume all responsibility to correct any errors after the import. This imports the package even if there are errors. You should always validate the package and understand the errors first, and then select this option only if you agree to ignore the errors.
8.Click Execute
9.At the confirmation prompt, click Yes. The system starts the import process.
If the package contains many changes, the import process can take a long time. Your system may time out or you may accidentally get disconnected from the system due to loss of wifi or VPN. If this happens, log in again. The system continues to import the package and display the importing message. However, the system may not dismiss the importing message, even after the import process has finished. In this case, click Cancel or Refresh to dismiss it.
The system displays a message about the success or failure of the import, including specifying if there are any warnings or errors.
If there are any errors, you cannot import the package. If you do not understand the impact of the errors, we recommend that you restore your database back to the production environment, as the error may disrupt your production operation. See Troubleshooting Package Import Errors or contact Ivanti Software Inc. for further information about the errors.
10.Click Close.
11.To view the imported package, do the following:
| a. | Click Build > HEAT Development Project > Projects to open the Projects workspace. |
| b. | Under the Name column, double-click the project that you just imported, to open it. |
Troubleshooting Package Import Errors
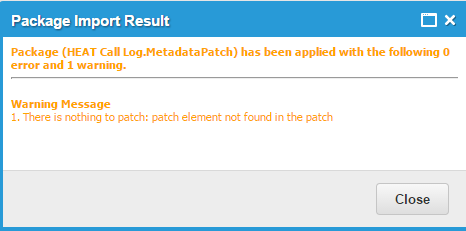
If you get any errors while importing a package, the package import fails. You must correct the errors before importing the package. If you get any warnings, the import continues; however, we strongly recommend that you correct the warnings before importing the package.
The system displays warnings in orange text and errors in red text.
Import Warning Example
Try the following for troubleshooting import package warnings and errors:
•If the error message references a sequence number, open the package in a text editor such as Notepad and look for that sequence number. Examine the package for information.
•From the Configuration Console, click Build > HEAT Development Project > Transaction Sets to open the Transaction Set workspace. Open the transaction set associated with the warning or error. Examine the transaction set for information.
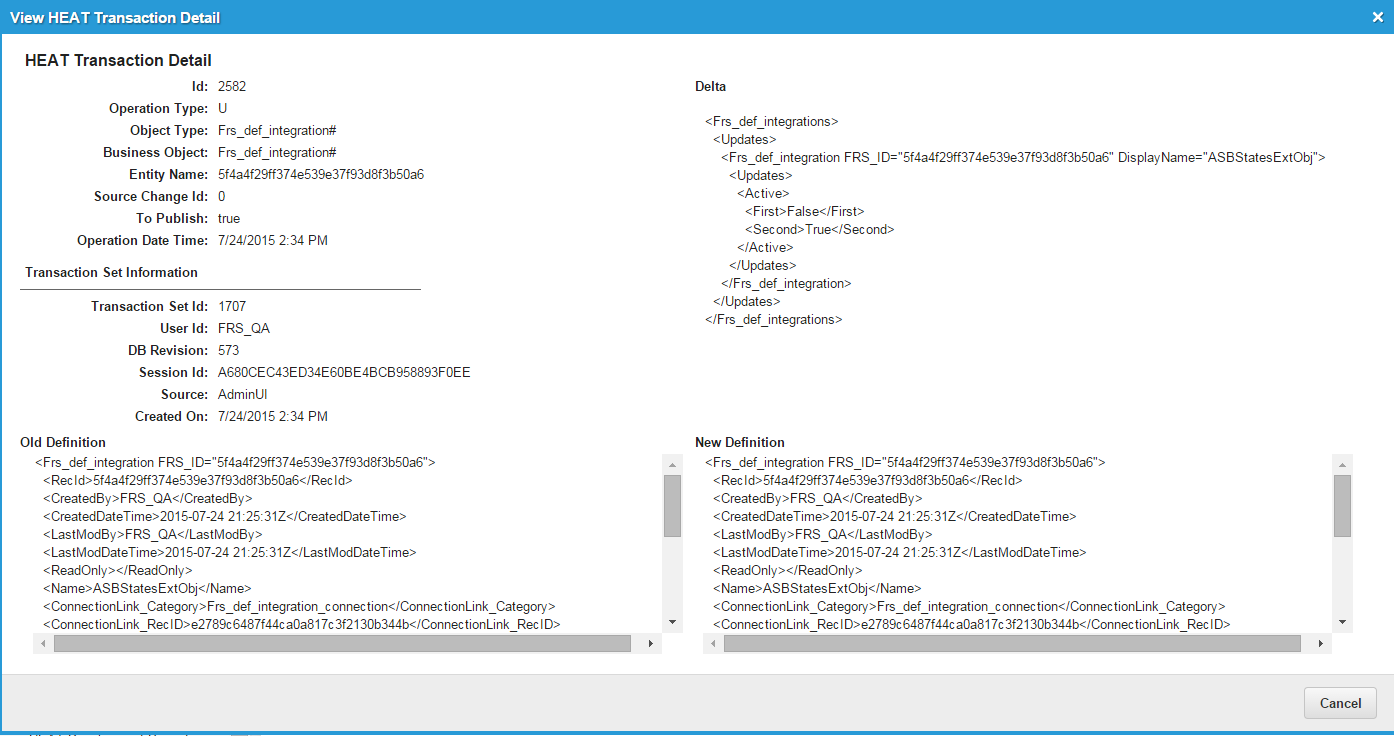
View HEAT Transaction Detail
Saving a Package as a File
You can save an incremental or master package as a file (but you cannot save a package as a file if it is already a file) so that you can have a record of it at a certain time. This is similar to versioning the package. You can export or import packages saved as files. All aspects in the package are copied to the file, but you can edit them after they are copied to the file.
Follow these steps to save a package as a file:
1.From the Configuration Console, click Build > HEAT Development Package > Packages to open the Packages workspace.
2.Highlight the name of the package to save.
3.Click Save As File.
4.Enter a new name or description, or leave the default values.
5.Click Save. The system saves the package as a file.
6.Click Refresh to see the new file in the file list.
Deleting a Package
You can only delete a package if it is open and if it is not being used by another package.
1.From the Configuration Console, click Build > HEAT Development Package > Package to open the Packages workspace.
2.Highlight the name of the package to delete.
3.Click the delete icon  .
.
Migrating a Data Package
How you migrate a data package depends on your deployment type.
•For on-premise users: See the Operations Console Guide for Ivanti Service Manager for information about migrating data.
•For Ivanti Service Manager Cloud users: To request a package be moved from the staging instance of the tenant to the UAT instance of the tenant or from the UAT instance of the tenant to the production instance of the tenant, contact Ivanti. Refer to the process described in the Customer Data Migration Guide for HEAT Service Management.
Example: Migrating Request Offering Changes
This example describes how to make a change to a request offering in the staging instance of a tenant and then migrate the change to the production instance of the tenant.
•Packaging the Changes Using Ivanti
•Migrating the Data from the Staging Instance to the UAT Instance
•Making Changes to the Request Offering in the Configuration Console
•Migrating the Data from the Staging Instance to the Production Instance
•Migrating the Service Request Data from the UAT Instance to the Production Instance
About this Migration
Ivanti Service Manager does not have a system for tracking request offerings, so to migrate a request offering from one environment to another, you must create and apply a package and also do a master data push using the Ivanti Service Manager Operations Console. Creating and applying a package alone does not migrate the request offering change.
Before You Begin
Before you begin, use the Ivanti Service Manager Operations Console to refresh the staging instance of the tenant from the production instance of the tenant. This ensures that you have the same baseline in both environments before you make the change.
Packaging the Changes Using Ivanti
When you make changes to request offerings, Ivanti Service Manager tracks the changes made to the request offering and associated workflows and quick actions, but does not track the changes made to some related content. Ivanti Service Manager does not record changes for the organizational unit, configuration item service, location, or request offering links to organizational units, configuration item services, or locations. This can cause confusion when you move changes from one system to another.
The changes that the system records may differ depending on if you are logged in as an administrator or as another role when you make the changes.
•If you make the changes as a service owner, you cannot select the project to apply the changes to. Therefore, all changes are added to the default project.
•If you make the changes as an administrator, you can select the project to apply the changes to. Before you make the changes to the request offering, we recommend that you create a new project and apply the changes to that project. See Creating a Project.
1.(Optional. For administrators only.) Go to the Configuration Console, create a project, and then select it.
2.Make the changes to the request offering. The system tracks the changes to the workflows and quick actions associated with the request offering.
3.Create a package with the transaction sets associated with the changes that you made to the request offering. Ensure that the package contains all of the changes made to the system since you made the baseline, as described in Before You Begin, regardless of if they are related to your project.
Migrating the Data from the Staging Instance to the UAT Instance
1.Log into the Ivanti Service Manager Operations Console.
2.Refresh the UAT instance of the tenant from the production instance of the tenant.
3.From the Tenants tab, find the instance to migrate and click Manage Migration.
4.At the top of the page, click Enable to enable the package migration feature. At the confirmation message, click OK.
5.In the arrow going from the staging instance of the tenant to the UAT instance of the tenant, click Apply Package.
6.Do the following:
•In the Source Package field, select the package to migrate.
•Check Skip Target Tenant Backup.
•Select Apply without validation. This allows you to apply the package even if there are errors. You may need to fix the errors after the change is applied, if you do not want to restore the database and fix the root cause.
•Click Execute.
The system migrates the package.
7.In the arrow going from the staging instance of the tenant to the UAT instance of the tenant, click Push.
8.Do the following:
•In the Operation field, select Copy Master Data Only.
•Check Delete data items in uat that do not exist in staging.
•Check Service request.
•Click Execute.
The system migrates all of the service requests.
Making Changes to the Request Offering in the Configuration Console
If the target tenant instance does not have an equivalent request offering, (for example, if you are importing a package from the Ivanti App Store or a package from another system), you must manually link the configuration item service, organizational unit, and location.
1.Log in to the application on the UAT instance of the tenant.
2.Open the Request Offering workspace.
3.Find and open the existing request offering.
4.On the 1. Define request offering page, for the Service field, select the configuration item service associated with this request offering. Note that in many cases, the configuration item service is represented by a GUID and not by its name in the drop-down list. Be sure to select the correct configuration item service.
5.Click Next twice until you reach the 4. Publish Action Access page.
6.Click Add to add a new organizational unit and location. The system displays a new line.
7.Click Any under the Team header and select the organizational unit associated with this request offering. Click OK. Note that in many cases, the organizational unit is represented by a GUID and not by its name in the drop-down list. Be sure to select the correct organizational unit.
8.Click Any under the Location header and select the location associated with this request offering. Click OK. Note that in many cases, the location is represented by a GUID and not by its name in the drop-down list. Be sure to select the correct location.
9.Click Save & Exit.
Testing the Change
1.Log into the UAT instance of the tenant and test the changes.
2.If anything is wrong, perform the procedures in both Packaging the Changes Using Ivanti and Migrating the Data from the Staging Instance to the UAT Instance.
3.When you are finished testing the change and are satisfied with the results, go back to the staging instance of the tenant and close the package. This ensures that no further changes in the system are added to the package.
Migrating the Data from the Staging Instance to the Production Instance
1.Log into the Ivanti Service Manager Operations Console.
2.From the Tenants tab, find the instance to migrate and click Manage Migration.
3.At the top of the page, click Enable to enable the package migration feature. At the confirmation message, click OK.
4.In the arrow going from the staging instance of the tenant to the production instance of the tenant, click Apply Package.
5.Do the following:
•In the Source Package field, select the package to migrate.
•Ensure that Skip Target Tenant Backup is not checked.
•Select Apply without validation. This allows you to apply the package even if there are errors. You may need to fix the errors after the change is applied, if you do not want to restore the database and fix the root cause.
•Click Execute.
The system migrates the package.
Migrating the Service Request Data from the UAT Instance to the Production Instance
You must publish the service request master data from the UAT instance of the tenant to the production instance of the tenant because the UAT instance has the tested service request data. (If you are sure that no changes were made to the staging instance of the tenant, you can push the service request data from there to the production instance of the tenant instead.)
1.Log into the Ivanti Service Manager Operations Console.
2.From the Tenants tab, find the instance to migrate and click Manage Migration.
3.In the arrow going from the UAT instance of the tenant to the production instance of the tenant, click Push.
If there is no Push link in the arrow, you must push the data from the staging instance to the UAT instance. In the Operation field, select No Op (Increase version only) and click Execute.
4.Do the following:
•In the Operation field, select Copy Master Data Only.
•In the Additional Data section, select any or all of Service (CI.Service), Organizational Unit (OrganizationalUnit), and Location (Location).
•Check Skip target tenant backup before operation.
•Check Delete data items in production that do not exist in uat.
•Click Execute.
The system migrates all of the service requests.
Was this article useful?
The topic was:
Inaccurate
Incomplete
Not what I expected
Other
Copyright © 2017, Ivanti. All rights reserved.