Service Manager powered by HEAT
Using Layouts
•Making Layouts Available to Users
•Assigning Layouts (Workspaces) to Roles
About Layouts
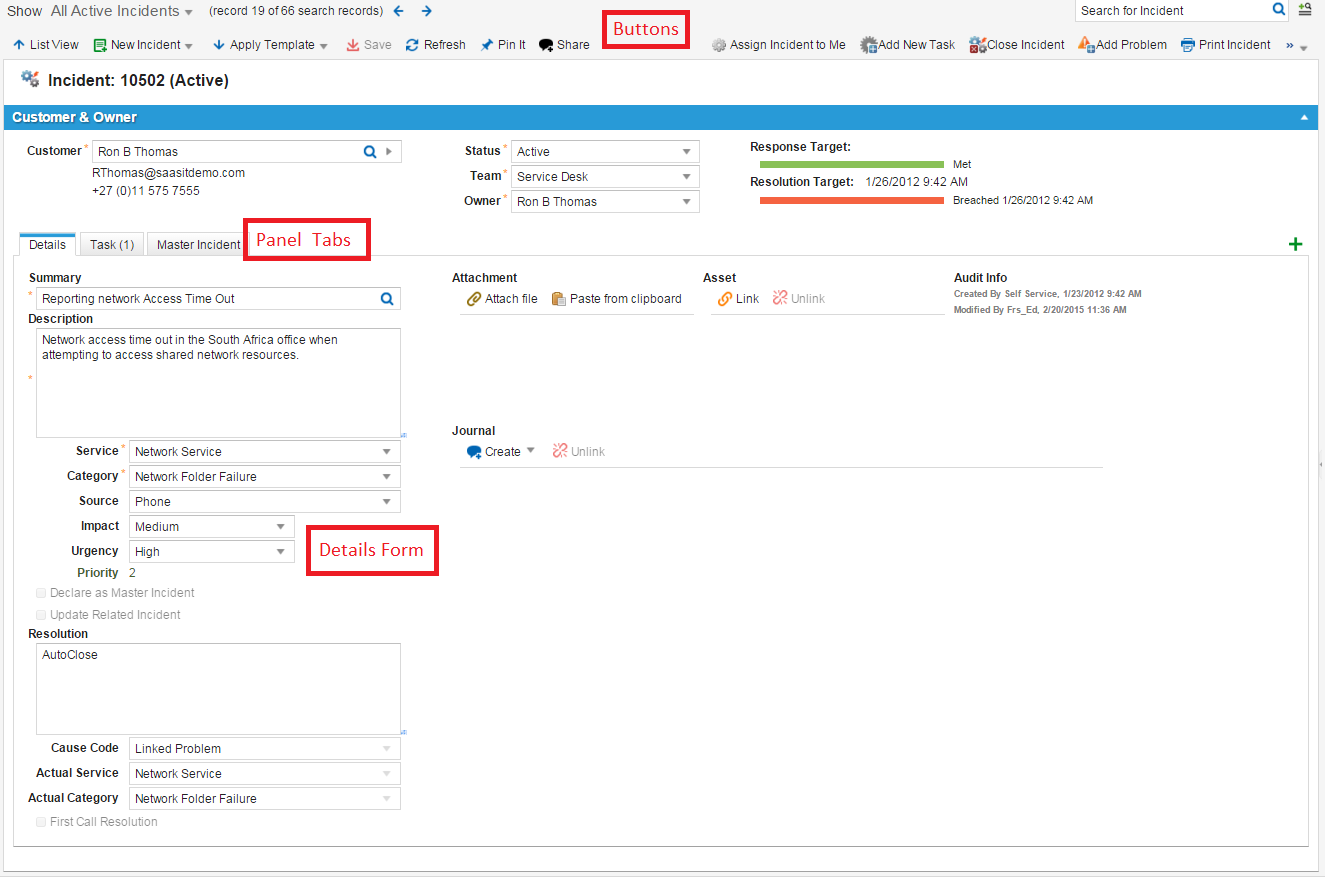
A layout is what you see when viewing a workspace: a collection of forms, tabs, lists, and splitters that displays a parent record and its child records. The layout shows you a complete view of a parent record. The parent record appears as a form with its child records displayed under a series of tabs. Layouts use forms to present the user with fields in which they can enter data for a specific record. Layouts generally show a list of records at the top part of the window, and a preview section of a selected record at the bottom.
Layouts enable you to define which business objects and fields are available to specific users. Layouts are designed with a role in mind, and contain the lists and forms that the role can use. Multiple roles can use a layout. A layout can contain tabs, which in turn hold forms.
After defining a role, create the layout, then assign the layout to the role.
Only administrators can design layouts.
Parts of a Layout
The following illustrates a typical layout for a change record:
Sample Change Record Layout

Layouts appear in an application workspace and include two main areas:
•Parent Record: This area shows the active parent record (for example, an employee record). A parent record is a form, usually at the top of the work area. Each parent record has a toolbar to help you navigate between parent records and access operations.
•Child Records: This area shows the child records (for example, attachments and notes) of the active parent. Child records usually appear in a series of tabs grouped with a splitter. Each tab represents a child business object, and individual records are displayed on each tab. View the list of records in a list or view an individual record as a form or a form summary. The child record toolbar helps you navigate between child records and perform operations.
Ivanti Service Manager comes with several default layouts that are designed for your business needs. As an administrator, you can use these layouts, edit them, delete them, or create your own.
Viewing Layouts
•Viewing a Layout for a Business Object or a Pick List
•Creating a Workspace for Viewing Layouts
Viewing the Layouts List
Layouts are tied to specific business objects, and you can only view a list of layouts for each.
Do one of the following to view a list of layouts:
•From a business object, click the Layouts tab.
•From the Configuration Console, click Build > Page Layouts to open the Page Layouts workspace.
Viewing a Layout for a Business Object or a Pick List
You can easily see all layouts in the system for a business object or a validation business object (pick list). Do the following:
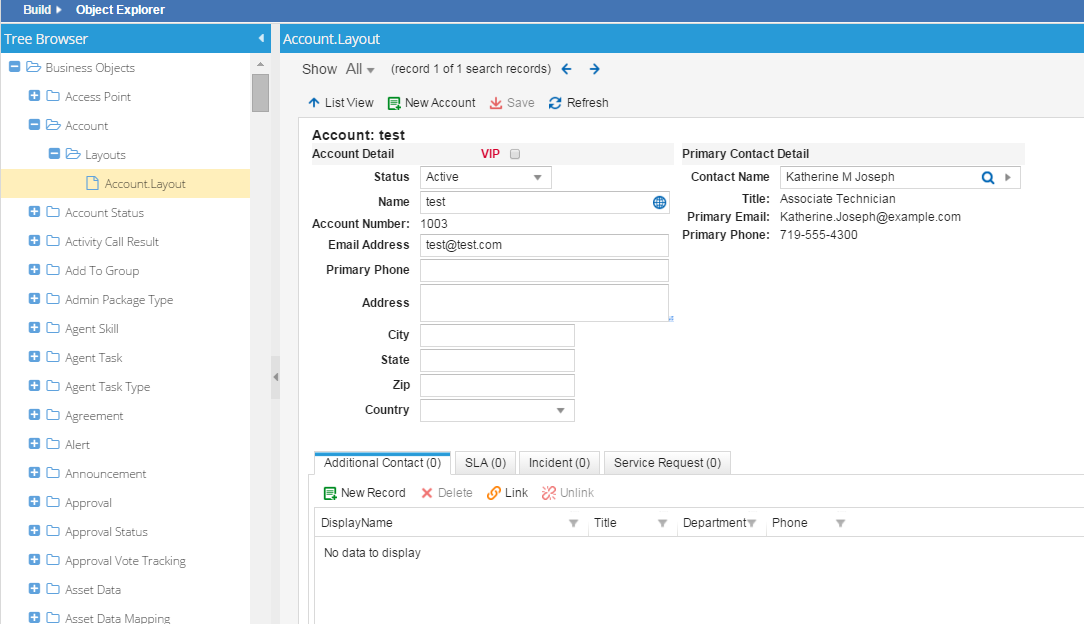
1.From the Configuration Console, click Build > Object Explorer. The system displays the Object Explorer workspace.
2.On the left, expand either the Business Objects heading or the Pick Lists heading to show all of the items under the heading. Only business objects or pick lists that have layouts are listed.
3.Expand the Layouts heading to show all of the layouts for that business object or pick list.
4.Click the name of a layout. The system displays the layout on the right side.
Object Explorer Workspace
Creating a Workspace for Viewing Layouts
In addition to viewing the layouts for a business object or pick list in the Configuration Console, you can also create a similar workspace in the Service Manager Application for other roles to see these layouts, even if they do not have access to the Configuration Console.
Follow these steps:
1.From the Configuration Console, click Configure> Users and Permissions > Roles and Permissions. The system displays the Roles and Permissions workspace.
2.Click the role to create the workspace for. Only users who log in with this role can see the new workspace. You can create additional workspaces for other roles if needed by following these steps again. The system displays the Role Details page for the role that you selected.
3.Click Top Level Tabs.
4.Click Add New Tab. The system displays the Add New Tab page.
5.From the list, click Object Explorer.
6.Enter a name for the new workspace. This is the name that users see in the Service Manager Application.
7.Click Add This Tab.
8.On the Top Level Tabs page, click Save.
9.To verify that the workspace displays properly, do the following:
| a. | Go to the Service Manager Application and log in as the role that you created the new workspace for. |
| b. | Refresh the application. |
| c. | From the header bar, click More... and in the Search objects field, enter the name of the workspace that you created. The system displays the new workspace. |
Creating a Layout
1.From the Configuration Console, click Build > Business Objects.
2.Open a business object.
3.Click the Layouts tab.
4.Click Add New Layout. The system displays the Layout Editor.
5.Enter information into the fields.
| Field | Description |
|---|---|
| Display Name | A unique name for this layout. |
|
Enable Simple Search |
Makes the simple search text box visible on the workspace. Also known as full-text search, this searches all full-text indexed fields. See About the Different Search Types for more information on how this works. |
| Use Type Ahead Search | Enables type ahead search. This option invokes a panel listing the results of what the user types into the search box, allowing them to click one of the results. |
| Search all full-text indexed fields | Only searches in full-text indexed fields. This option is checked by default and enables you to use Partial word results. |
| Partial word results | Shows partial word results in the Type Ahead panel and the results list. |
| Search primary display fields only | Limits the search to only the primary display field (as opposed to all full-text indexed fields). Use this option only if the search freezes due to an excessive number of records. Note that the results from this search option will be different from the list results. |
| Do not sort | Disables automatically sorted results. By default, Type Ahead search results are sorted in ascending alphabetical-numeric order. This might cause a slow-down in getting search results. |
|
Show Saved Search Link |
Shows the saved search link (see Using Saved Searches). |
| Enable Saved Search | Shows the list of saved searches with this layout. |
| Views in this layout |
Determines which view initially appears. The chosen views appear in this area. You can add a list view (list) or a form view. See the following procedures for more information on creating these views. |
| Modal Forms assignment |
Automatically populated based on the initial view selected for this layout. |
6.Click Save.
Adding a New List View
1.From the Configuration Console, click Build > Business Objects.
2.Select a business object.
3.Click the Layouts tab.
4.Click Add New Layout. The Layout Editor appears.
5.Click Add New List View. The list view editor appears.
6.Enter information into the fields.
| Field | Description |
|---|---|
| Display Name | A unique name that appears to users. |
| List |
Select a list from the drop-down list. Click Edit to modify the list. Click Add New List to create a new list. |
| Preview Form |
Choose from the drop-down list. Click Edit to modify the form. Click Add New Form to create a new form. |
| Toolbar | Click Edit to add items to the toolbar. |
| Remember position of the splitter | Saves the position of the splitter bar. |
| Navigation to other views | |
| On request to create new object show |
Select a business object from the drop-down list. Click Edit to modify the business object. Click Add New Form View to create a new form. |
| On request to edit existing object show |
Select a business object from the drop-down list. Click Edit to modify the business object. Click Add New Form View to create a new form. |
7.Click Save.
Adding a New Form View
1.From the Configuration Console, click Build > Business Objects.
2.Open a business object.
3.Click the Layouts tab.
4.Click Add New Layout. The Layout Editor appears.
5.Click Add New Form View. The form view editor appears.
6.Enter information into the fields.
| Field | Description |
|---|---|
| Display name | A unique name that appears to users. |
| Main Form |
Choose from the drop-down list. Click Edit to modify the form. Click Add New Form to create a new form. |
| Toolbar | Click Edit to add items to the toolbar. See Service Manager powered by HEAT. |
| Enable Object View Auditing | Automatically shows audit information. |
| Enable smart fill on repetitive input of some values | Enables smart fill. When entering repetitive data, the system automatically enters data into certain fields (not template fields). You can overwrite the information if needed. |
| Enable Next/Previous buttons on the search bar | Enables the Next and Previous buttons on the toolbar. This allows you to move from one record to the next. |
| Enable Cost Management | Enables costing for this layout. Click Edit Cost Settings to set costing information. The system displays the Edit Cost Management dialog box. Select a child relation and a parent relation and click OK. |
| Enable Matching panel | Enables the related items search feature. Click Edit Matching Settings to set the matching information. See Working with Object Matching and Related Items for more information. |
| After saving object show |
Selects the view to show after the user saves the business object. Otherwise, the original view remains. Click not set and select a view. Click Edit to modify the view. Click Add New Form View to create a new view. |
| Add Child Panel |
The default child panels are listed. Click to add a child panel to the form. See About Data Rollups. |
7.Click Save.
Editing a Layout
•Using the Try Our New Look Style
Using the Old Style
You can edit a layout after it has been created. For example, you can add a tab, change the tab order, change the view, edit search options, and so on.
1.From the Configuration Console, click Build > Business Objects.
2.Select a business object.
3.Click the Layouts tab.
4.Select and click a layout.
5.Do the following to change the tab order:
| a. | Click formView. |
| b. | Navigate to the Child Panels area. |
| c. | Select an item using the icon on the left side and move it up or down to set the tab order for this layout. |
6.Do the following to hide a tab from initial view:
| a. | Click formView. |
| b. | Navigate to the Child Panels area. |
| c. | Select a tab and navigate by scrolling, to the Hidden Expression column. |
| d. | Click <Not Set>. |
| e. | In the Expression Editor, enter False. |
| f. | Click Save. This hides the tab at the initial view. The tab remains accessible by clicking the add  icon. icon. |
7.Click Save from the toolbar.
Using the Try Our New Look Style
•Opening the Layout in the Try Our New Look Style
•Editing the Properties of a Panel Within a Layout
Opening the Layout in the Try Our New Look Style
1.From the Configuration Console, click Build > Business Objects to open the Business Object workspace.
2.Open the business object associated with the layout to modify.
3.Click the Layouts tab.
4.Click the layout to modify. The system displays the Edit Layout page.
5.Under Views in this layout, click formView. the system displays the Form View Editor [formView] page.
6.Click Try our new look! to go to the new Form View Editor [formView] page. The page shows the layout.
See Adding the ESX Business Object to the CI Layout for a step-by-step process for editing a layout.
Adding a Panel to a Layout
1.Perform steps 1-6 in Opening the Layout in the Try Our New Look Style.
2.Under the Toolbox heading, expand any of the panel categories, such as Custom Panels.
3.Click a panel name and drag it into the Layout area. As you drag the panel, the system highlights in yellow the places where you can drop it.
Adding a Panel to a Layout
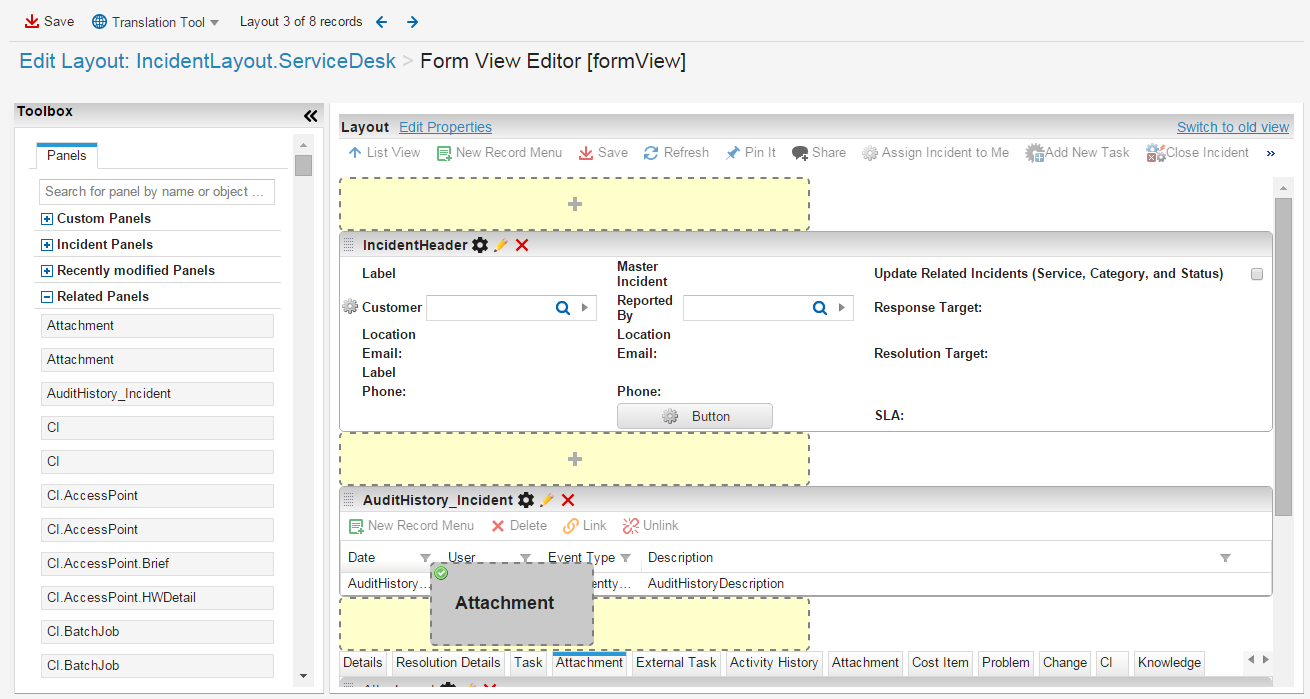
After you drop it, the system displays the FormView Child Panel Relationship Editor dialog box.
4.Select the relationship type. See About Data Rollups for information about the relationship types.
5.Click Save to close the dialog box.
6.Click Save to save the layout.
7.To view the new layout, do the following:
| a. | Go to the Service Manager Application. |
| b. | Open the business object associated with the layout that you modified. |
8.To remove the panel from the layout, click the delete  icon.
icon.
9.To edit the panel, click the edit  icon.
icon.
Editing Layout Properties
1.Perform steps 1-6 in Opening the Layout in the Try Our New Look Style.
2.Click Edit Properties. The system displays the Form View Properties Editor dialog box.
3.Enter information into the fields.
| Field | Description |
|---|---|
| Display name | A unique name that appears to users. The default name is formView. |
| Enable Object View Auditing | Automatically shows audit information. |
| Enable smart fill on repetitive input of some values | Enables smart fill. When entering repetitive data, the system automatically enters data into certain fields (not template fields). You can overwrite the information if needed. |
| Enable Next/Previous buttons on the search bar | Enables the Next and Previous buttons on the toolbar. This allows you to move from one record to the next. |
| Enable Cost Management | Enables costing for this layout. Click Edit Cost Settings to set costing information. The system displays the Edit Cost Management dialog box. Select a child relation and a parent relation and click OK. |
| Enable Matching panel | Enables the related items search feature. Click Edit Matching Settings to set the matching information. See Working with Object Matching and Related Items for more information. |
| After saving object show |
Selects the view to show after the user saves the business object. Otherwise, the original view remains. Click not set and select a view from the drop-down menu. |
4.Click Save.
Editing the Properties of a Panel Within a Layout
1.Perform steps 1-6 in Opening the Layout in the Try Our New Look Style.
2.For any panel within a layout, click the settings  icon. The system displays the Panel Properties Editor dialog box.
3.Enter information into the fields.
| Field | Description |
|---|---|
| Display Name | A unique name that appears to users. |
| Relationship | Specifies the relationship type. See About Data Rollups for information about the relationship types. |
| Hidden Expression | Specifies an expression that defines when the panel is hidden. Click not set to open the Expression Editor. Enter false and click Save to specify that the panel is not hidden. |
| Link Button Filter | Shows the list of records to be displayed so you can restrict the records to be shown. |
| List Filter | Specifies an expression that defines a filter for the list. Click not set to open the Expression Editor. |
| Initially Visible | Specifies an expression that defines if the panel is initially visible. Click not set to open the Expression Editor. Enter true and click Save to specify that the panel is initially visible. |
| Closable | Specifies if the panel can be closed. |
| Show Count In Title | Displays the number of records in the header. |
4.Click Save.
Localizing a Layout
When you work with layouts in a language other than English, you might observe a word or phrase that is not properly translated. Do the following to add or correct a translated word or phrase:
1.From the Configuration Console, click Build > Business Objects.
2.Select a business object.
3.Click the Layouts tab.
4.Click a layout.
5.Click the translation tool icon ![]() and choose the locale language from the drop-down menu. The system displays the Translation Tool workspace and it is preset for the layout that you are working on.
and choose the locale language from the drop-down menu. The system displays the Translation Tool workspace and it is preset for the layout that you are working on.
6.Optional. To view words and phrases from all layouts, choose All in the Layouts drop-down menu.
7.Click Search to view the words and phrases from the current layout. The system displays the search results.
•The first column shows the property, that is, the specific place, where a word or phrase is used in the current form.
•The third column shows the word or phrase as it appears right now for the language that you selected.
8.In the third column, click a translated string to open it for editing.
9.Do one of the following:
•Select a string from the drop-down list, if the system lists any suggestions.
•Enter new text.
10.Press Enter to record (but not save) the change. The system displays a red triangle next to the unsaved text string. This marks the changed string for reference.
11.Change additional strings as necessary.
12.Do one of the following:
•To save your changes, click Save.
•To remove all of the changes that made, click Revert. The system returns the strings to their original settings.
13.Optional. Import the translation strings to a spreadsheet. See Importing Language Records from Microsoft Excel.
Deleting a Layout
1.From the Configuration Console, click Build > Business Objects.
2.Select a business object.
3.Click the Layouts tab.
4.Move your mouse pointer over the layout to delete and click Delete Layout.
Deleting a Layout

The system displays the Delete confirmation dialog box.
5.Click Yes to confirm the deletion.
The system checks whether the layout is used in another business object. If so, a validation message informs you that the layout cannot be deleted and where the layout is used.
If this layout is not used in another business object, the system deletes the layout.
Was this article useful?
The topic was:
Inaccurate
Incomplete
Not what I expected
Other
Copyright © 2017, Ivanti. All rights reserved.