Service Manager powered by HEAT
Creating a Calendar
Creating a Calendar
You can create and define your own calendar for any business object. For example, you may want to create a calendar for your tasks to show all the resource utilization in the system and to check for any overlaps.
You can also create a page layout to display your calendar.
To create a calendar for any business object, do the following:
1.From the Configuration Console, click Build > Calendars.
2.Click Add. The system displays the Add Calendar page.
3.Enter information into the fields.
| Field | Description |
|---|---|
| Business Object | The business object to which to apply this calendar. Select a value from the drop-down list. |
| Calendar Name | A descriptive name for the calendar. |
| Multi-Day Title Expression | A title for this calendar item if it spans multiple days. This title is displayed in the Multi-Day Title Expression field in the calendar. Click the folder icon to display the Expression Editor. |
| Single-Day Title Expression | A title for this calendar item if it is for one day only. This title is displayed in the Single-Day Title Expression field in the calendar. Click the folder icon to display the Expression Editor. |
| Start Date Field Ref | Indicates the field from which the start date for the calendar item is referred. Select a value from the drop-down list. |
| End Date Field Ref | Indicates the field from which the end date for the calendar item is referred. Select a value from the drop-down list. |
| Display Name | The display name for this calendar. |
| Description | A description for this calendar. |
| Color Field Ref | Defines the calendar item display color. Select a value from the drop-down list. |
| Popup Expression | The text to display when the user hovers over the items in the calendar. |
4.Click Save.
Adding a Calendar to a Role
Add your new calendar to a role so that when a user with the same role logs into the system they can access the calendar. For example, when you link your calendar to the Administrator role, any user linked to the administrator role can access the calendar.
Follow these steps to add a calendar to a role:
1.From the Configuration Console, click Configure > Users and Permissions > Roles and Permissions.
2.Select the role to which you want to link your calendar. The system displays the Role Details page.
3.Click Top Level Tabs.
4.Click Add New Tab.
5. Click Calendar Workspace.
6.In the Name field, enter a name for your calendar. The name you enter appears in the top-level menu.
7.In the Configuration area, do the following:
| a. | In the Calendar field, select a name from the drop-down list. |
| b. | Optionally, in the Saved Search field, select a saved search from the drop-down list to associate it with this calendar. Use a saved search to restrict relevant data from displaying in the calendar. |
| c. | In the Default View field, select your default view. |
8.Click Add this tab.
9.Click Save.
10.Go to the Service Desk Console and refresh the browser.
11.Click More ....in the top level tab and select your Calendar from the drop-down list.
Adding Color to a Calendar
You can add color to items in the calendar, such as priorities or other references, to help you quickly distinguish them. Follow these steps to add color to a calendar:
•Adding the Color to the Calendar
Creating a Color Code Field
1.From the Configuration Console, click Build > Validation Business Objects.
2.Click on a business object of your choice.
3.Add a new text field by doing the following:
| a. | Click the Fields tab. |
| b. | Click Add New.... |
| c. | Select Text. |
4.In the Field Name field, enter Frs_ColorCode.
You must enter Frs_ColorCode in the Field Name field otherwise the color code field is not created.
5.Click Add This Field in the bottom left-hand corner of the workspace.
6.Click Save.
Adding the Color to the Form
1.From the Configuration Console, click Build > Validation Business Objects.
2.Click on the name of the business object you have been using.
3.Click the Forms tab.
4.Click on a form name to open a form.
5.In the left-hand column click the plus sign to expand your object.
6.Expand the Fields folder and drag Frs_ColorCode to the frame on the right side. The system adds a new field called Frs_ColorCode to the form.
7.Click the Frs_ColorCode field on the right.
8.Click the Control Properties tab.
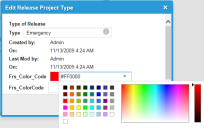
9.In the Control Type row select a control type from the drop-down list in the Value column. For example, Color Picker.
10.Click Save.
Adding the Color to the Calendar
1.From the Configuration Console, click Build > Calendars to open the Calendars workspace.
2.Click on a calendar name.
3. Click edit next to the item to which you want to add a color. The system displays the Edit dialog box.
4.In the Color Code field, select a color from the drop-down list.
5.Click Save.
Adding a Color to a Calendar Item
The system adds the selected color box next to the item name.
6.Continue adding different colors to additional items.
7.Click Save.
8.Return to the Service Desk Console and refresh the browser.
9.Click Release and then More..... from the top level tab and click on the new calendar to display it.
Example of a Calendar with Color
Was this article useful?
The topic was:
Inaccurate
Incomplete
Not what I expected
Other
Copyright © 2017, Ivanti. All rights reserved.

