Service Manager powered by HEAT
Working with Variance Reports
•Generating a Variance Report from a Quick Action
•Creating a Request for Change from a Variance Report
About Variance Reports
You can view a variance report to see all configuration items that have been updated. The report shows as a dashboard part in the Configuration Manager dashboards.
To baseline a configuration item, the configuration item type must be under change control by the administrator. In addition, you must select the properties of the configuration item type to baseline and select the Change Control option on the Details tab of the configuration item record.
The two ways in which variance reports are generated are:
•By running a quick action from the list view in the Configuration Manager workspace.
•By scheduling the quick action to run at a defined interval.
To revert a configuration item to its last recorded baseline, create a request for change.
The newly logged change, shows the variance information in its Variance Details tab.
Generating a Variance Report from a Quick Action
You can select a few configuration item records for which to view variance reports, select the Run Variance quick action, and then view the report in the Variance Reports dashboard part.
1.Log in to the application as a Configuration Manager.
2.Open the Configuration Item workspace. A list of configuration items appears.
3.Select the configuration item records for which to view variance reports.
4.From the Action Menu, select Run Variance Report > Run Variance. In the Run Variance Report quick action, the Run Async flag is selected.
5.The report appears in the dashboard.
If there are no changes to the configuration items from the last time the report was generated, no records appear in the dashboard part.
Scheduling a Variance Report
By default, the Run Variance workflow for the schedule entry business object is available to the administrator for managing the scheduling of the variance report. To make sure that the scheduler runs effectively, uncheck the Run Async flag for the quick action called Run Variance Through Scheduler. The scheduled variance report uses the saved search called CIs in Change Control.
The default variance schedule is stored in the Schedule Entry workspace as WeeklySchedule Run Variance quick action.
Viewing the Variance Report
You can view a variance report to see which configuration items have been modified.
1.Log in to the application as a Configuration Manager.
2.Make sure that the Configuration Manager dashboard is selected on the Home tab.
3.View the dashboard part called Variance Report.
If there have been no changes in the configuration of the configuration items, there are no records displayed in the dashboard part.
Only the configuration items that have changed since the last time the baseline was taken appear in the dashboard part.
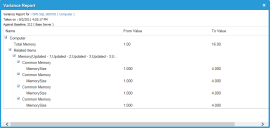
To view the changes, click the configuration item name link and view the attributes that have changed in the From Value and To Value columns.
Variance Report
Creating a Request for Change from a Variance Report
After viewing the variance report, you can choose to log a request for change for the configuration item that is affected.
1.Log in to the application as a Configuration Manager.
2.Make sure that the Configuration Manager dashboard is selected on the Home tab.
3.View the dashboard part called Run Variance.
4.Click the Configuration Item tab.
5.Search for the configuration item by entering its name in the Search field and then clicking Search.
6.Select and open the record.
7.From the Action Menu, select No Category > Create RFC for Variance.
8.Click the Change tab of the configuration record. The change is set to logged status. The change remains in logged status until it is set to requested.
9.Open the change record and view the defined field values.
10.Modify the fields, if appropriate.
11.Notice that the Variance Details tab on the change record shows the details of the variance from the last baseline.
12.When you are ready for this change to be worked on, select the record and click Go to.
13.Click the Request Change quick action from the toolbar.
Was this article useful?
The topic was:
Inaccurate
Incomplete
Not what I expected
Other
Copyright © 2017, Ivanti. All rights reserved.
