Service Manager powered by HEAT
Installing HEAT Discovery Gateways and Client Agents
•About Installing HEAT Discovery Gateways and Client Agents
•About the Windows MSI - Administrative Deployment Option
•Running the Windows Client Agent Installer
•Running the Windows Gateway Installer
•Running the Windows Gateway Data Center Edition Installer
•Using the MAC Operating System X Client Agent Installer
•Using the AIX Client Agent Installer
•Using the HP-UX Client Agent Installer
•Using the RedHat Client Agent Installer
•Using the Solaris Client Agent Installer
•Using the SUSE Client Agent Installer
•Using the Ubuntu Client Agent Installer
About Installing HEAT Discovery Gateways and Client Agents
ISM Discovery components, such as client agents, can be installed in two main ways: through a gateway or by downloading an agent directly to a computer. The second option includes installing the client agent to a computer (client) that is not connected to the network using the remote installation option. The following covers information about the agents, the options available to install them, and what to consider before selecting an installation method.
For instances where a remote agent is installed (to a computer that is not directly connected to the network) or if an agent is installed directly to a computer, the computers connect to and send their data directly to the ISM Discovery database. This is not always an optimal scenario as it may create unwanted network traffic that compromises the available bandwidth. Consider instead deploying agents through a gateway. For more information about gateways and deploying them, see Service Manager powered by HEAT.
Even when installing client agents to computers with UNIX, Linux, or iOS (Macintosh) operating systems, the gateway must be installed on a Windows machine. ISM Discovery currently supports client agents for the following operating systems:
| Operating System | Versions Supported |
|---|---|
| Windows |
7, 8/8.1, 10 Server versions: 2003, 2008, 2008R2, 2012, and 2012R2 |
| Mac iOS | OSX (10.x) |
| UNIX | AIX, HP-UX, Solaris |
| Linux | Ubuntu, RedHat, SUSE |
Deploying Client Agents
The HEAT Discovery workspace enables you to deploy ISM Discovery agents in various ways.
1. From the Configuration Console, click Extend > HEAT Discovery to display the ISM Discovery installers.
HEAT Discovery Installers
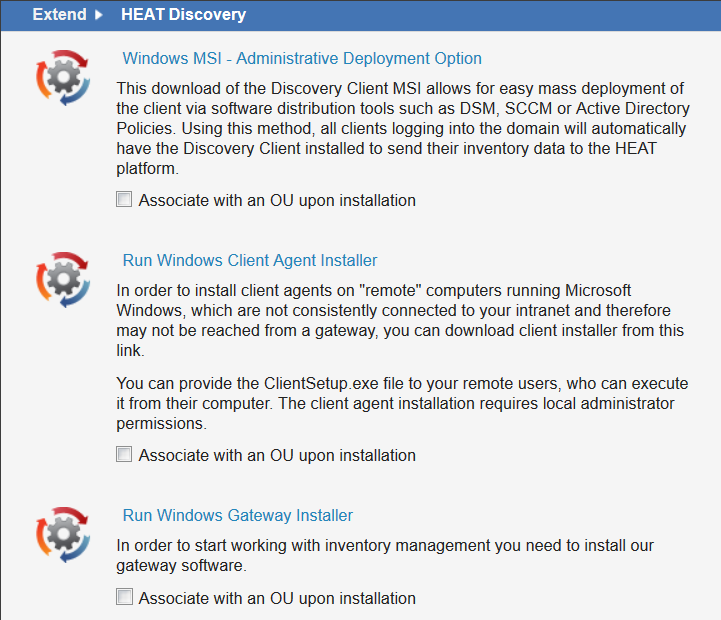
2.Click the name of an installer to begin the installation.
The recommended procedure is to first install and set up a gateway or data center edition gateway, then use the gateway to deploy the client agents. See Working with Gateways for information about installing gateways.
About the Windows MSI - Administrative Deployment Option
This package enables easy mass deployment of the client using software distribution tools such as HEAT DSM, SCCM or Active Directory policies. Using this method, the ISM Discovery client is automatically installed to all clients logging into the domain. Their inventory data is then sent to Ivanti Service Manager. This option will use a gateway to collect and forward the information to the ISM Discovery database.
The permissions to the Ivanti Service Manager agent deployment share are set to allow domain computers and users read access.
1.Optional. Check Associate with an OU upon installation, then choose an organizational unit. The organizational unit is automatically associated upon installation.
When specifying a default organizational unit when installing the gateway, ensure that the computer that you are using to install the gateway does not already have a configuration item record in Ivanti Service Manager.
2.Click the title to download the MSIPackage file to your local machine. The download confirmation window appears.
3.Choose Save File to place it into your preferred directory, then click OK. The file downloads.
4.Extract the zip file and follow the instructions in the enclosed readme.txt file.
During installation you have the option to change the default location for the log files.
Running the Windows Client Agent Installer
This package enables you to install client agents on remote computers (not consistently connected to your intranet) running Microsoft Windows.
The client agent installation requires local administrator permissions.
1.Optional. Check Associate with an OU upon installation, then choose an organizational unit. The organizational unit is automatically associated upon installation.
When specifying a default organizational unit when installing the gateway, ensure that the computer that you are using to install the gateway does not already have a configuration item record in Ivanti Service Manager.
2.Click the title to download the ClientSetup file to your local machine. The download confirmation window appears.
3.Choose Save File to place it into your preferred directory, then click OK. The file downloads.
4.Provide the file to your remote users (generally via email). The users execute the file from their computers.
Running the Windows Gateway Installer
This package installs the gateway software needed to work with ISM Discovery.
1.Optional. Check Associate with an OU upon installation, then choose an organizational unit. The organizational unit is automatically associated upon installation.
When specifying a default organizational unit when installing the gateway, ensure that the computer that you are using to install the gateway does not already have a configuration item record in Ivanti Service Manager.
2.Click the title to download the GatewaySetup file to your local machine. The download confirmation window appears.
3.Choose Save File to place it into your preferred directory, then click OK. The file downloads.
4.Double-click the .exe file to run the gateway installation.
During installation you have the option to change the default location for the log files.
Running the Windows Gateway Data Center Edition Installer
This package installs the gateway data center edition. The data center edition comes with additional auditing capabilities that are not available on a gateway. See Working with Gateways for more information.
1.Optional. Check Associate with an OU upon installation, then choose an organizational unit. The organizational unit is automatically associated upon installation.
When specifying a default organizational unit when installing the gateway, ensure that the computer that you are using to install the gateway does not already have a configuration item record in Ivanti Service Manager.
2.Click the title to download the GatewayDSetup file to your local machine. The download confirmation window appears.
3.Choose Save File to place it into your preferred directory, then click OK. The file downloads.
4.Double-click the .exe file to run the gateway data center installation.
During installation you have the option to change the default location for the log files.
Using the MAC Operating System X Client Agent Installer
1.To associate the installer with an organizational unit, check Associate with an OU upon installation, and select an organizational unit, if needed.
2.Click the title to download the heatclient_osx zip file to your local machine. The download confirmation window appears.
3.Choose Save File to place it into your preferred directory, then click OK. The file downloads.
4.Extract the zip file and follow the instructions in the install.txt file.
Using the AIX Client Agent Installer
The AIX installer installs clients agents for machines running AIX. The installer checks for 32-bit support libraries for 64-bit machines.
1.Click the title to download the saasclient_aix zip file to your local machine. The download confirmation window appears.
2.Choose Save File to place it into your preferred directory, then click OK. The file downloads.
3.Extract the zip file and follow the instructions in the install.txt file.
4.The installer alerts you if the 32-bit support libraries are not found.
•Enter y to have the installer find and install the libraries from the internet.
•Enter N to terminate the installation, manually install the libraries then restart the client installer.
Using the HP-UX Client Agent Installer
The HP-UX agent installs client agents on computers running HP-UX. The installer checks for 32-bit support libraries for 64-bit machines.
1.Click the title to download the saasclient_hpux zip file to your local machine. The download confirmation window appears.
2.Choose Save File to place it into your preferred directory, then click OK. The file downloads.
3.Extract the zip file and follow the instructions in the install.txt file.
4.The installer alerts you if the 32-bit support libraries are not found.
•Enter y to have the installer find and install the libraries from the internet.
•Enter N to terminate the installation, manually install the libraries then restart the client installer.
Using the RedHat Client Agent Installer
The RedHat agent installs client agents on computers running RedHat. The installer checks for 32-bit support libraries for 64-bit machines.
1.Click the title to download the saasclient_redhat zip file to your local machine. The download confirmation window appears.
2.Choose Save File to place it into your preferred directory, then click OK. The file downloads.
3.Extract the zip file and follow the instructions in the install.txt file.
4.The installer alerts you if the 32-bit support libraries are not found.
•Enter y to have the installer find and install the libraries from the internet.
•Enter N to terminate the installation. Manually install the libraries by using the following procedure:
To manually enable 32-bit support for 64-bit machines, you can run the following command to install the libraries before installing the client agent: sudo yum -y install glibc.i686.
The -y option answers yes to any questions asked during the installation.
Once installation is completed, check that the glibc.i686 library is installed by using the following command: yum list installed | grep glibc.i686.
5.Restart the client agent installer.
Using the Solaris Client Agent Installer
The Solaris agent installs client agents on computers running Solaris.
1.Click the title to download the saasclient_solaris zip file to your local machine. The download confirmation window appears.
2.Choose Save File to place it into your preferred directory, then click OK. The file downloads.
3.Extract the zip file and follow the instructions in the install.txt file.
4.Additionally, for Solaris v10 or later, modify the saasdiscovery file as follows:
•Search for and find the line: zpid=`ps -deaf | grep saasdisc | grep -v saasdiscovery | awk '{ print $2 }'`
•Modify it to: zpid=`ps -e | grep saasdisc | grep -v saasdiscovery | grep -v pst | awk '{ print $1 }'`
Using the SUSE Client Agent Installer
To install client agents on computers running SUSE, download the SUSE client agent archive from this link. After it is downloaded, extract its contents including an install.txt file that contains more detailed installation instructions.
1.Click the title to download the saasclient_suse zip file to your local machine. The download confirmation window appears.
2.Choose Save File to place it into your preferred directory, then click OK. The file downloads.
3.Extract the zip file and follow the instructions in the install.txt file.
Using the Ubuntu Client Agent Installer
To install client agents on computers running Ubuntu, download the Ubuntu client agent. Once it is downloaded, extract its contents including an install.txt file that contains more detailed installation instructions. The installer checks for 32-bit support libraries for 64-bit machines.
1.Click the title to download the saasclient_ubuntu zip file to your local machine. The download confirmation window appears.
2.Choose Save File to place it into your preferred directory, then click OK. The file downloads.
3.Extract the zip file and follow the instructions in the install.txt file.
4.The installer alerts you if the 32-bit support libraries are not found.
•Enter y to have the installer find and install the libraries from the internet.
•Enter N to terminate the installation. Manually install the libraries by using the following procedure:
5.To manually enable 32-bit support for 64-bit UBUNTU/Debian, you can run the following command prior to installing the agent: sudo apt-get install libc6-i386.
Ubuntu 15.04 is not supported as it is not a LTS (Long Term Support) release. However Ubuntu release 14.04 (and previous) are supported.
6.Restart the client agent installer.
Was this article useful?
The topic was:
Inaccurate
Incomplete
Not what I expected
Other
Copyright © 2017, Ivanti. All rights reserved.