Service Manager powered by HEAT
Adding Additional Information to a Request Offering, Form Offering, or External Offering
•Adding Images to the List Control
•Service Manager powered by HEAT
•Service Manager powered by HEAT
•Service Manager powered by HEAT
•Service Manager powered by HEAT
•Service Manager powered by HEAT
Adding Images to the List Control
You can have images appear next to items in a list. It is easiest to add images before attaching them to a list.
1.Log in to the application as a service owner.
2.Open the Request Offering workspace.
3.Open a request offering, form offering, or external offering.
4.Click the 2. Design request form tab.
5.Click the Edit icon  next to the list control on the form. The Item Configuration Editor appears.
6.Expand the Pick List section.
7.Select Custom.
8.Click the Add icon  . An option line appears.
9.Enter the option name and price.
10.Select an image from the Image File drop-down list. These images are taken from the Attachments tab.
11.Click OK to close the Item Configuration Editor.
12.Click Saveto save the form.
Creating Tool Tips
A tool tip is text that appears when users hover their mouse over a help icon on the page. Tool tips can contain extra information that is not on the form, such as how to fill out the form or what a term means. For example, if you have a phone number field, you could create a tool tip that states "Use XXX-XXX-XXXX format" or "Do not use dashes or spaces."
Tool Tips Icon
1.Log in to the application as a service owner.
2.Open the Request Offerings workspace.
3.Open a request offering, form offering, or external offering.
4.Click the 2. Design request form tab.
5.Click the edit icon  next to the list control on the form. The system displays the Item Configuration Editor. (Not all controls support this feature.)
6.Expand the Field Help section and click Enable Help hint. The system displays a text area.
7.Enter text. You can format the text using standard formatting tools (bold, italic, underline, color, size, font, alignment, etc.) and enter as much text as needed. You can also include hyperlinks and embedded HTML.
8.Click OKto close the Item Configuration Editor.
9.Click Save to save the form.
Inserting a Hyperlink
1.Log in to the application as a service owner.
2.Open the Request Offerings workspace.
3.Open a request offering, form offering, or external offering.
4.Click the 2. Design request form tab.
5.Click the edit icon  next to the list control on the form. The system displays the Item Configuration Editor. (Not all controls support this feature.)
6.Expand the Field Help section and click Enable Help hint. The system displays a text area.
7.Enter text into the Field Help text area.
Field Help Text Area
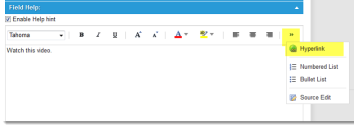
8.Select the text, then from the right side of the toolbar, click Hyperlink.
The Hyperlink Button
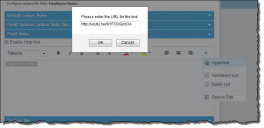
9.Enter the URL.
Enter the URL
10.Click OK, then click OK again.
11.Click Save. Users now see the text when they hover over the Help icon and can click the link.
Sample Tool Tip with a Hyperlink to a Video
Inserting or Editing HTML
1.Log in to the application as a service owner.
2.Open the Request Offerings workspace.
3.Open a request offering, form offering, or external offering.
4.Click the 2. Design request form tab.
5.Click the edit icon  next to the list control on the form. The system displays the Item Configuration Editor. (Not all controls support this feature.)
6.Expand the Field Help section and click Enable Help hint. The system displays a text area.
7.Enter text into the Field Help text area.
8.From the right side of the toolbar, click Source Edit. The help text is now in HTML format.
Sample Tool Tip with HTML Text
9.Edit the HTML as needed or insert embedded HTML.
You can also paste images into the HTML; however, each image must be 3 MB or smaller. Larger images may crash the system and affect performance.
10.Click OK, then click OK again.
11.Click Save.
Was this article useful?
The topic was:
Inaccurate
Incomplete
Not what I expected
Other
Copyright © 2017, Ivanti. All rights reserved.


