Service Manager
Configuring the DSM Legacy Integration
•Establishing the DSM Legacy Environment
•Configuring the DSM Legacy Integration
•About Synchronizing Software Packages and Sets
•Activating Software Packages, Software Sets, and Operating System Sets
•Specifying Approval for Software Packages
•Viewing and Editing Default Installation Parameters
•Linking Software Packages to Software Records
•Defining Hardware and Software Profiles
•Mapping Configuration Items to DSM-Managed Computers
Establishing the DSM Legacy Environment
To establish the initial Service Manager- DSM environment, do the following:
| Step # | Step Description | Reference |
|---|---|---|
| 1 | Specify the DSM server URL and restart the DSM Messenger service. | Configuring the DSM Legacy Integration |
| 2 | Ping the DSM server from Service Manager to verify connectivity. | Pinging the DSM Server |
| 3 | Synchronize software so that software packages and sets on the DSM application are accessible through Service Manager. | About Synchronizing Software Packages and Sets |
| 4 | Activate software to make it available for installation or provisioning through Service Manager. Optional: During activation you can update software parameters, specify whether approval is required, and publish the software by making it available in the Self-Service Portal. | Activating Software Packages, Software Sets, and Operating System Sets and Specifying Approval for Software Packages |
| 5 | Optional. Update default software package parameters. | Viewing and Editing Default Installation Parameters |
| 6 | Link software packages to Service Manager software records to enable DSM-managed software to appear in the Service Manager software list. | Linking Software Packages to Software Records |
| 7 | Create hardware and software profiles for provisioning. | Defining Hardware and Software Profiles |
| 8 | Map Service Manager configuration items to DSM-managed computers. | Mapping Configuration Items to DSM-Managed Computers |
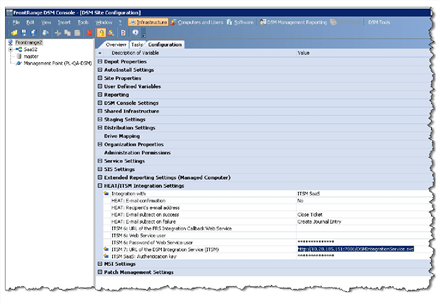
Configuring the DSM Legacy Integration
You must apply the following changes in DSM:
1.Update to DSM Release 7.0.2 or a newer version.
2.Open the DSM Console.
3.Specify the URL for the DSM integration service.
DSM Console
4.Log into the Service Manager Configuration Database. See the Configuration Database Guide for Ivanti Service Manager for more information about using the Service Manager Configuration Database.
5.Open the Tenants workspace and then open the tenant.
6.Copy the value in the Client Authentication Key field into the DSM Console field in the DSM Console.
7.Set the Integration with field to Cloud Platform. (This was formerly called ITSM SaaS.)
8.Save the changes that you made in the DSM Console.
9.Stop and restart the DSM Messenger Service.
10.Ping the DSM server from Service Manager to verify connectivity, as described in Pinging the DSM Server.
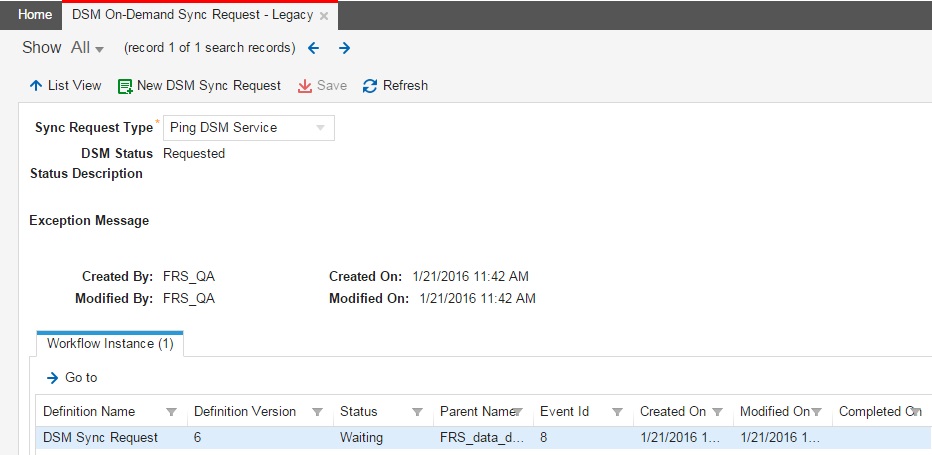
Pinging the DSM Server
Ping the DSM server to check the connection between Service Manager and DSM.
1.Log into the Service Desk Console.
2.Open the DSM On-Demand Sync Request - Legacy workspace.
3.Click New DSM Sync Request.
4.From the Sync Request Type menu, choose Ping DSM Service.
5.Click Save.
6.Click Refresh.
•If the ping is successful, the status changes to completed.
•If the ping fails, the status changes to failed.
DSM Ping Server
If the ping fails, do the following:
•Check the connectivity between the DSM Messenger Service and the DSM integration web services.
•Check the connectivity between the DSM server and the DSM integration web services.
•Check the workflow instantiation record upon creating the ping request.
About Synchronizing Software Packages and Sets
On the DSM application, software types and properties determine which software can be synchronized and managed through Service Manager.
Software synchronization between DSM and Service Manager can be performed manually (on-demand) or on a defined schedule.
•Synchronizing the Software On-Demand
•About Scheduled Synchronization
•Synchronizing Software on a Recurring Schedule
•Updating the DSM Schedule Entry Workflow
Synchronized Software Types
The following software types are synchronized between DSM and Service Manager whenever a synchronization occurs:
Not all types of software packages and sets can be managed through Service Manager. See Software Properties in DSM for details about which types can and cannot be managed through Service Manager.
|
Software Type as Displayed in DSM |
Software Type as Displayed in Ivanti Service Manager |
Available in Ivanti Service Manager as ... |
|
Application Package |
Software Package |
Software Installation Software Reinstallation Computer Provisioning Computer Reprovisioning |
|
eScript Package |
Software Package |
Software Installation Software Reinstallation Computer Provisioning Computer Reprovisioning |
|
Software Set |
Software Set |
Computer Provisioning Computer Reprovisioning |
|
OS Installation Set |
OS Set |
Computer Provisioning Computer Reprovisioning |
For example, a software package residing on the DSM application in the Application Package category has a software type of Software Package when it appears in Service Manager. The package is available for software installation, reinstallation, provisioning, and reprovisioning within Service Manager.
Synchronizing the Software On-Demand
To synchronize software manually, do the following:
1.Log into the Service Desk console.
2.Open the DSM On-Demand Sync Request - Legacy workspace.
3.Click New DSM Sync Request.
4.From the Sync Request Type menu, choose Sync Software The application sets the DSM status to requested.
5.Optional. Select the Workflow Instance tab to view workflow status and other details. To view information about each workflow block (and not just the workflow instance), highlight the workflow instance and click Go to.
6.Click Save.
When the application complete the synchronization, the application changes the status to completed. The application synchronizes all of the software types described in Synchronized Software Types between DSM and Service Manager.
About Scheduled Synchronization
A single default daily schedule is set up to synchronize software and computers. However, you can modify this record or create separate records to synchronize software and computers on different schedules.
Synchronizing Software on a Recurring Schedule
1.Log into the Service Desk console.
2.Open the Schedule Entry workspace. The application displays the Schedule Entry List view.
3.Open a DSM Software Sync and Computer Sync record.
4.In the default schedule, view or modify any of the fields.
5.Click Save.
Updating the DSM Schedule Entry Workflow
1.From the Configuration Console, click Build > Business Objects to open the Business Objects workspace.
2.Open the ScheduleEntry business object.
3.Click the Workflows tab.
4.From the list of workflows, select the schedule that you created, either DSM Computer Sync or DSM Software Sync.
5.If there are different versions of the same workflow, click the edit icon  next to the active version, which is highlighted in green. The application displays the Workflow Designer.
6.Click Configuration from the toolbar. The application displays the Workflow Configuration dialog box.
7.Click the Trigger Definition tab.
8.From the Use Schedule Definition drop-down list, select the schedule that you created.
9.Click Save to associate the workflow with the schedule entry business object.
10.Save the workflow.
The new workflow definition is not published until you click Publish and confirm that you want to publish the new definition.
11.Go back to the Workflow workspace and click the publish icon  to publish the new workflow definition.
Post-Synchronization Tasks
After you have synchronized software, you must do the following:
•Make available (or activate) the software packages, software sets, and operating systems and publish in the Self-Service Portal the software packages and sets that were synchronized between DSM and Service Manager, as described in Activating Software Packages, Software Sets, and Operating System Sets.
•If appropriate, specify whether approval is required before the software package is made available to the requester, as described in Specifying Approval for Software Packages.
•Associate one or more DSM-defined software packages into a Service Manager software record, as described in Linking Software Packages to Software Records. Only software packages that are linked to the Service Manager software record are available in the Self-Service Portal and to Service Desk Analysts.
•View the installation parameters for a software package, as described in Viewing and Editing Default Installation Parameters.
•View operating systems linked to the software packages, as described in Viewing Operating Systems Linked to Software Packages.
•Map your configuration items to the DSM-managed computers, as described in Mapping Configuration Items to DSM-Managed Computers.
Activating Software Packages, Software Sets, and Operating System Sets
After synchronization between DSM and Service Manager, the software or operating application has a status of not available in Service Manager until it is activated. You must activate any software that has a status of not available before it can be installed or provisioned in Service Manager.
You must publish the software package and software set in the Self-Service Portal so that it is available for requesters from the Self-Service Portal.
1.Log into the Service Desk console.
2.Open one or more of the following workspaces:
•To make available software packages, open the DSM Software Package - Legacy workspace.
•To make available software sets, open the DSM Software Set - Legacy workspace.
•To make available software operating systems, open the DSM Operating System Set - Legacy workspace.
3.Click the arrow at the top of the Status column, then choose Group by this Field. The application lists all the records set to not available together.
4.Depending on the workspace you are in, choose one of the following actions:
•Activate Software Package: If you are in the DSM Software Package - Legacy workspace.
•Activate Software Set: If you are in the DSM Software Set - Legacy workspace.
•Activate OS Set: If you are in the DSM Operating System Set - Legacy workspace.
The application sets the status to requested and creates a task to activate. After the DSM server processes the task, the application sets the status to available.
5.Select the records to make available to end users in the Self-Service Portal:
•Publish to Self Service: If you are in the DSM Software Package - Legacy workspace.
•Publish to Self Service: If you are in the DSM Software Set - Legacy workspace.
You can also open a record and select Publish to Self Service.
The Publish to SelfService column shows a value of yes and the application makes the item available in the Self-Service Portal.
Specifying Approval for Software Packages
If you specify approval for a software package, an approval task is created when the software is requested from the Self-Service Portal.
To require approval for hardware or operating system sets, see Defining Hardware and Software Profiles.
1.Log into the Service Desk console.
2.Open the DSM Software Package workspace.
3.Open the record for which to specify approval.
4.On the Details tab, check Approval required. The Approval Required column in the list view shows a value of yes.
5.Save the record.
Viewing and Editing Default Installation Parameters
Installation parameters (such as parameter name, display name, additional text, and so on) that are displayed in a software package are inherited from the DSM application when software packages are synchronized. You can, however, edit the inherited parameters and make the edited parameters default to Service Manager.
1.Log into the Service Desk console.
2.Open the DSM Software Package - Legacy workspace.
3.Select a record for which to view installation parameters, and open it.
4.Click the Installation Params tab.
5.Select a parameter in the list and open it or click Go to.
6.In the Edit Installation Parameters window, do any of the following:
•In the Display Name field, enter a new display name.
•From the Parameter Type menu, select an option: integer, text, or password.
•Check Required if the parameter is mandatory.
7.Click Save.
Linking Software Packages to Software Records
•Linking Software Packages to Software Records
•Creating a New Software Record and Linking to a Software Package
•Viewing Operating Systems Linked to Software Packages
Linking Software Packages to Software Records
Use the DSM user interface to create installable software packages. You can optionally use the Service Manager server to associate one or more DSM-defined software packages to a Service Manager software record.
The application displays Service Manager software records, which are containers for groupings of software packages, as selectable choices in the Software field of the Software Details tab of a Software Installation Request template.
If an appropriate Service Manager software record does not exist, create a new record as described in Creating a New Software Record and Linking to a Software Package.
1.Log into the Service Desk console.
2.Open the DSM Software Package - Legacy workspace. The application displays list of packages.
3.Double-click the record that to link to Service Manager software.
4.From the FRS Software tab, click Link. The application displays a list of Service Manager software records.
5.Choose the record to which to link software packages, then click Select.
6.Repeat to link other Service Manager software to the software package.
7.Click Save.
Creating a New Software Record and Linking to a Software Package
If the existing set of Service Manager software records does not meet your requirements, create a new Service Manager software record.
1.Log into the Service Desk console.
2.Open the DSM Software Package - Legacy workspace.
3.Select the record to link to Service Manager software, and open it.
4.From the FRS Software tab, click New FRS_Software.
5.Enter information into the Name, Version, Edition, and Price fields as needed.
6.Click Save. The new Service Manager software record is now associated with the DSM software package.
Viewing Operating Systems Linked to Software Packages
In DSM, software packages are mapped to one or more operating systems. After the DSM synchronization occurs, the operating systems that are associated with software packages are populated in Service Manager from DSM.
Operating systems that are linked to software packages appear as a prepopulated field in the Software Installation Request template when a user in the Self-Service Portal selects a software package from the software menu. The value of the operating system field is also derived from the computer selected.
1.Log into the Service Desk console.
2.Open the DSM Software Package - Legacy workspace.
3.Select a record for which to view the associated operating systems, and open it.
4.Select the Platform tab. View the linked operating systems.
Defining Hardware and Software Profiles
•About Defining Hardware and Software Profiles
About Defining Hardware and Software Profiles
Hardware and software profiles are used when a new computer is provisioned or when a new software installation is requested in the Self-Service Portal. The application uses the information that you defined in a profile to populate the Hardware Profile and Software Profile fields whenever you submit a new request or incident or whenever a Service Desk Analyst creates one.
Defining Hardware Profiles
When a requester submits a provisioning request in the Self-Service Portal, the application uses the information that they defined in the hardware profile to populate the Hardware Profile field and the Incident Details tab.
The hardware profile that you create here will be linked to computers through the Model field in configuration item records as described in Mapping Configuration Items to DSM-Managed Computers. This allows all computers having the same model number to be included in a single hardware profile.
1.Log into the Service Desk console.
2.Open the Provisioning Profile Hardware - Legacy workspace.
3.Click New Hardware Profile.
4.Enter information into the fields.
| Field | Description |
|---|---|
| Name | The name to show in the drop-down list in the Hardware Profile field in Incident Details or Request Detail (in the Self-Service Portal) when a computer provisioning incident is created. |
| Model | The model of computer (as defined in the configuration item record Model field) that will be included in this hardware profile. For example, the model shown in the Hardware Profile record above specifies that all computers having that model in their configuration item record Model field are included in this hardware profile. |
| Hardware Type | An appropriate hardware type, such as desktop or server. To create a new type, click Add. In the New Hardware Type field, enter a new type of hardware and then click Save. |
| OSType | An appropriate operating system type. |
| Price | A price for this hardware. |
| Publish to SelfService | Makes this hardware profile available in the Self-Service Portal. |
| Description | Optional. A description of this profile. |
5.Click Save.
Defining Software Profiles
When a requester submits a provisioning request in the Self-Service Portal, the application uses the information that they defined in the software profile to populate the Software Profile field and the Incident Details tab.
1.Log into the Service Desk console.
2.Open the Provisioning Profile Software - Legacy workspace.
3.Click New Software Profile.
4.Fill in the Name, OS Type, OS Set, and Description fields. The value that you enter in the Name field displays as a choice in the drop-down list in the Software Profile field in Incident Details when a computer provisioning incident is created.
All activated operating system sets are available as choices in the OS Set field (See Activating Software Packages, Software Sets, and Operating System Sets). Your selection displays under Included Software in Incident Details and in the Installation Package field in the Self-Service Portal.
5.Check Approval Required to require approval for provisioning of this software profile.
6.Select the DSM Managed Software tab to include additional software packages or software sets in the software profile.
7.Click Link to link DSM-managed software records to the software profile. The application displays the linked software packages and sets with the operating system set under Included Software in Incident Details and in the Installation Package field in the Self-Service Portal.
The application displays a list of DSM-managed software records.
8.Choose a record to link to software profiles, then click Select.
9.Repeat to link other software packages and sets.
10.Click Save.
Mapping Configuration Items to DSM-Managed Computers
•About Mapping Configuration Items to DSM-Managed Computers
•Manually Creating a Configuration Item Computer Record and Mapping to DSM
•Mapping a Discovered Computer to DSM
About Mapping Configuration Items to DSM-Managed Computers
Before you begin this process, ensure that DSM, the Service Manager inventory management application, or another Discovery product is able to export configuration items for managed computers to Service Manager so that the configuration items are available in Service Manager prior to starting this procedure. If this is not the case, you must manually create a configuration item for each HEAT DSM-managed computer before performing the following procedures.
We recommend that all new computers enable network boot prior to provisioning.
When configuration items are first created or discovered in Service Manager, they do not contain DSM ID or DSM platform information. These fields are auto-filled during the mapping procedures described in this section; you cannot enter or edit information in these fields manually.
After these fields are populated, their information is used as follows:
•To provision a computer from Service Manager, the DSM ID field must be populated.
•To install software packages on the computer from Service Manager, the DSM ID and DSM Platform fields must be populated.
Manually Creating a Configuration Item Computer Record and Mapping to DSM
Before you perform this procedure, the new computer must be identified in DSM by a DSM administrator. We recommend that the new computer have network boot enabled, or press F12 during the boot sequence.
1.Log in to the application as a Discovery Manager.
2.Open the CI workspace.
3.Click New and select the appropriate New CI Type, such as workstation or server.
4.Enter information into the fields.
| Field | Description |
|---|---|
| Name | The name of the computer to which you are mapping. The name you provide must be the NetBIOS name of the computer (for example, (http://xyz.abc.com/kb/1234). The name can have a maximum of 15 characters and cannot contain any special characters. |
| Domain | The domain name of the computer to which you are mapping. |
| MAC Address | The MAC address of the computer. The MAC address must contain 12 characters and no dashes (for example, 0286BCF423F0). |
| Owner | An owner for this computer. |
5.Manually map the configuration item to computer as follows:
| a. | Log into the Service Desk console. |
| b. | Open the DSM On-Demand Sync Request - Legacy workspace. |
| c. | Click New DSM Sync Request. |
| d. | In the Sync Request Type field, select Identify Computers. |
| e. | Click Save. |
After the sync is successful, the application populates the DSM ID and DSM Platform fields in the configuration item record based on the MAC address that you specified.
Instead of performing the configuration item-to-computer mapping manually, you can wait until the mapping is executed on a recurring basis when the DSM Computer Sync workflow runs. To view or set up a mapping schedule, see About Scheduled Synchronization.
Mapping a Discovered Computer to DSM
1.Install the gateway on the client computer, if this has not been done before.
2.Log into the Service Desk console.
3.Open the Gateway workspace, and then open the record.
4.Click Scan Active Directory.
5.At the prompt, click Yes. The application starts the scanning process. The application lists the unmanaged computers when the scan is complete.
6.Click the task link to open the Agent Tasks tab from where you can view the progress of the scan.
The scan is displayed as an agent task, with a status (pending or complete). When the Active Directory scan has finished, all the unmanaged computers are listed.
7.Click the Configuration Item tab, then select the devices to which to deploy the agent, and click Deploy Agent.
8.Click Yes to confirm that you want to deploy to the selected computers.
9.Click Audit Inventory.
10.Click Yes to confirm that you want to proceed.
The application creates an audit task. It can take a while for the agent to receive the task and act on it (up to 30 minutes with the default settings), and then a while longer for the resulting data to be processed into the CMDB. When the audit has finished, any changes since the last audit are recorded. If there are no changes since the last inventory, no additional information is recorded.
You can continue to work while the audit is being processed.
You must install the DSM client agent on all the computers to manage via DSM. Refer to the DSM documentation for more information.
11.Map the configuration item to the computer as follows:
| a. | Log into the Service Desk console. |
| b. | Open the DSM On-Demand Sync Request - Legacy workspace. |
| c. | Click New DSM Sync Request. |
| d. | In the Sync Request Type field, select Identify Computers. |
| e. | Click Save. |
After the sync is successful, the application populates the DSM ID and DSM Platform fields in the configuration item record.
Was this article useful?
Copyright © 2019, Ivanti. All rights reserved.