Service Manager
Using Gantt Charts
•Using a Gantt Chart with Business Objects
About Using Gantt Charts
Gantt charts were introduced to Service Manager in Release 2015.2. In earlier releases, you could only use Gantt chart functionality specific to the Release workspace under the Schedule tab. This was not called Gantt chart functionality because the charts were hard coded and were only applicable to release schedules. Starting in Service Manager Release 2016.1, you can now use Gantt charts with any workspace or business object.
You can create milestones and tasks for a release using the Schedule tab of any release record. The Schedule tab contains a Gantt chart view of the project that you can set up and manage from the Gantt chart itself.
If you are using release templates to create a release, the system displays defined milestones associated with the release template under the Milestones tab and under the Schedule tab of the release record. When you update the status of the release record to active, the system creates tasks for the milestones. You can view these tasks by going to each milestone record and clicking the Task tab, or from the Schedule tab of the release record, where each task for the milestone is listed under the milestone that it is associated with.
Gantt charts are a way to graphically show the progress of a project. Project management is easier if it is viewed as small manageable items where the dependencies are visually illustrated and the overall progress is tracked. The tasks of a project can be quite complex and depend on each other. With a project management tool such as the Gantt chart, you can graphically view all milestones and their tasks.
For Gantt charts, the system displays the milestone and its tasks for the release project on the y-axis and displays the timeline on the x-axis. The bars show when a task should start and when it will be finished. Blue bars show tasks which have been completed or the progression towards completion. Yellow bars show work which still must be done.
The system tracks the progress of a task as a percentage of the task and displays it in the chart. You can also filter the tasks to show tasks that are not completed. The system also visually indicates any task dependencies.
When you create a new milestone using a Gantt chart, the system does not associate any workflows or approvals with its tasks. If you need an approval process for the new milestone, work with the administrator.
Using a Gantt Chart with Business Objects
•Adding the Gantt Chart to a Business Object
•Creating a New Milestone Using a Gantt Chart
•Creating Tasks Using a Gantt Chart
About Using a Gantt Chart
The Gantt chart feature was originally created to work with the Release business object. However, you can create and use Gantt charts with any business object. An example of a business object that uses a Gantt chart is the Project business object.
Creating the Gantt Chart
1.From the Configuration Console, click Build > Charts and Graphs > Gantt Charts to open the Gantt Charts workspace.
2.Click Add. The system displays the Add Gantt Chart page.
3.Enter information into the fields. You can only add one task business object to each milestone, but each task business object can be made up of multiple task records.
| Field | Description |
|---|---|
| General | |
| Business Object | The business object that this Gantt chart applies to. Select from the drop-down list. |
| Gantt Chart Name | The name of the Gantt chart. |
| Display Name | The name of the Gantt chart as displayed in the system. |
| Description | A description of the Gantt chart. |
| Milestone Object | |
| Business Object |
The business object for the milestone. This business object must have a relationship with the business object that applies to the Gantt chart. Select the object from the drop-down list. The system only displays the list of related business objects if the object contains the necessary fields for a Gantt chart. The business object must contain two DateTime fields, one each for the start date and end date, and at least one (1) number (percent) field in order to display in the list for creating the Gantt chart. |
| Label | The label for this milestone. |
| Add/Edit Form | The form to add this milestone to. The drop-down list contains the forms associated with the business object relationship. |
| Header Expression | An expression to use for the milestone header. Click the function icon to open the Expression Editor. icon to open the Expression Editor. |
| Image Expression | An expression to use for the milestone image. Click the function icon to open the Expression Editor. |
| Successor Relationship |
Contains a link to the same business object type (self). It explains the dependency. For example, the milestone that comes before the current milestone. |
| Predecessor Relationship | Contains a link to the same business object type (self). It explains the dependency. For example, the milestone that after the current milestone. |
| Start Date Field Ref | The field that contains the start date of this milestone. |
| End Date Field Ref | The field that contains the end date of this milestone. |
| Percent Complete Field Ref | The field that contains the percent complete for this milestone. |
| Sequence Order Field Ref | The field that contains the sequence order of this milestone in relation to other milestones. |
| Task Object | |
| Business Object |
The business object for the task. This business object must have a relationship with the milestone business object. Select from the drop-down list. The system only displays the list of related business objects if it contains the necessary fields for a Gantt chart. The business object must contain two DateTime fields, one each for the start date and end date, and at least one (1) number (percent) field in order to display in the list for creating the Gantt chart. |
| Label | The label for this task. |
| Add/Edit Form | The form to add this task to. The drop-down list contains the forms associated with the task. |
| Header Expression | An expression to use for the task header. Click the function icon to open the Expression Editor. |
| Successor Relationship |
Contains a link to the same business object type (self). It explains the dependency. For example, the milestone that comes before the current milestone. |
| Predecessor Relationship | Contains a link to the same business object type (self). It explains the dependency. For example, the milestone that after the current milestone. |
| Start Date Field Ref | The field that contains the start date of this milestone. |
| End Date Field Ref | The field that contains the end date of this milestone. |
| Percent Complete Field Ref | The field that contains the percent complete for this milestone. |
| Right Label | The label for the right side of the Gantt chart. |
4.Click Save.
Adding the Gantt Chart to a Business Object
After you create the Gantt chart, you must add it to a business object.
1.From the Configuration Console, click Build > Business Objects to open the Business Objects workspace.
2.Open the business object to add the Gantt chart to. This must be the same business object that you created the Gantt chart for.
3.Click the Layouts tab. The system displays the layouts associated with the business object.
4.Open the layout to add the Gantt chart to.
5.Under the Views in this layout header, click formView.
6.Near the bottom, click Add Custom Child Panel to add a new tab to the business object.
7.For the new tab, in the Display Name field, enter a name for the tab that the user will click to see the Gantt chart. We recommend entering Gantt Chart.
8.For the Plugin field, click <Not Set> and from the drop-down list, select Gantt Chart.
9.For the Gantt Chart Name field, click <Not Set> and from the drop-down list, select the name of the Gantt chart that you created. The system only displays the Gantt charts that you created for that particular business object and not all Gantt charts.
10.Click Save.
11.To verify that the system added the Gantt chart to the business object, do the following:
| a. | Go to the Service Desk Console and refresh it. |
| b. | Open the business object workspace. |
| c. | Open a record. |
| d. | Ensure that there is a tab showing the Gantt chart. |
Creating a New Milestone Using a Gantt Chart
You can create ad-hoc milestones using either a Gantt chart or from the Milestones tab of a release record.
The following procedure is for creating milestones without using a release template. If you use a release template to create a release, the system displays the defined milestones that are associated with the release template under the Milestones tab.
1.Log in to the application as a Release Manager.
2.Open the Release workspace.
3.Open the release record to create milestones for.
4.Click the Schedule tab. The system displays the default schedule view, showing a 10 week period.
5.Click Add Milestone. The system displays the New Milestone dialog box.
6.Enter information into the fields.
| Field | Description |
|---|---|
| Subject |
The milestone. Build and test release Building Closed pilot Deploy release to the selected group Deployment Deployment preparation Early life support New service testing and pilot milestone Open pilot Planning Release and deployment planning Release review and closure milestone Service testing and pilot User communication User training |
| Description | Details about the milestone. |
| Sequence Order | The sequence number for this milestone. There is no workflow associated with the sequence order if you are creating an ad-hoc milestone; the sequence number is only for your reference. The sequence number in the template-based milestones indicates the sequence that the milestones activate in. |
| Release | The release that the milestone is associated with. |
|
Release Number |
The release number. The system automatically auto-fills this based on the release record. |
| Status |
The status. Choose from the drop-down list. A new milestone is set to pending status. No workflows are associated with the status value when creating an ad-hoc milestone; the status is only for your reference. The Status field in the template-based milestones indicates the sequence that the milestones activate in. |
| Owner | The owner of this milestone. The default owner is the logged-in user. |
| Environment | The environment of this milestone, such as dev, production, or QAT. |
|
Started On |
The start date and time. The default is the current date and time. |
| Target End Date |
The targeted end date of this milestone. If you leave this field blank, the milestone duration shifts to encompass the end date of the last task. If you open the milestone form, the system populates the target end date with the end date of the last task. |
| Actual End Date | The actual end date of this milestone. |
| Percent Complete | The percentage completed. |
| Estimated Cost | The estimated cost of this milestone. |
7.Click Save. The system displays the new milestone on the Gantt chart.
The Start column shows the started on date. The duration is shown in days and is taken from the target end date value or from the end date of the last task in the milestone.
8.(Optional) You can manually extend a milestone duration by clicking in the duration column and updating the number of days. To align the milestone to the duration of the tasks associated with it, check Align Milestone.
Editing a Milestone
You can edit a milestone from the Schedule tab of the release record or by going to the milestone record from the Milestone tab of the release record.
1.Log in to the application as a Release Manager.
2.Open the Release workspace.
3.Open the release record to edit a milestone for.
4.Click the Milestones tab.
5.Click the milestone to edit. The system displays the Milestone workspace.
6.Find and open the milestone to edit.
7.Make changes to the milestone.
8.Click Save.
Deleting a Milestone
You can delete any milestone from the Schedule tab of the release record or by going to the Milestone tab of the release record.
1.Log in to the application as a Release Manager.
2.Open the Release workspace.
3.Open the release record to delete a milestone for.
4.Click the Milestones tab.
5.Select the milestones to delete.
6.Click Delete.
Completing a Milestone
You cannot set the status of a milestone to complete (or 100%) until all of the tasks under it have a status of complete. If you try to update the status of a milestone to complete or enter 100% in the % Done field, the system displays an error message stating that the tasks under it are not all in the complete status.
If you created the milestone from a template, you cannot set the status of the milestone to complete or 100% if the approval is in pending status. The system does not create the associated tasks for the next milestone sequence until the status of the milestone is complete.
To complete a milestone that you created manually (that is, a milestone that you did not create from a release template), do the following:
1.Log in to the application as a Release Manager.
2.Open the Release workspace.
3.Open the release record to create a milestone for.
4.Click the Schedule tab.
5.Ensure that values of the % Done field for all of the associated tasks for the milestone are set to 100%.
If the value of the % Done field for any of the associated tasks under the milestone is not set to 100%, do the following:
| a. | Select the milestone. |
| b. | Enter 100 in the % Done field. |
| c. | In the Actual End Date field, enter the date of the milestone completion. |
6.Click Save.
Creating Tasks Using a Gantt Chart
The following procedure is for creating ad-hoc tasks for a milestone using a Gantt chart. You can also create tasks for a milestone using the Task tab of a milestone record.
If you are using a release template to create a release, the system displays the defined milestones associated with the release template under the Milestones tab and the Schedule tab of the release record. When you update the status of the release record to active, the system creates tasks for the milestones. You can view these tasks by going to each milestone record and clicking the Task tab, or from the Schedule tab of the release record, where each task for the milestone is listed under the milestone that it is associated with.
1.Log in to the application as a Release Manager.
2.Open the Release workspace.
3.Open the release record to create a milestone for.
4.Click the Milestones tab.
5.Select the milestone to add a task to.
6.Click the Task tab.
7.Click New Task. The system displays the New Task dialog box.
8.Enter information into the fields.
| Field | Description |
|---|---|
| Summary | A brief summary title for the task. |
| Details | Description of the task. |
| Status | This field is automatically generated. |
| Priority | The priority. Automatically entered or select from the drop-down list. |
| Team | The team. Select from the drop-down list. |
| Manager | This field is automatically generated based on the team field. |
| Owner | The owner. Select from the drop-down list. |
| This field is automatically generated based on the value of the Owner field. | |
| Phone | This field is automatically generated based on the value of the Owner field. |
| Start Date | The starting date of the task. |
| Target End Date | The targeted ending date of the task. |
| Actual Effort | The amount of time (in minutes) that the task has taken. |
| Cost | This field is automatically generated based on the actual effort and cost per unit. |
9.(Optional) You can update the start and end dates of a task from the Gantt chart by selecting the task and dragging its outermost point. The system updates the Duration field for the task and for the milestone.
10.Click Save.
11.Click Open in Parent to return to the release record.
12.From the release record, click the Schedule tab. The new task appears on the Gantt chart. When you create successor or predecessor tasks, notice that the Gantt chart visually indicates the dependency.
13.(Optional) You can update the start and end dates of a task from a Gantt chart by selecting the task and dragging its outermost point. The system updates the Duration field for the task and for the milestone.
14.(Optional) You can manually indicate the dependency of one task on another by selecting the task and dragging its handle to the dependent task.
The chart visually indicates the dependency.
Dependencies in a Gantt Chart

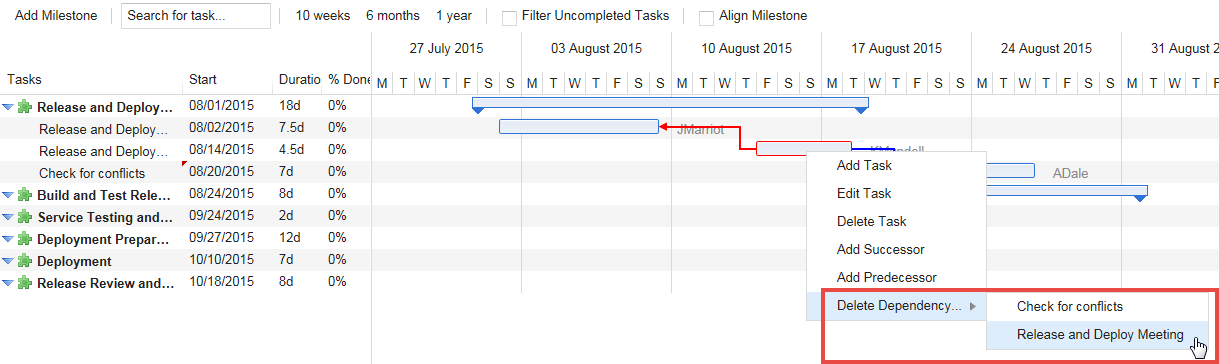
15.To delete a dependency, select the task, right-click, select Delete Dependency, and select the specific task whose dependency to delete.
Deleting a Dependency
16.To indicate the progress of a task, enter the percentage of work done on the task in the % Done column or select the task, right-click, select Edit Task, and enter the percentage in the Percent Complete field.
17.To align all tasks under the start and end dates of a milestone, check Align Milestone.
Was this article useful?
Copyright © 2019, Ivanti. All rights reserved.