Service Manager
Working with Roles
•Assigning Business Object Permissions
•Assigning Permissions to Grant Roles
•Finding Users Assigned to a Role
About Roles
The system assigned at least one role to all Service Manager users of the type employee. Users can have multiple roles. The system uses roles to define responsibilities for the users as they work within the application.
A role consists of device- or function-specific application access to various workspaces, business objects, and fields. When you create users, you assign them to a specific role. These roles are available to the user upon logging in. When a role is selected, it determines the default set of user interfaces (forms, dashboards, and their controls) available to the user.
Service Manager contains a default set of roles organized by common user functions, including administrator, Service Desk Analyst, and various manager roles. Access to modules and features (security rights) and access to business objects and fields (business object rights) are based on the user's role. You can customize these roles or create entirely new ones.
For example, a user logging into Service Manager as a Change Manager might view a layout of the change form that differs from the change form seen by a technician, in addition to dashboards displaying change request data recorded by the system over the last day and trending information for the week. The role can also be linked to a specific device, letting users log on in a role that views dashboard data for layouts for that machine.
Viewing Roles
1.To view a list of roles, do one of the following:
•From the Configuration Console, click Configure > Users and Permissions > Roles to open the Roles workspace. The system displays the list of available roles.
•Log in to the application and open the Roles workspace.
2.To view the roles associated with a business object, do the following:
| a. | From the Configuration Console, click Build > Business Objects to open the Business Objects workspace. |
| b. | Open a business object. |
| c. | From the toolbar, click Roles. |
3.Double-click a role name to view the list of users assigned to that particular role.
Sample List of Administrators
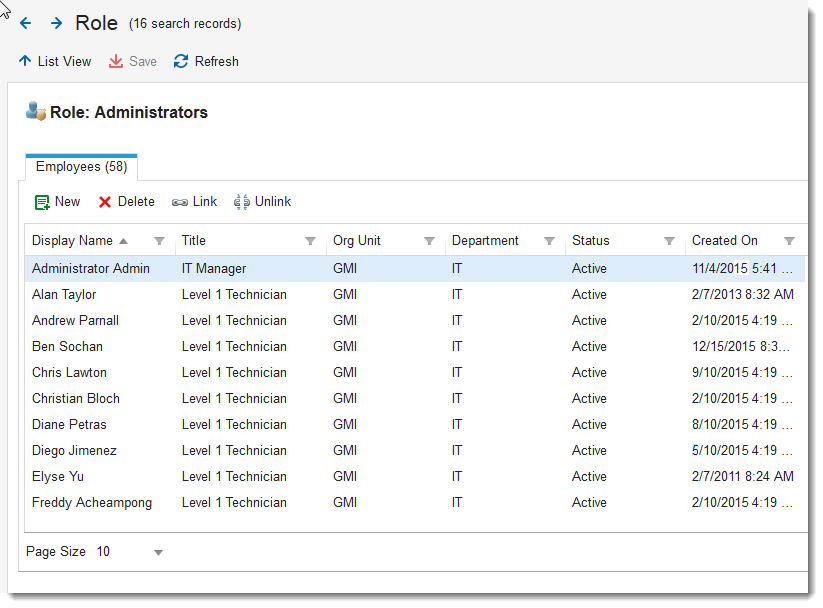
The list of available roles appears with the following information:
| Field | Description |
|---|---|
| Role Name | The name of the role as stored within the business object. |
| Display Name | The name of the role as displayed in the Service Manager interface and in pick lists. |
| Tabs | A list of the available tabs (user interfaces) available for display for users assigned to this role. Hover over a table cell to display a complete pop-up list of the tabs assigned to the particular role. |
| Users | Click Find Users on any row to open the Roles workspace, from where you can view the list of employees who are in that particular role. |
| Action | Click Clone to create another role with the same attributes. You must provide a unique name for the new role. |
Creating a Role
You can create roles that appear within the application role lists, such as when defining a quick action. New roles do not appear in the main login drop-down list. Therefore, users must be associated with one of the default roles before they can be linked to a created role.
1.From the Configuration Console, click Configure > Users and Permissions > Roles and Permissions to open the Roles and Permissions workspace.
2.Click Add new.... The system displays the Role Details workspace. The following default tabs appear (results may vary depending on your system setup):
•Translation Tool: See Using the Ivanti Translation Tool.
•Role Details: Continue to the next step.
•Top Level Tabs: See Defining Top Level Tabs
•Object Permissions: See Assigning Business Object Permissions
•System Permissions: See Assigning System Permissions
•Permissions to Grant Roles: See Assigning Permissions to Grant Roles
3.Enter information.
| Option | Description |
|---|---|
|
Show 'Talk with Agent' button (applicable for Self Service only) |
Places a talk with agent button in the header bar of the role interface. This only applies in the Self-Service Portal. |
| Show "Report an Issue" button | Places a report an issue button in the header bar of the role interface. |
|
Overwrite default branding options with the options listed below |
Enables selections within the branding options section.
NOTE: We do not recommend checking this option for the admin role. |
|
Mobile Self Service UI |
If selected, this option defaults the user to the mobile Self Service user interface/portal. This is helpful if the user will primarily use the Mobile interface. If not selected, the system displays the original user interface. |
|
Self Service Role |
This option has been deprecated. Use the Mobile Self Service UI checkbox instead. Selecting this option from a role may disable access to other workspaces. |
|
Branding Options (This section is only available if you checked the Overwrite default branding options with the options listed below option) |
|
|
Logout Button |
Shows the logout |
|
Change Password Button |
Shows the change password button. |
|
New Window Button |
This option is not currently valid for the release. |
|
Select Workspace Button |
Shows the workspace |
|
Change Role Button |
Shows a down arrow icon that allows you to change roles. The option is enabled for all roles by default, since many users within an organization have access to more than one role. For example, a user can have both Knowledge Manager and Self Service user roles and switch between the two roles as needed. However, if you do not selecting this option, you can disable the option to switch roles for certain roles.
Note: If you disable the ability for a user to change roles by checking Overwrite default branding options with the options listed below and you do not select Change Role Button, you run the risk of locking the user out of all other roles.
IMPORTANT: We do not recommend selecting the Overwrite default branding options with the options listed below button for the Admin user. If the button is selected for an Admin user, then ensure that the Logout Button, Change Password Button, and Change Role Buttons are all checked before you continue. |
 button.
  icon on the left side of the top header bar.
Changing the Logo for a Role
You can select a different logo for any role. By default, each role uses the original logo defined for the application. See also Using the Style Editor.
1.From the Configuration Console, click Configure > Users and Permissions > Roles and Permissions to open the Roles and Permissions workspace.
2.Click Add New.... The Role Details page appears.
3.Click Change Logo. The file navigation window appears.
4.Navigate to a logo and click Open. The updated logo appears.
5.Click Save. Users of that role will see the logo in the top left corner of their window.
6.To revert to the original default logo, click Reset Logo.
Defining External Links
You can define external links to be visible at the top of the pages in the Self-Service Portal. For example, you can direct customers to pages to download software updates or to access an external Knowledge Base.
1.From the Configuration Console, click Configure > Users and Permissions > Roles and Permissions to open the Roles and Permissions workspace.
2.Click Add New.... The Role Details page appears.
3.Click the add item icon  to add a table row for defining a top link. This icon only appears when you check Overwrite default branding options with the options listed below.
4.Enter information into the fields.
| Field | Description |
|---|---|
|
Title |
The display name for the link. |
|
URL |
A valid URL to be used as the link target, such as http://www.ivanti.com. |
|
New Window |
Displays the link in a new browser window. |
|
Pass Single Sign-on Info |
Passes single sign-on information if working within a secured environment. |
5.Click Save.
Defining Top Level Tabs
In Service Manager, the top-level tabs contain user interfaces available to the user upon logging in. These user interfaces are also known as workspaces. User interfaces, shown as additional tabs at the top of the Service Desk Console, combine forms for recording information for your company, the dashboards that display the compiled metrics, and their controls.
For example, an Incident Manager can view a Home tab containing several dashboards displaying metrics for incidents according to status and ownership. In addition, the Incidents tab contains a list that lists existing incidents, a record display area with details for a selected incident, and a toolbar allowing the Incident Manager to create a new incident, change its status, or take additional actions.
For more information on editing options in Top Level Tabs, see also Configuring Workspace Options.
1.From the Configuration Console, click Configure > Users and Permissions > Roles and Permissions to open the Roles and Permissions workspace.
2.Click Add New.... The system displays the Role Details page.
3.Click Top Level Tabs.
4.Click Add New Tab. The system displays a list of workspace types.
5.Click a workspace type. The system displays the tab preferences page.
6.Select options.
| Options | Description |
|---|---|
|
The Tab Is Available |
Gives this role access to this workspace, but the tab might not be initially visible. |
|
The Tab Is Initially Visible |
Gives this role access to this workspace and the tab is initially visible. |
|
The Tab Can Be Closed By User |
Gives this role access to this workspace, and the tab contains a Close button (X). |
| Hidden Expression |
Specifies if the workspace is hidden. Click none to open the Expression Editor. Enter an expression such as $(if Status == "Logged" then true else false) and click Save. When the expression evaluates to true, the system hides the workspace. |
|
Search Tags |
•Specifies one or more tags (commands or navigation shortcuts) that refer to a workspace. These are usually created for workspaces that are not business object workspaces. You can assign multiple search tags to the same workspace by separating them with a comma. •Only used for the following workspaces (and their known search tag): •Dashboard (Home) •Agreements (SLA Agreements) •My Items (MyItems) •Report (report) •Self Service Search (Search) •Service Catalog (ServiceCatalog) |
|
Show Toolbar |
Allows this role to see the search toolbar. Only applies to the following workspaces: •Admin dashboard •Configuration Management Aspect Mapping •Dashboard •Report •Report Template |
| Calendar |
•Specifies the calendar to use. •Only applies to the Calendar workspace. |
| Saved Search |
•Specifies the saved search to use. Choose from the list of saved searches that correspond to the calendar that you selected above. The saved searches restrict the amount of data that is shown in the calendar. •Only applies to the Calendar workspace. |
| Default View |
•Specifies the default view. Can be Day, Week, or Month. •Only applies to the Calendar workspace. |
| Enable Issue Templates |
•Specifies a predefined incident template whenever a user creates a new incident in the My Items workspace. •Only applies to the My Items workspace. |
| Object |
•Specifies the business object to display in the tab. •Only applies to the Object, Process Wizard, and Risk Calculator workspaces. |
| Layout |
•Specifies the layout to display in the tab. •Only applies to the Object and Process Wizard workspaces. |
| Option to provide feedback |
Specifies if the workspace displays the fields for leaving feedback for a knowledge article. Only applies to the Self Service Knowledge workspace. |
| Execute action when creating feedback |
•Specifies the action to execute after a user leaves feedback for a knowledge article. Click Action Menu to select an action. •Only applies to the Self Service Knowledge workspace. |
| Search for matches in |
•Specifies the business object (which must have full-text search configured) for which to search for matches. After selecting a business object, click Edit Preview (Not Set) to define the preview and click Edit Filter to edit the filter. •Only applies to the Self Service Search workspace. |
| Configure Confirmation dialog |
•Allows you to configure the text and actions in the confirmation dialog box. •Only applies to the My Items and Service Catalog workspaces. |
| Workspace actions |
•Specifies the user interface actions for the Service Catalog. Click Edit to add buttons to the Service Catalog toolbar. •Only applies to the Service Catalog workspace. |
| Navigation Settings |
•Specifies the default category that is displayed when the Service Catalog is opened. Click Select Category to select the category. •Check Enable predefined category 'All Categories' to make the "All Categories" predefined category visible. •Check Enable predefined category 'Most Popular' to make the "Most Popular" predefined category visible. Select whether to sort by popularity or to sort alphabetically. •Only applies to the Service Catalog workspace. •This section is hidden when the New Self Service UI check box is selected for Self Service Mobile role. |
| Disable Chat |
•Specifies if the Chat feature is disabled. (Note that you can disable the Chat feature while still keeping the Social Board enabled.) •Only applies to the Social Board workspace. |
| Url |
•Specifies a URL that can be used as a tab or workspace. Click Preview to ensure that the URL can be displayed in Service Manager. See Working With Attachments and URLs for more information about using URLs. •Only applies to the Url workspace. |
7.Click Add this Tab.
8. Click Save. The system saves the settings.
Assigning Business Object Permissions
Specify the view for a role view and read-access rights for business objects. Unlike regular business object permissions, the Object Permissions workspace allows you to apply data-segregation security constraints. You can specify security rights based on the data and relations within the business object and within the business object of the current user.
For example, administrators may be able to view and modify data in any record, while members of the support role may not be able to view private information such as a social security number.
The application of the data-segregation security organizational unit constraint to a role can affect your saved searches. You may need to modify your search parameters to reflect these constraints.
1.From the Configuration Console, click Configure > Users and Permissions > Roles and Permissions to open the Roles and Permissions workspace.
2.Click Add new.... The system displays the Role Details page.
3.Click Object Permissions.
4.Select the business object (for example, Address) for which to change permissions. The system displays the list of permission selections.
5.Check the permissions for the role for the business object.
| Permission | Description |
|---|---|
|
Add |
Allows the role to add data to the business object. |
|
View |
Allows the role to view data in the business object. |
|
Edit |
Allows the role to manipulate data in the business object. |
|
Delete |
Allows the role to delete data in the business object. |
|
Lifecycle |
Click Edit, then check Allow Editing to enable the role user to edit the business object in the final state. For more specific rights, you can expand a business object in the table and set rights for specific business object components: Business object fields. Business object links to the Employee business object. Linked Employee business object fields. Relationships linking the business object to the Employee business object (such as the Change Approval Board in change). Business object links to business objects or hierarchies that are also related to the Employee business object. |
|
Access |
Click Edit, then click the add a new case...
You can match against: Your own Employee business object. Multiple business objects (one-to-many relations of the Employee business objects). A hierarchy of business objects (relation to a hierarchical business object).
If one role has both Update and View and also View permissions for the same business object, the system gives you Update and View permission.
Enter the criteria, then click Update. |
 icon to define advanced security criteria. For example, you can create a definition to make an incident be view-only when it is closed. The match can be based on literal, validated, or numeric input. You also can specify a match when the field is empty.
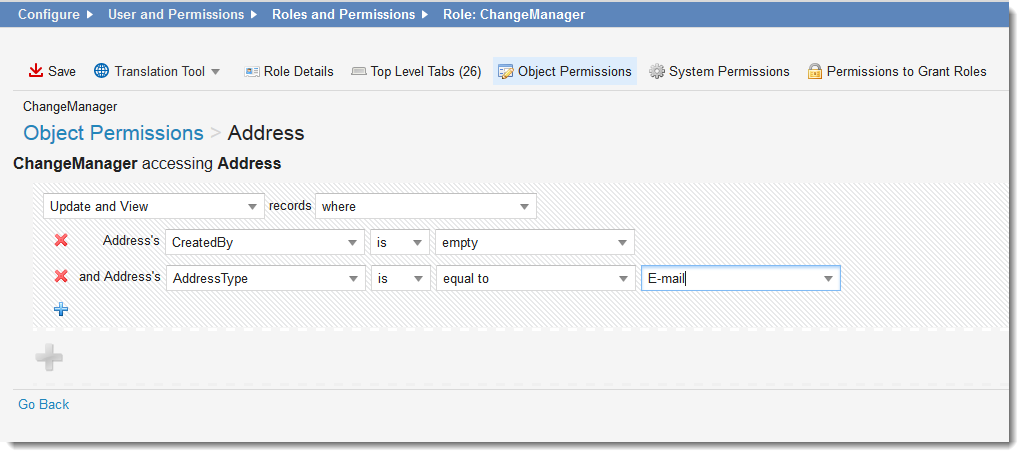
6.Click Save.
Assigning System Permissions
You can assign default permissions for sharing items with other roles. By publishing permissions, you can define dashboards, quick actions, or searches within one role and allow assigned users to share them with another role.
1.From the Configuration Console, click Configure > Users and Permissions > Roles and Permissions to open the Roles and Permissions workspace.
2.Click Add New.... The Role Details page appears.
3.Click System Permissions.
4.If you are working in a Managed Service Provider (MSP) environment, select Apply MSP Security to apply a combination of the user's tenant and organizational unit security access to this object when logging in with this role.
This option is visible only to MSP providers who have had the MSP database enabled by Ivanti.
5.Select options for the role.
If a role does not have permission to create quick actions, saved searches, or dashboards (and its parts), users in that role cannot create them. If a role does not have permission to edit quick actions, saved searches, or dashboards (and its parts), users in that role cannot edit them.
|
Create (For Self) |
Edit (For All) |
Delete (For All) |
|
|---|---|---|---|
|
Quick Action |
Create, edit, and delete quick actions created by the user. |
Create personal quick actions and edit quick actions created by other users. |
Delete quick actions created by other users. |
|
Search |
Create, edit, and delete saved searches created by the user. The user cannot publish to any other roles. |
Create personal searches and edit saved searches created by other users. The user can publish to other roles.
The system displays an Edit button next to the saved search.
The user can view dependencies (to see if the saved search is being used in other areas, such as dashboard parts). |
Delete saved searches created by other users.
The user can view dependencies (to see if the saved search is being used in other areas, such as dashboard parts). |
|
Dashboard |
Create, edit, and delete dashboard and dashboard parts created by the user. |
Create and edit dashboard and dashboard parts created by other users. |
Delete dashboard and dashboard parts created by other users. |
6.Select the roles that have permissions to publish (or save) from the Allow Publishing drop-down lists:
•Quick actions
•Searches
•Dashboards
•Reports
Publishing to other roles is enabled only if edit permissions are selected for the role.
7.Click Save.
The system permissions are in effect for the user role after they log out then log back in.
Assigning Permissions to Grant Roles
You can assign the ability to link a role to another user. For example, a Service Desk Manager may need the ability to assign supporting roles within the service organization, such as Service Desk Analyst.
1.From the Configuration Console, click Configure > Users and Permissions > Roles and Permissions to open the Roles and Permissions workspace.
2.Click Add New.... The Role Details page appears.
3.Click Permissions to Grant Roles.
4.Check the linked roles.
5.If needed, check This role can log into administration tool to permit users with this role to log into the Configuration Console. For example, a management-level employee may need access to the Configuration Console to edit a form or layout. In this case, you need to apply additional restrictions to this role.
Because it provides access to the Configuration Console, we recommend that you severely restrict the use of this permission. In a default installation, the system limits this permission to administrators.
6.Click Save.
Modifying Roles
1.From the Configuration Console, click Configure > Users and Permissions > Roles and Permissions to open the Roles and Permissions workspace.
2.Select the role to modify.
3.Edit the role using the options described above.
4.Click Save.
Deleting Roles
You can delete any role, including (Undefined variable: FRS_VARS.Product) default roles.
Do not delete the administrator role, as this could prevent access to the Configure Console.
1.From the Configuration Console, click Configure > Users and Permissions > Roles and Permissions to open the Roles and Permissions workspace.
2.From the far right column, click the delete icon  in the row of the role to delete.
Cloning Roles
You can create a copy of an existing role. For example, you could clone the basic settings for a Service Desk Analyst, then customize the role by changing its associated dashboards or security settings.
1.From the Configuration Console, click Configure > Users and Permissions > Roles and Permissions to open the Roles and Permissions workspace.
2.Click Clone corresponding to the role to clone. The Clone Role dialog box appears.
3.Enter a unique name for the role.
4.Click OK.
The new role appears in the role list.
Linking Users to a Role
For information on adding users to a role, or linking and unlinking users, see Linking Roles to an Employee.
Finding Users Assigned to a Role
You can view a list of users assigned to a specific role by doing the following:
1.From the Configuration Console, click Configure > Users and Permissions > Roles and Permissions to open the Roles and Permissions workspace. The list of available roles appears.
2.Click Find Users corresponding to the role. The list of users linked to this role appears.
3.Click New to create a new user record to link to this role.
4.To remove a user from a role, select the user on the list, then click Delete.
5.Click Link to link the selected user to another user. Select the other user from the list, then click Select.
6.Click Unlink to break the link between the selected user and the role.
Was this article useful?
Copyright © 2019, Ivanti. All rights reserved.